Manage
Who can use this feature
Anyone with an Administrator, Purchasing Officer, Canvasser, Purchasing Manager, Warehouse Staff, and Receiver role can access the Inventory module
Introduction to Manage Submodule
With this submodule, users can perform a variety of tasks, including creating and managing products, organizing product categories, overseeing units of measurement, uploading comprehensive product lists, and previewing products. Additionally, the submodule supports the efficient management of product data and streamlines product inventory processes. It also includes features for creating vendors and managing warehouses.
Definition of Terms
Defined in this section are the available pages under the Manage submodule as follows:
- Products. This page focuses on the creation of products, management of product categories, oversight of units of measurement, and previewing of products.
- Vendors. This page is dedicated to the creation and management of vendors.
- Warehouses. This page focuses on the creation and management of warehouses.
Roles and Permission
| Functions | Administrator | Canvasser | Purchasing Manager | Purchasing Officer | Warehouse Staff | Receiver |
|---|---|---|---|---|---|---|
| Products | ||||||
| Search | ||||||
| Filter by Category | ||||||
| Filter by Brand | ||||||
| Manage Product Categories | ||||||
| Upload Products | ||||||
| Create Products | ||||||
| Preview Products | ||||||
| Update Products | ||||||
| View Products | ||||||
| Edit Products | ||||||
| Activate/Deactivate Products | ||||||
| Vendors | ||||||
| Search Vendor | ||||||
| Filter by Status | ||||||
| Create Vendor | ||||||
| View Vendor | ||||||
| Edit Vendor | ||||||
| Activate/Deactivate Vendor | ||||||
| Warehouses | ||||||
| Search | ||||||
| Filter by Type | ||||||
| Filter by Status | ||||||
| Create Warehouse | ||||||
| View Warehouse | ||||||
| Edit Warehouse | ||||||
| Activate/Deactivate Warehouse | ||||||
Features
Products
Introduction to Products
This page allows the creation and management of products.
To access this page, navigate to the Inventory Module and click "Products" under Manage Submodule, as shown in the image below:
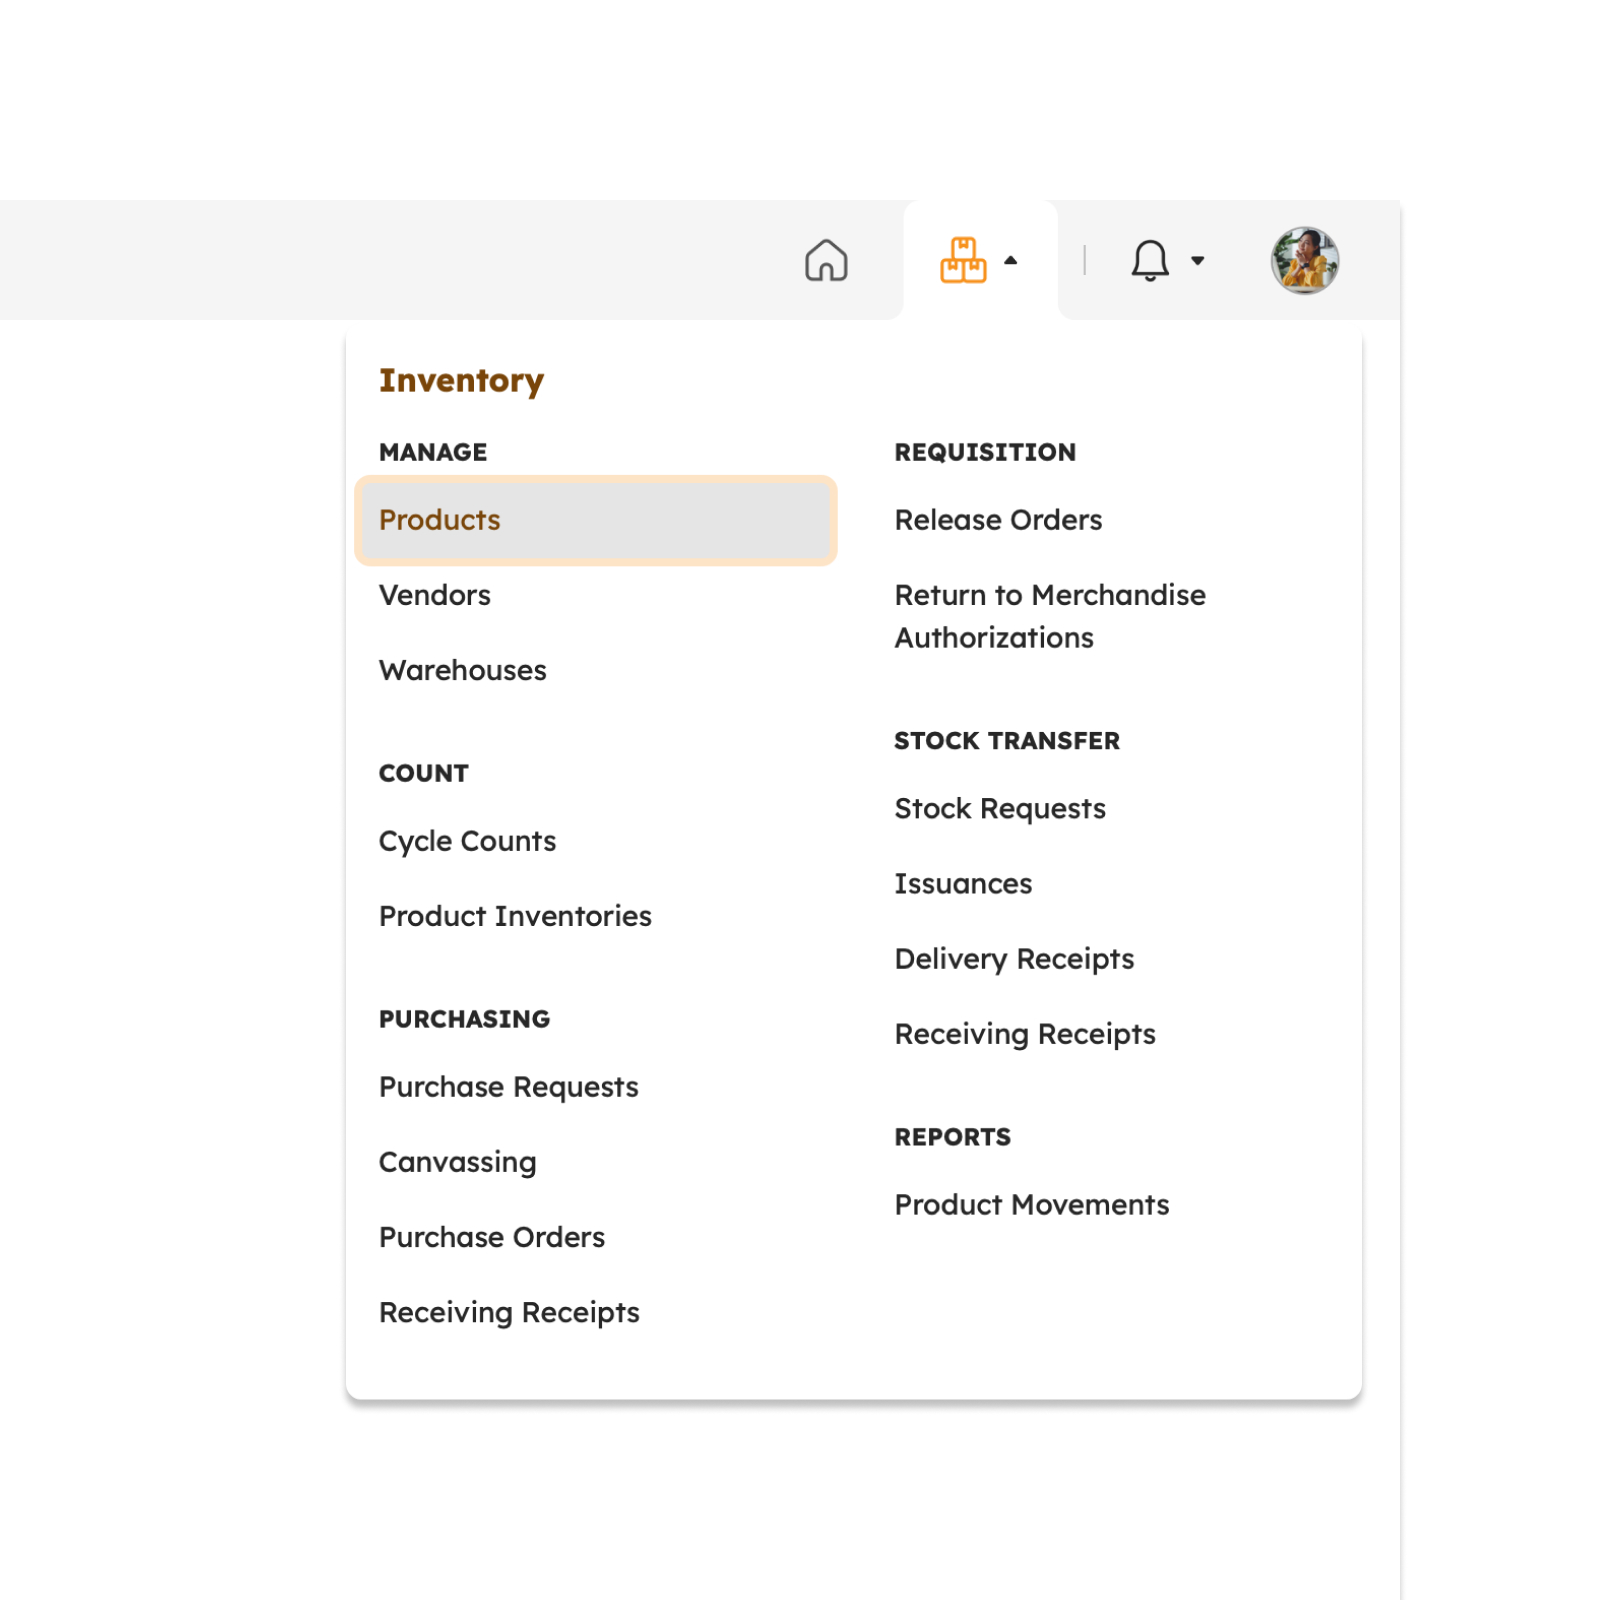
The screen will redirect to the Products page, showing several features to use that will be discussed in the next section.
Features in Products Page
The image below is the high-level view of the Products page along with its built-in features.
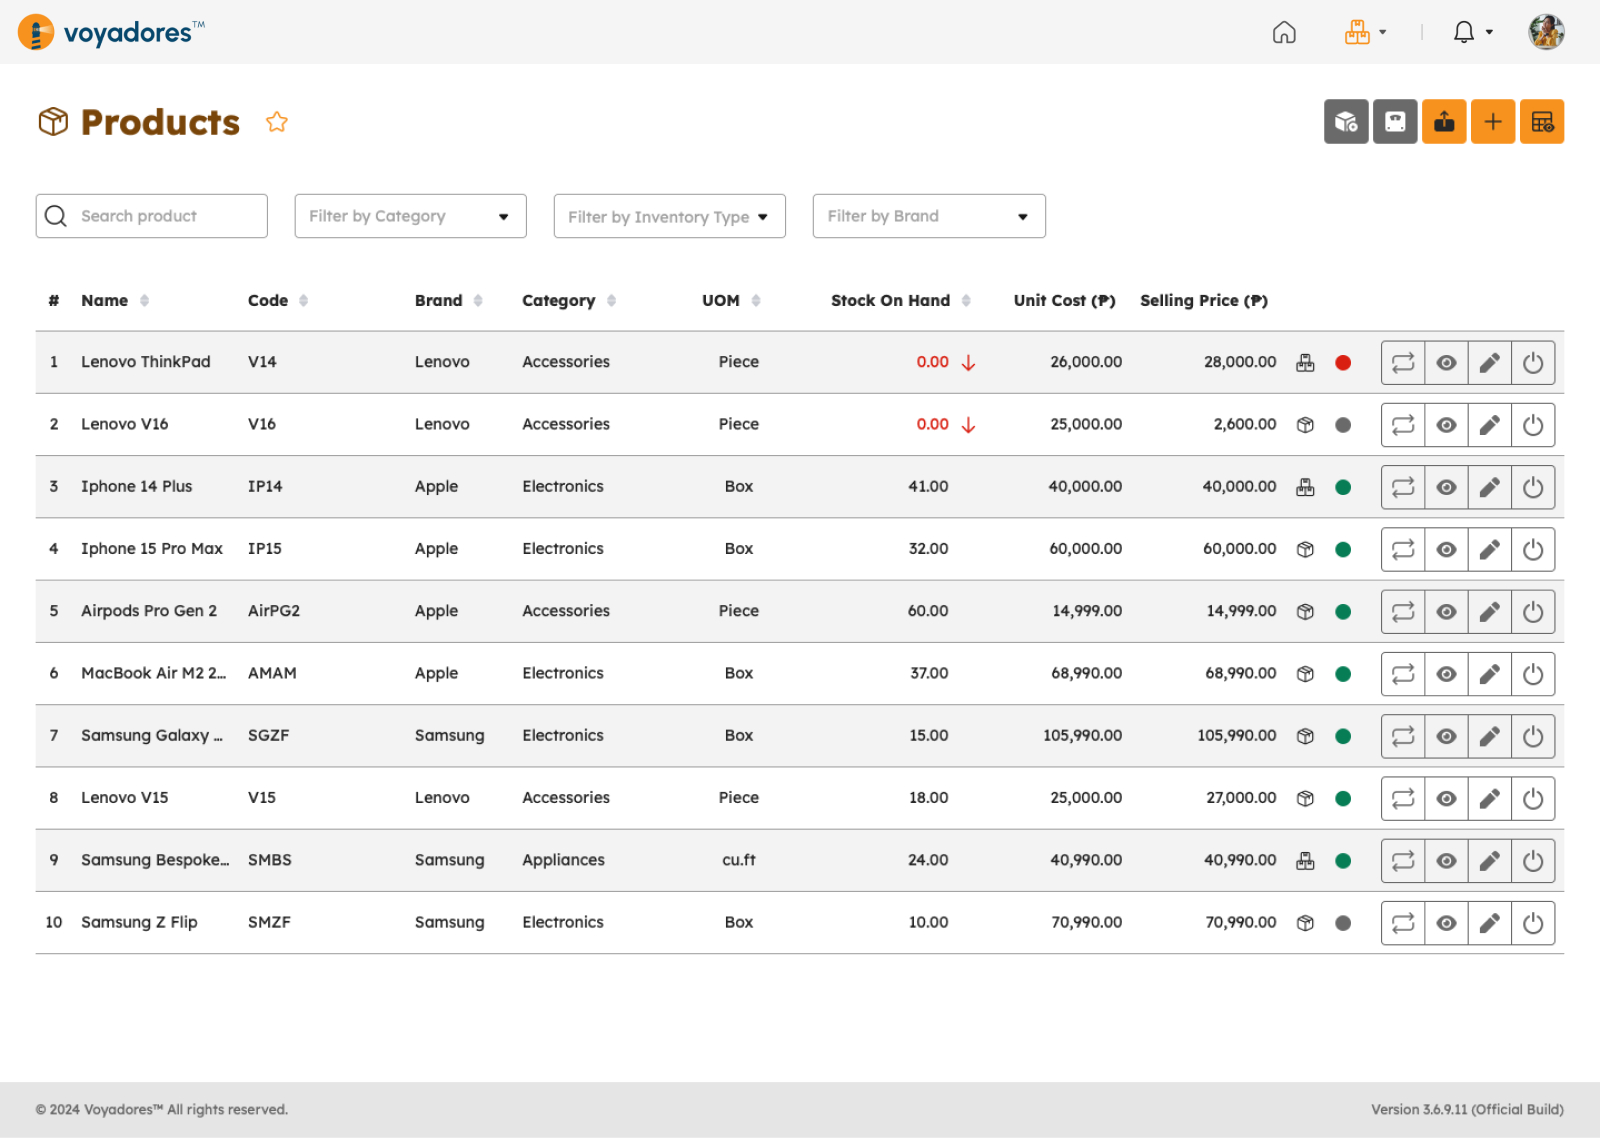
Products Summary Table
The Products Summary Table displays the following columns:
- Product number "#"
- Name
- Code
- Brand
- Category
- UOM (Unit Of Measurement)
- Stock On Hand
- Unit Cost
- Unit Price
-
Actions
- Update Products Stock On Hand
- View Product
- Edit Product
- Activate and Deactivate
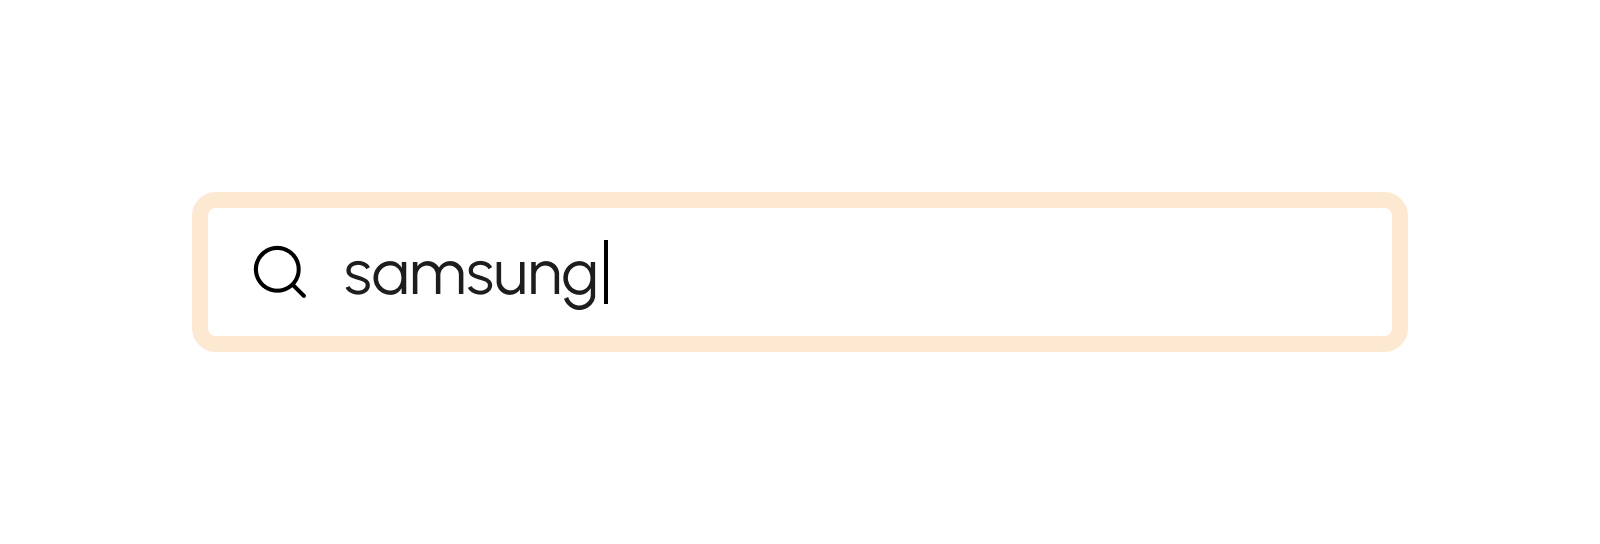
Searching Products
- Key in the name of the Product in the Search Bar to look for a particular Product.
- The Products Summary Table will display the searched Product.
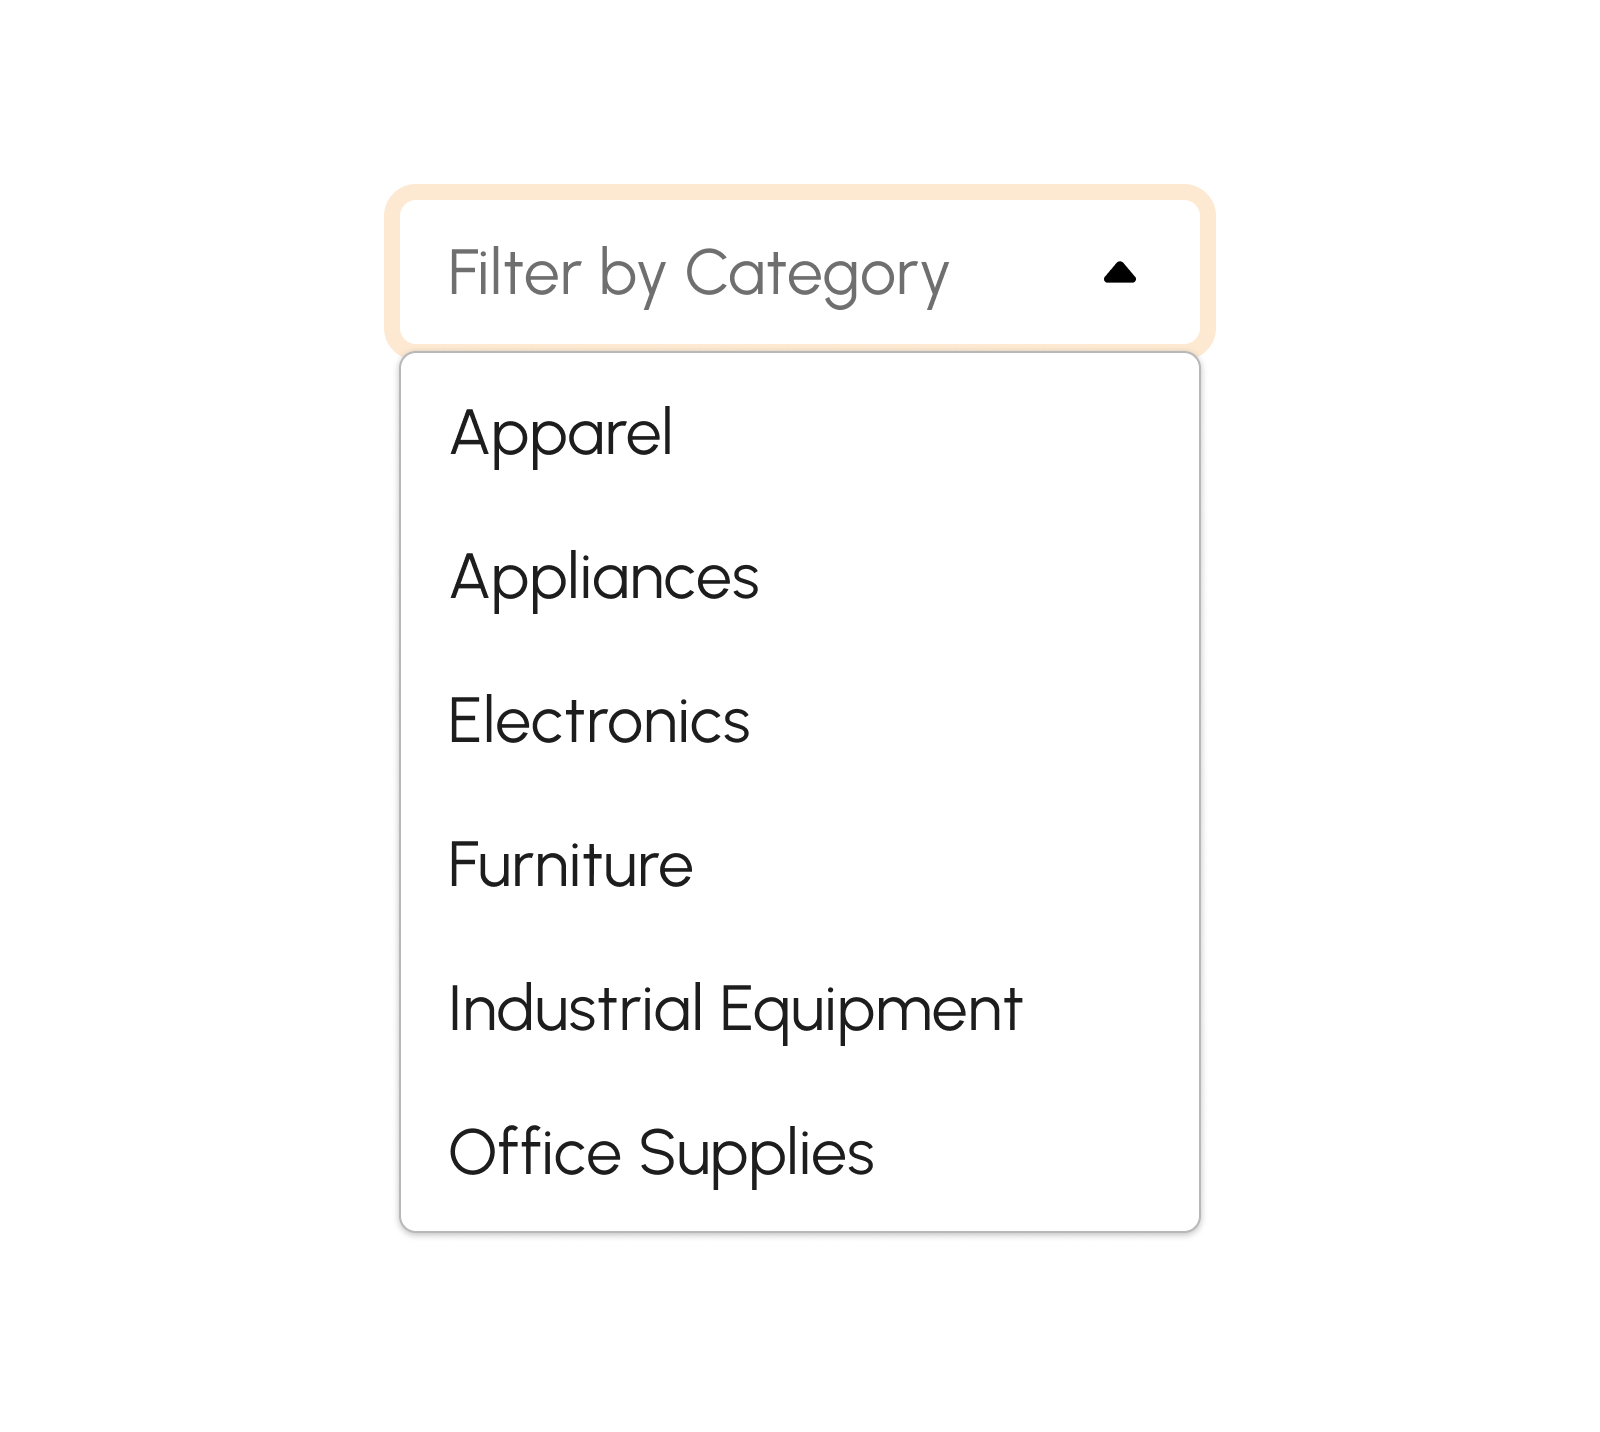
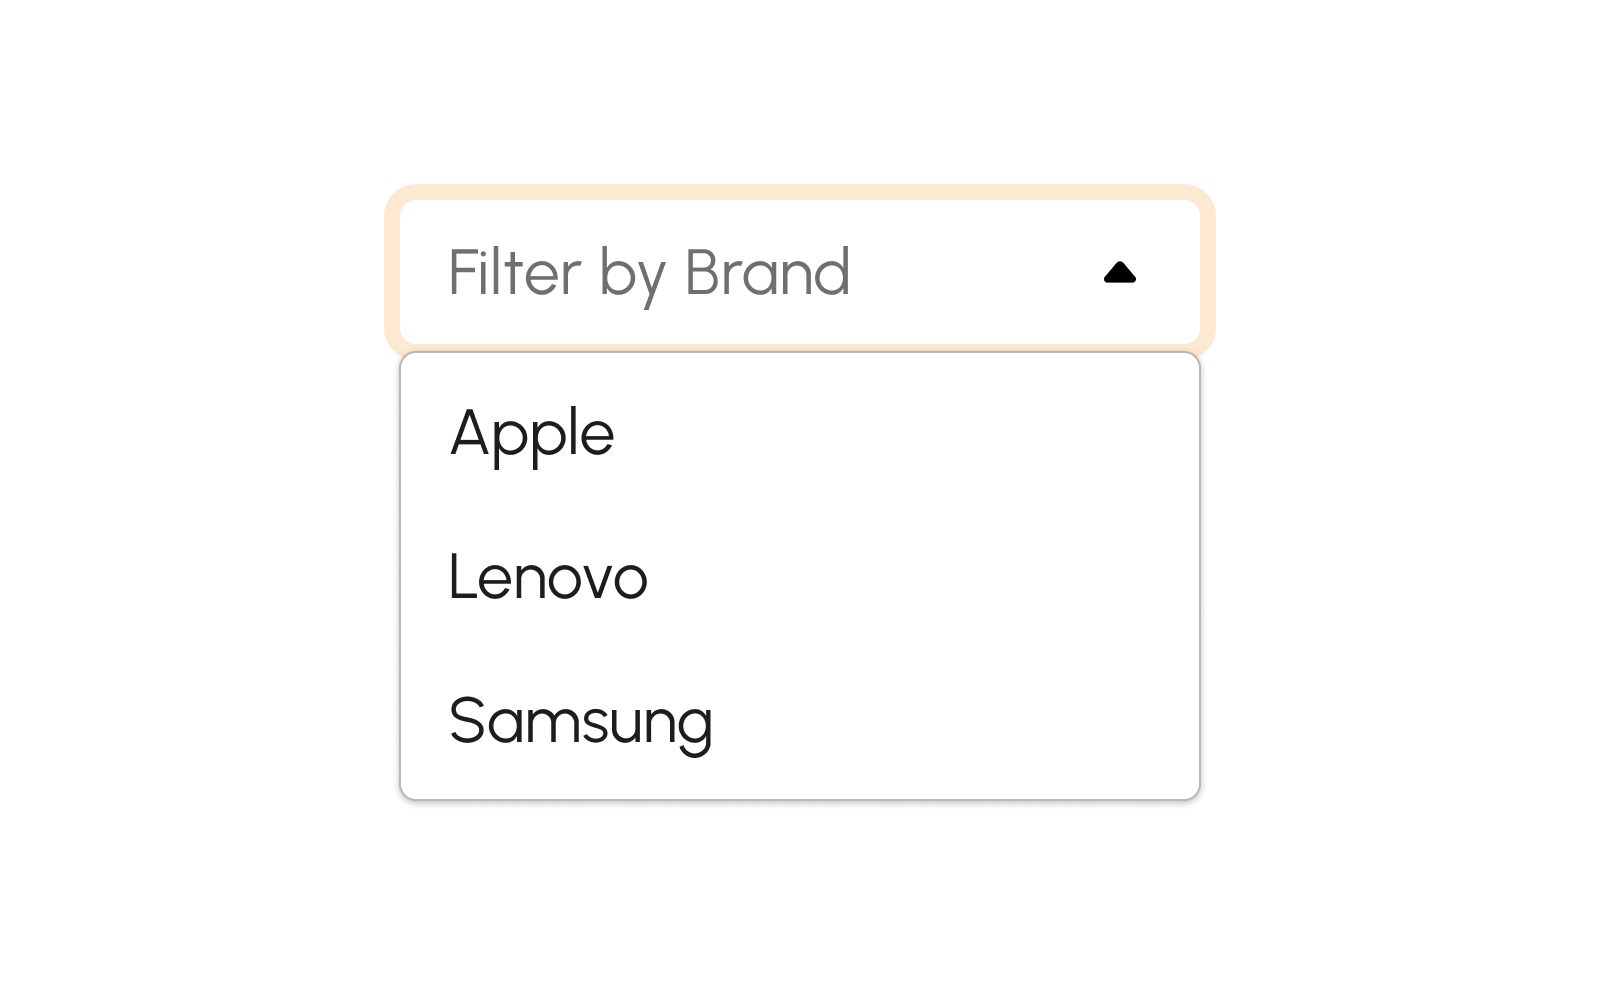
How to Filter Products by Category and Brand
Click the "Filter by Category" or "Filter by Brand" dropdown to display and select the desired categories or brands.
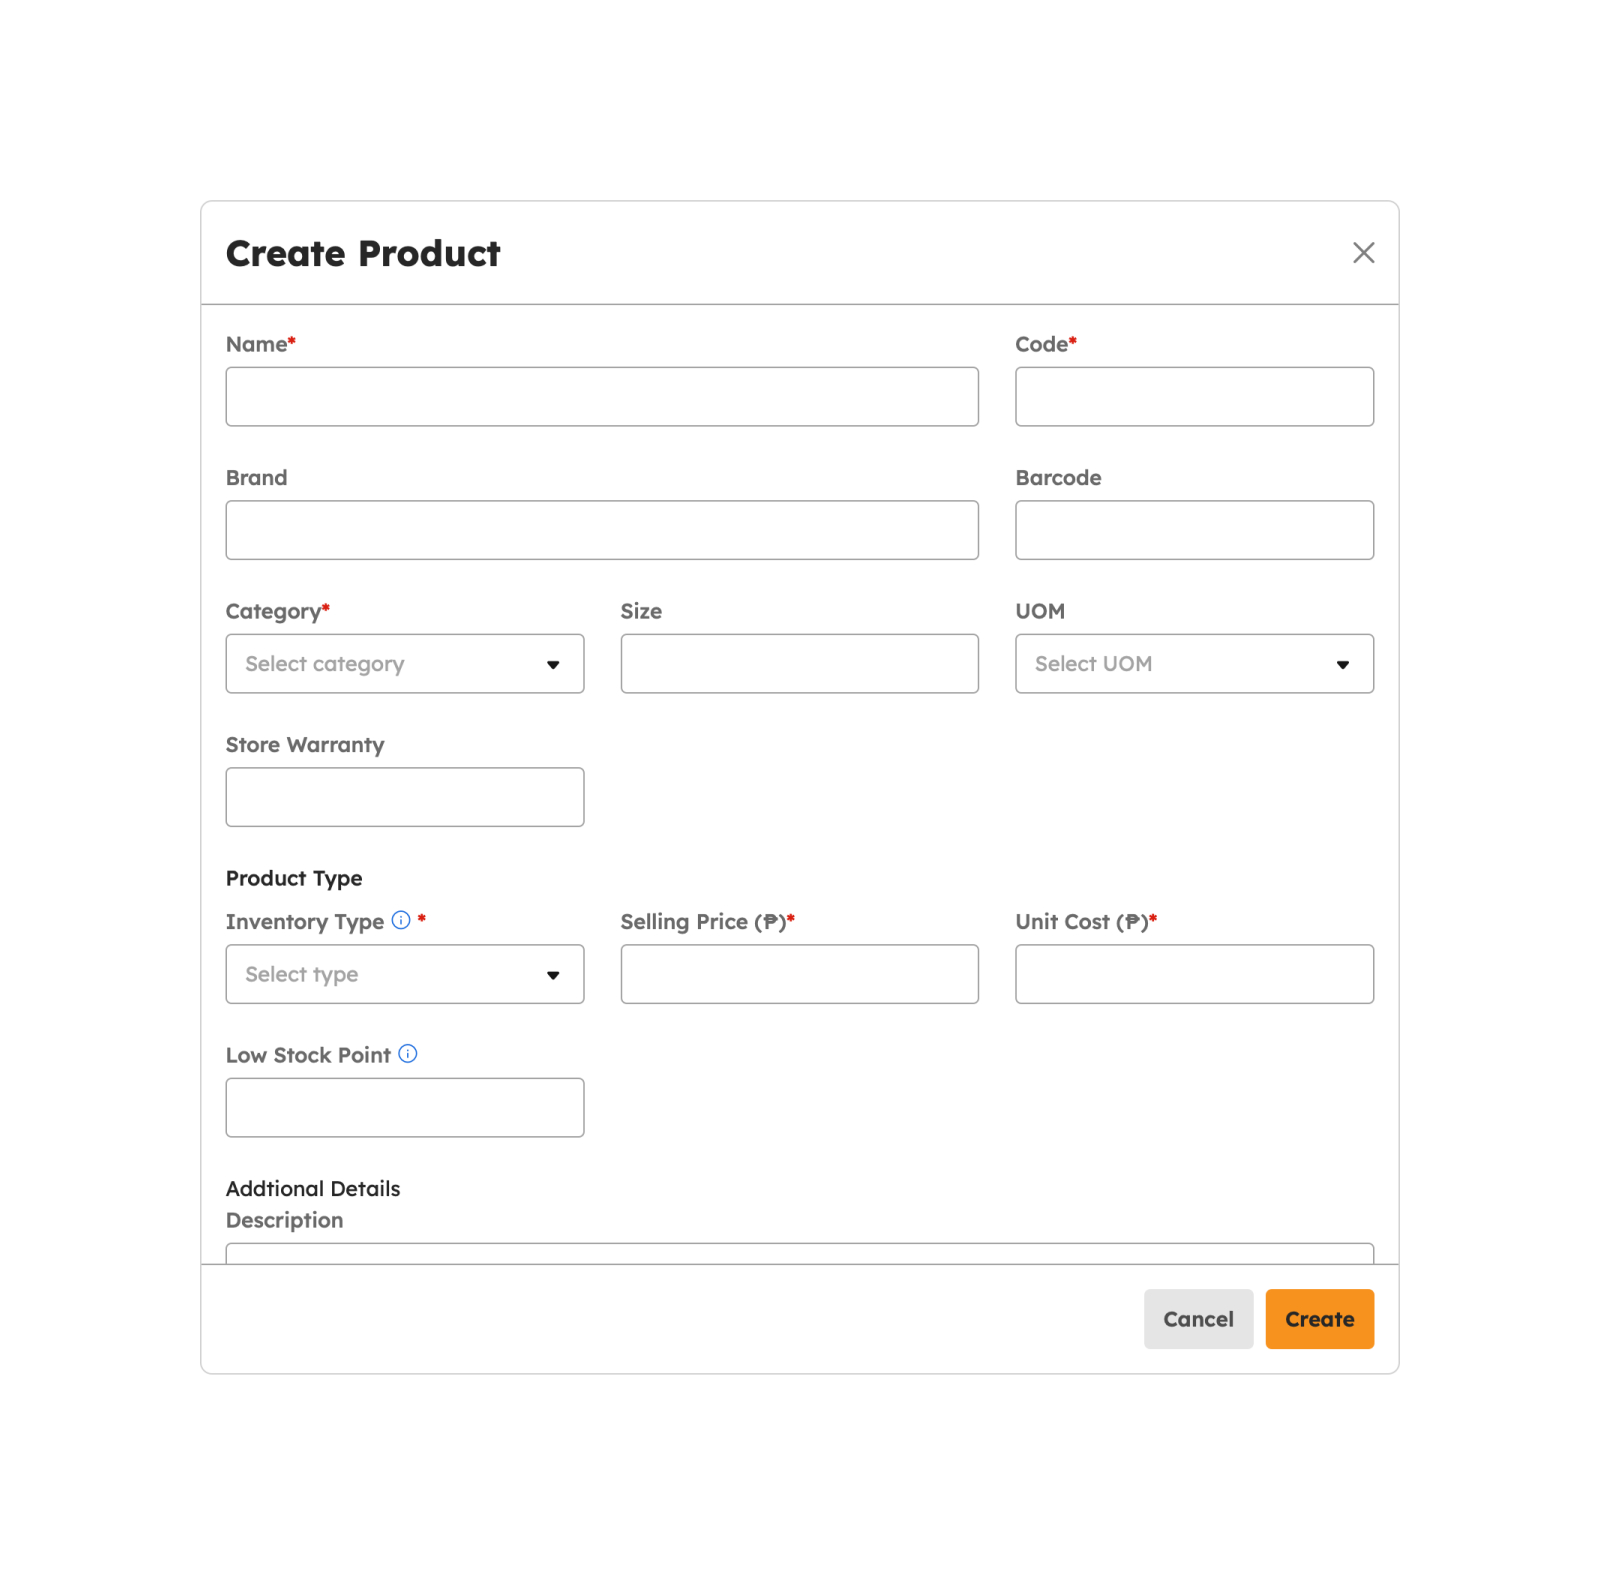
Creating Products
To begin creating Products, follow the procedures below:
-
Click the Create button to create a Product.
-
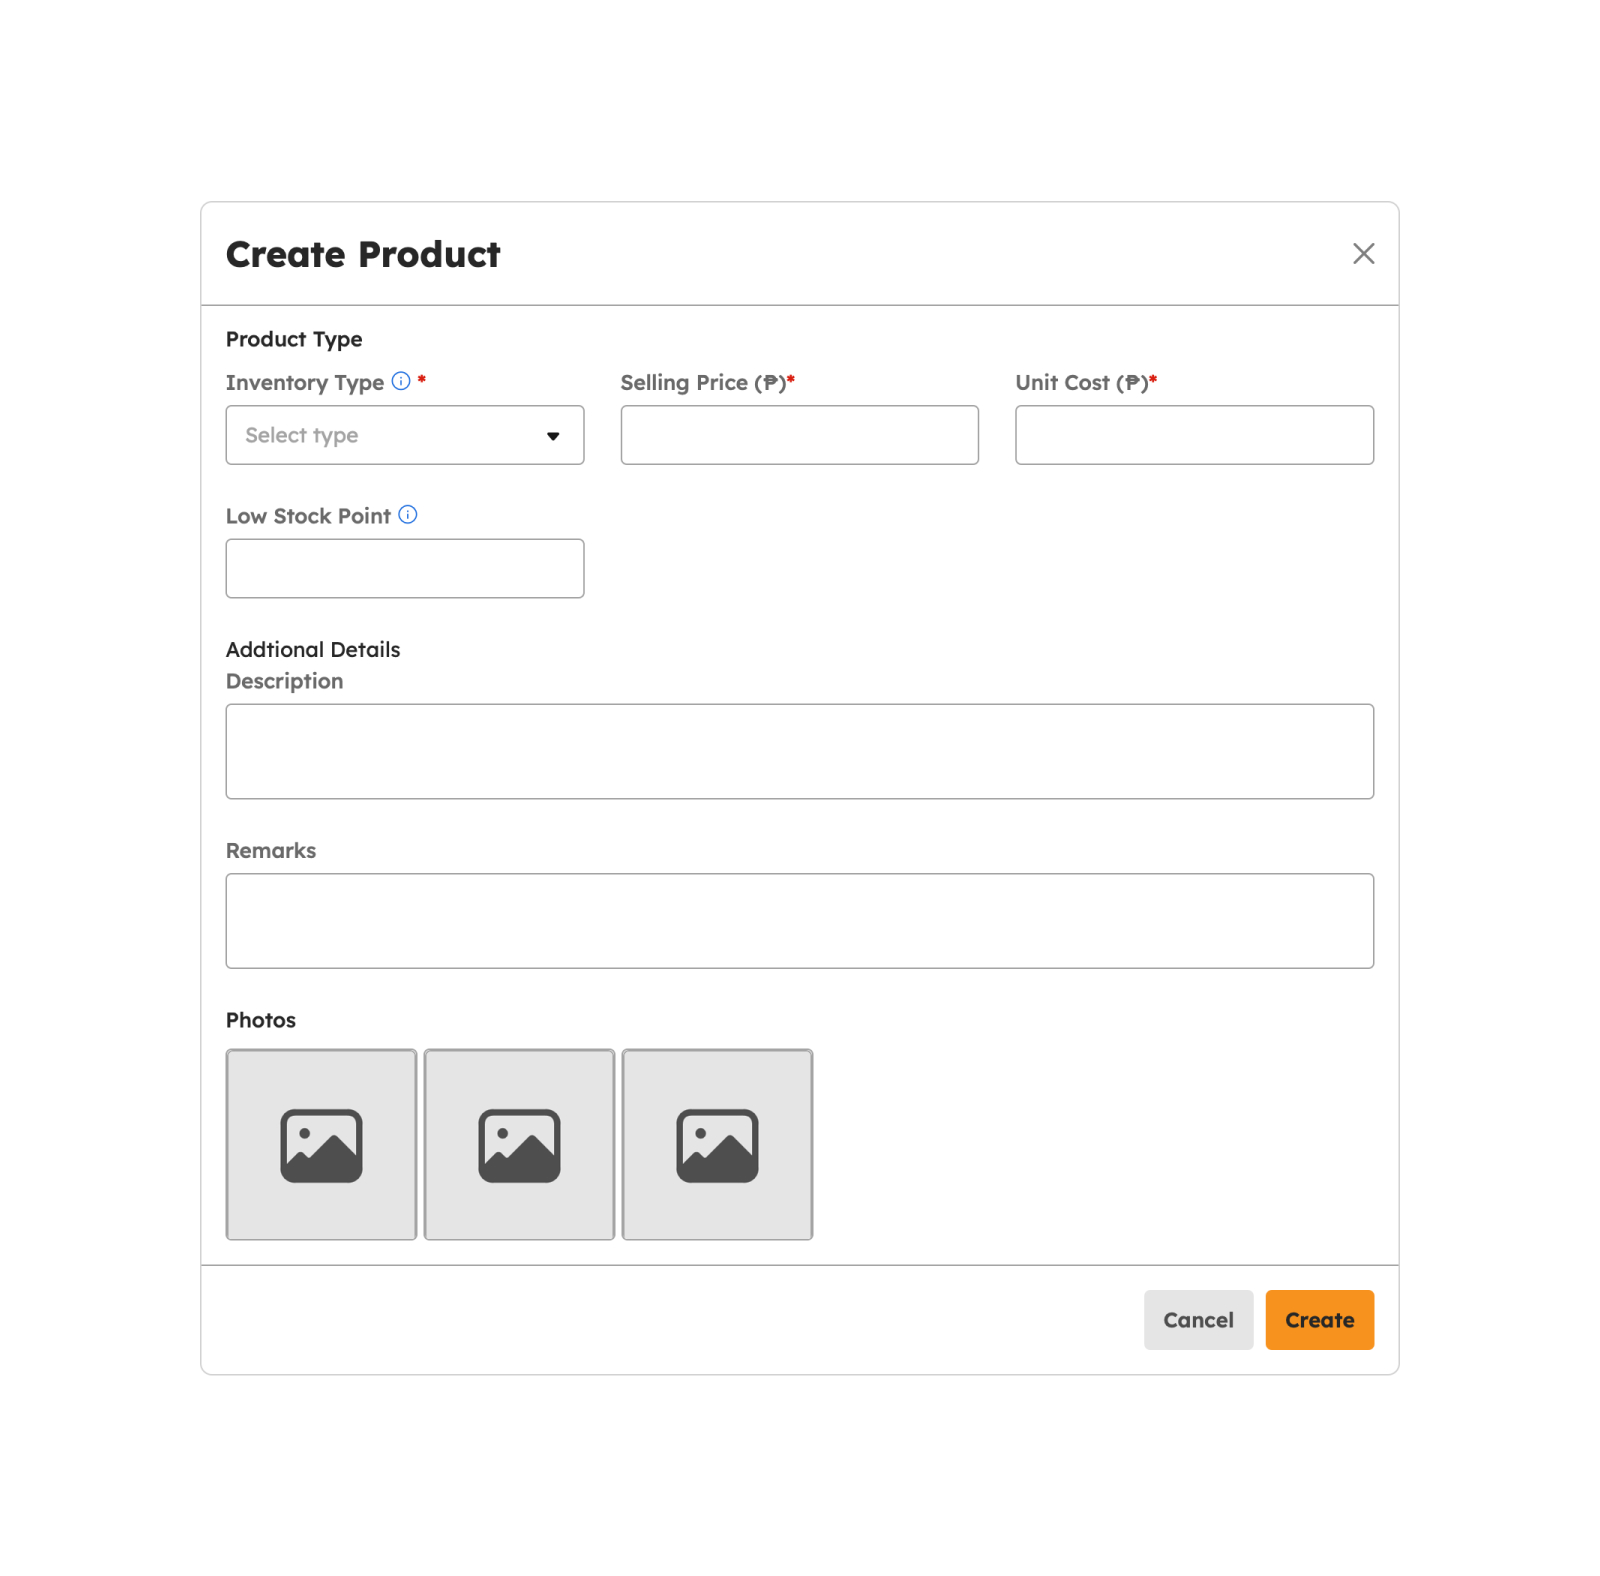
The screen displays a modal to key in the required details in the following fields:
- Name
- Code
- Barcode
- Brand
- Category
- UOM
- Store Warranty
- Inventory Type
- Non Inventory
- Single
- Aggregate
- Selling Price
- Description
- Remarks
Note
Fields with (*) are required.
-
Click the Create button to create the Product successfully.
-
A successful notification message will show.
Product successfully created
-
Created Product will be added to the list of Products in the Summary Table.
The default status for newly created Product is ”Inactive”.
To cancel the creation of Product, follow the procedures below:
- Click the Cancel button to cancel the creation of the Product.
- The screen closes the modal.
- The system will not proceed with creating and saving a Product.
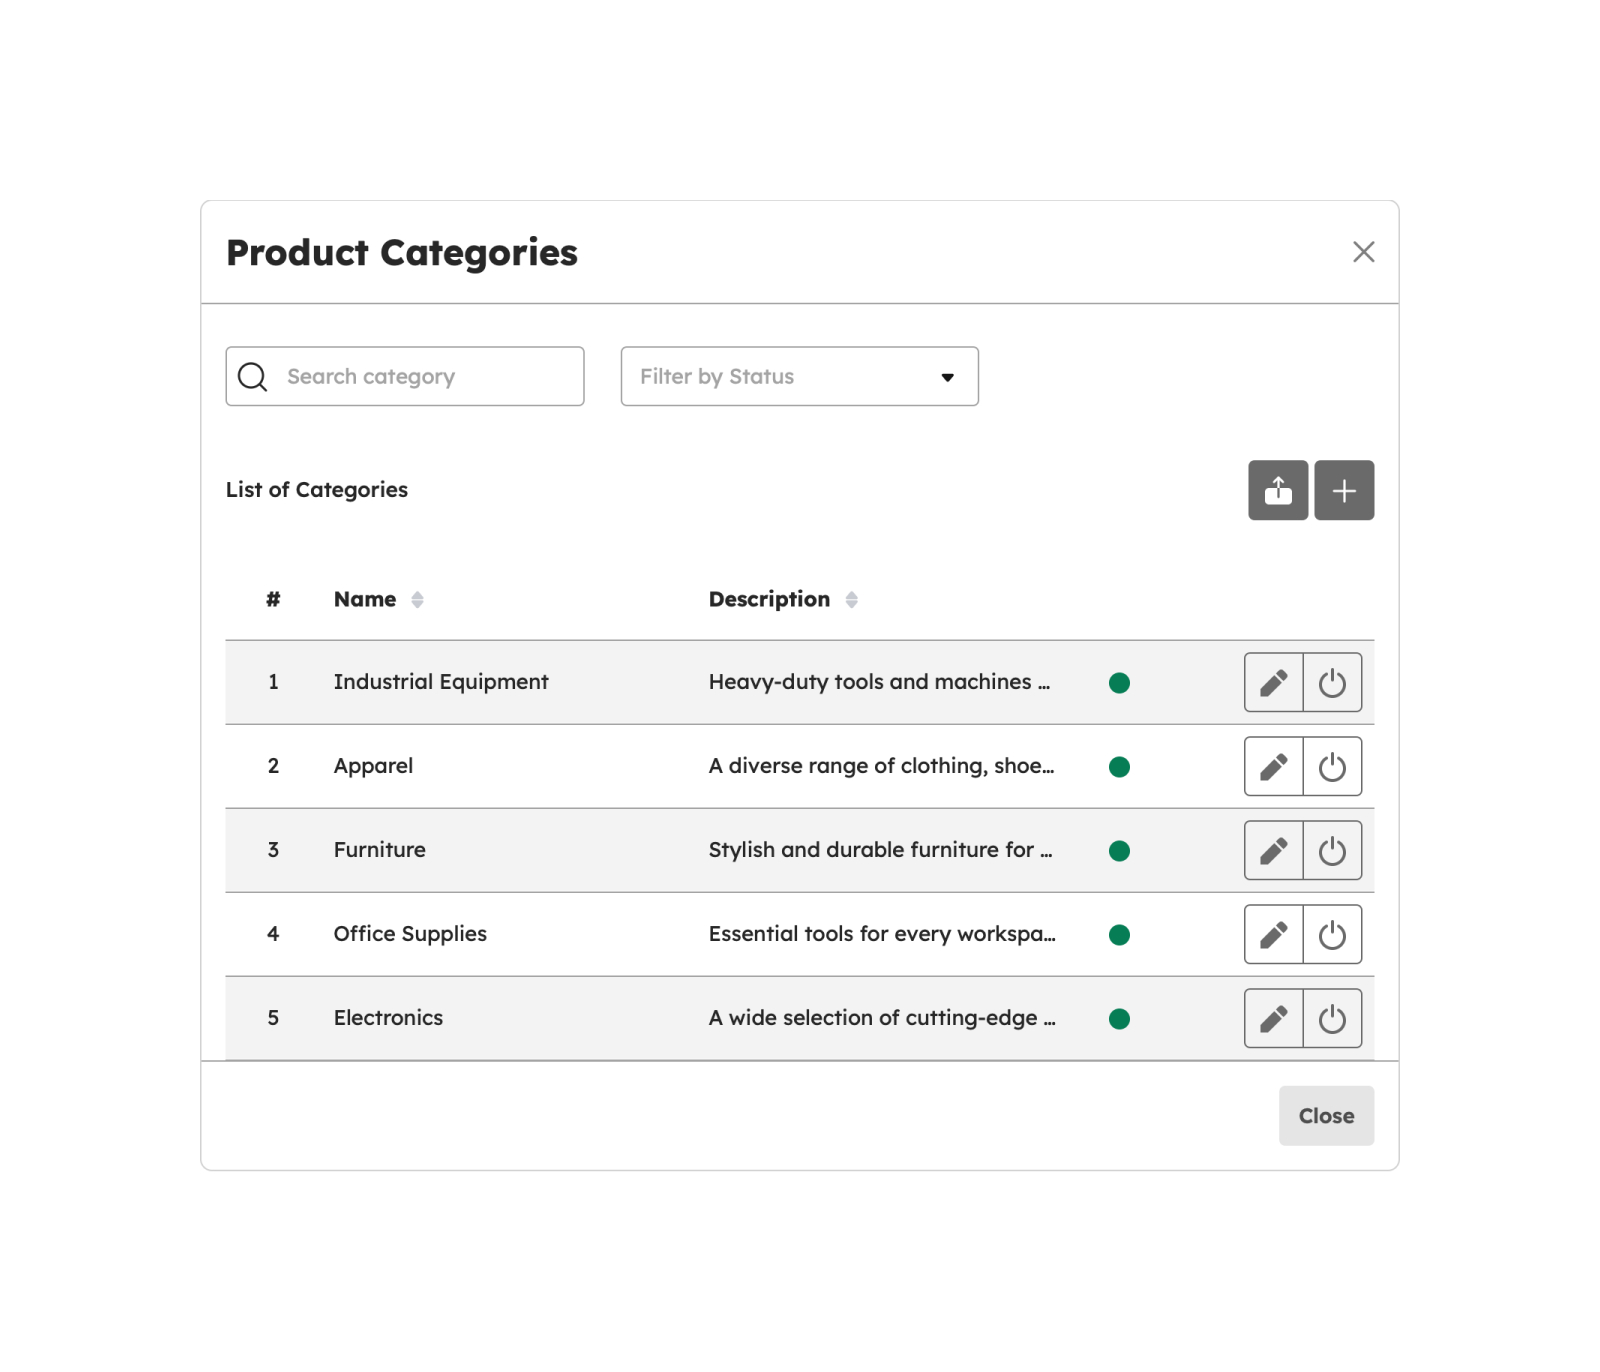
Manage Products Categories
To begin creating Products Categories, follow the procedures below:
-
Click the Manage Products Categories button to create a Category.
-
The screen displays a modal, then click the plus Create Product Category button to create a Category.

-
The screen displays another modal to key in the required details in the following fields:
- Name
- Description
Note
Fields with (*) are required.
- Click the Create button to create the Product Category successfully.
-
A successful notification message will show:
Product Category successfully created
- Created Product Category will be added to the list of Products Categories in the Summary Table.
To cancel the creation of Product Category, follow the procedures below:
- Click the Cancel button to cancel the creation of the Product Category.
- The screen closes the modal.
- The system will not proceed with creating and saving a Product Category.
Manage Unit of Measurements (UOM)
To begin creating UOM, follow the procedures below:
-
Click the Manage Unit of Measurements button to create a UOM.
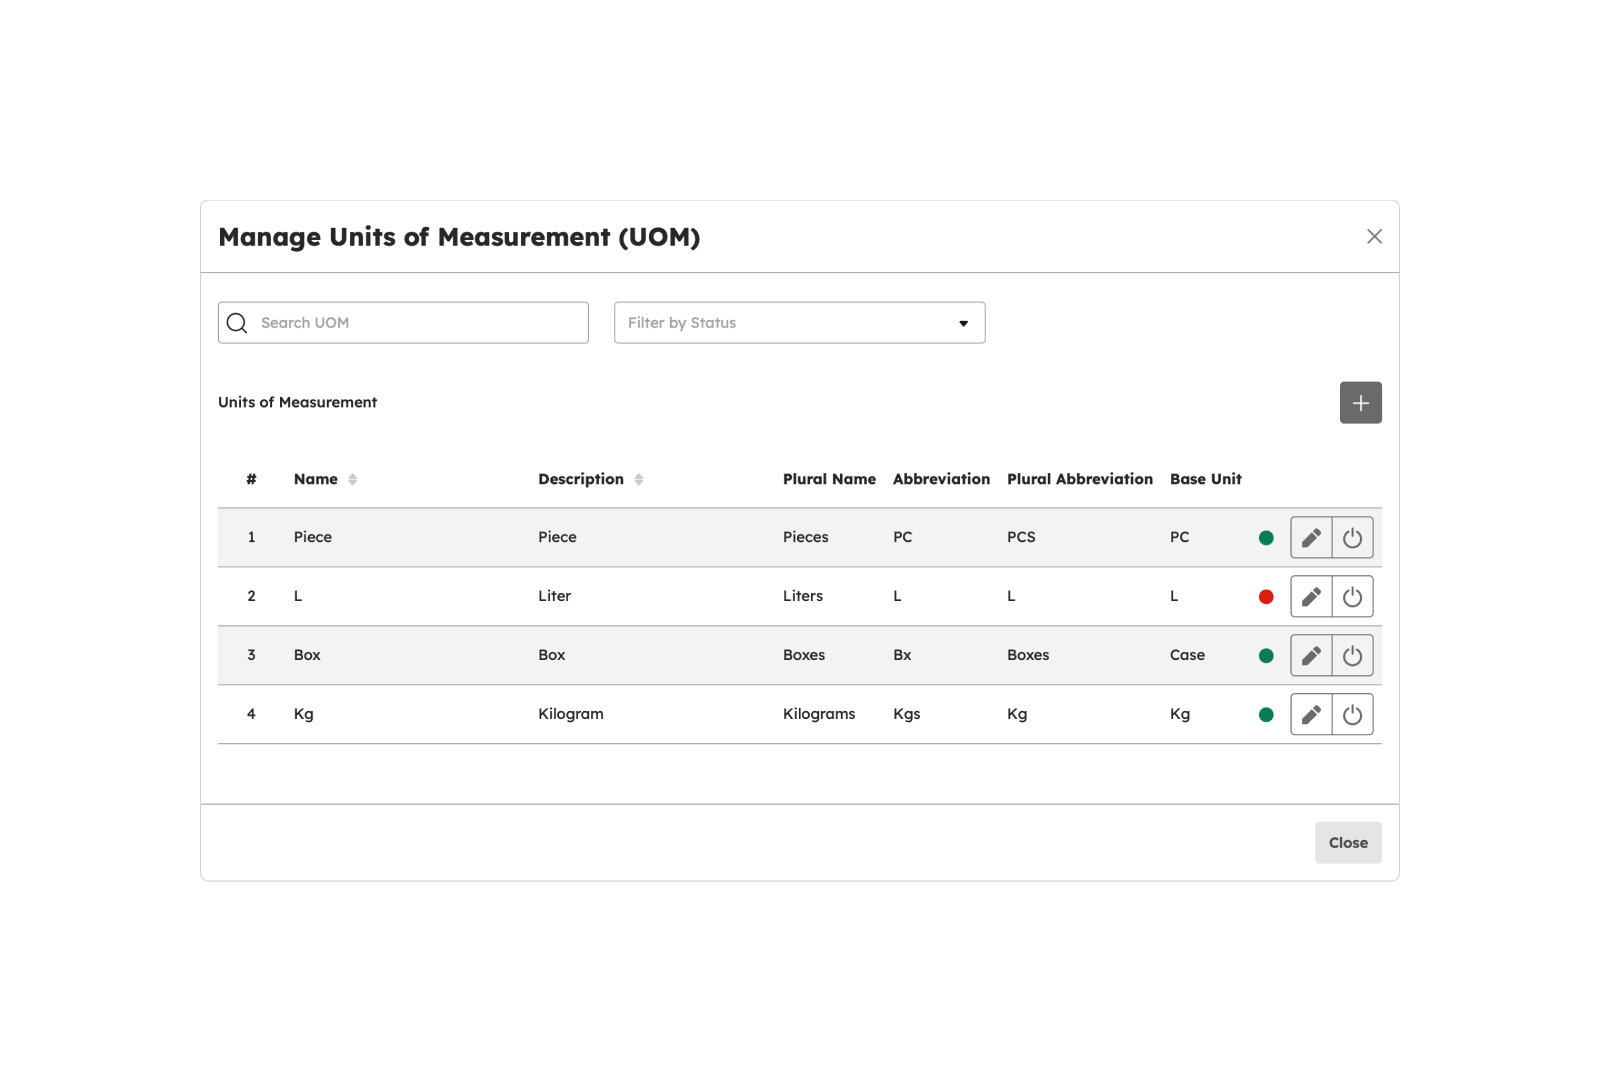
-
The screen displays a modal, then click the plus Create UOM button to create a UOM.
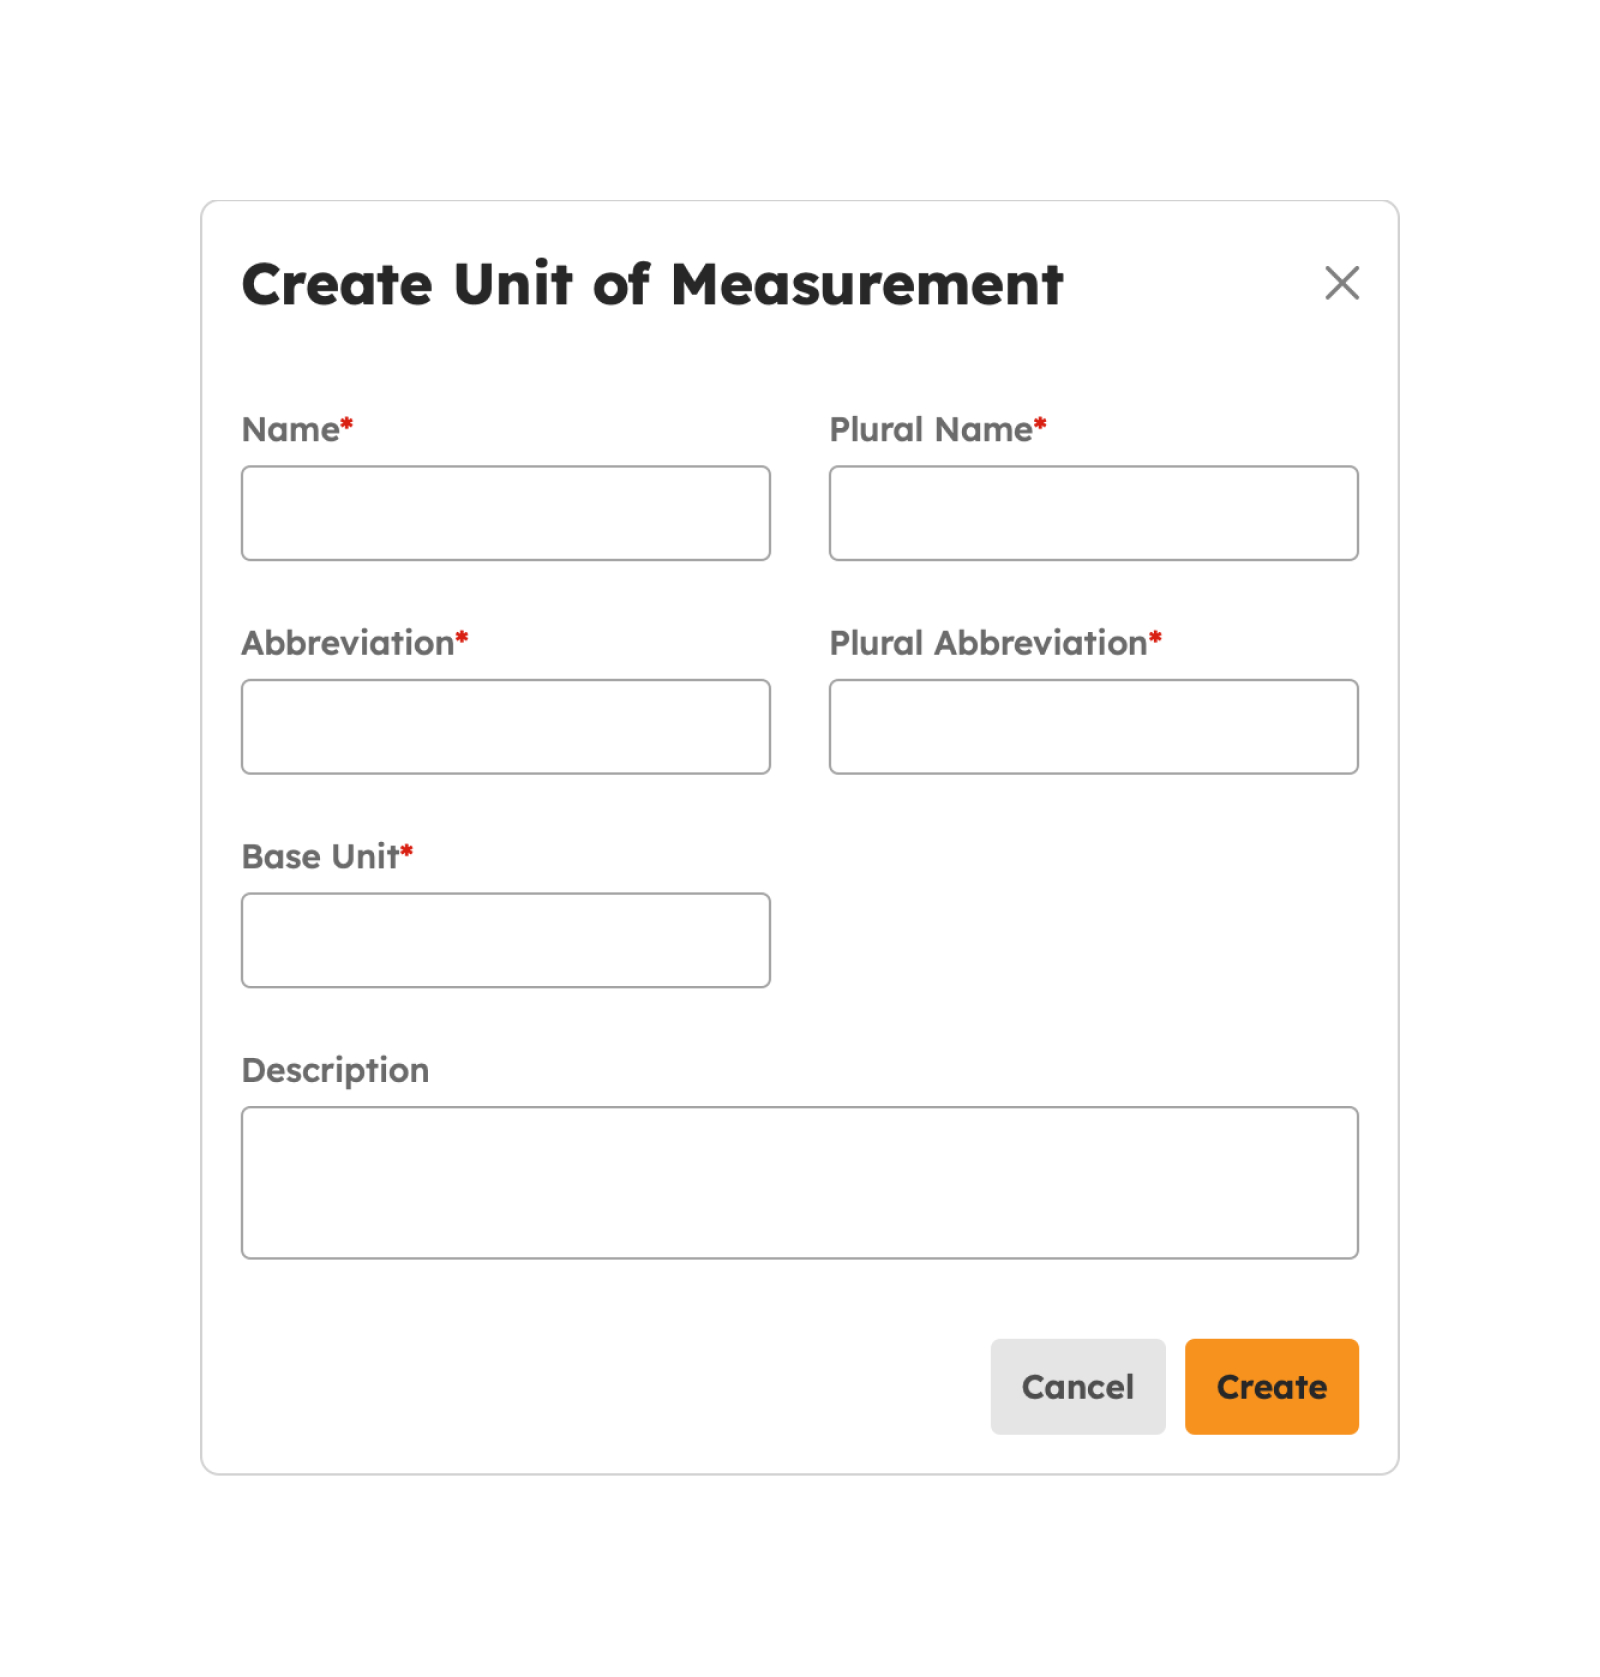
-
The screen displays another modal to key in the required details in the following fields:
- Name
- Description
Note
Fields with (*) are required.
- Click the Create button to create the UOM successfully.
-
A successful notification message will show:
UOM successfully created
- Created UOM will be added to the list of Manage Units of Measurements in the Summary Table.
To cancel the creation of UOM, follow the procedures below:
- Click the Cancel button to cancel the creation of the UOM.
- The screen closes the modal.
- The system will not proceed with creating and saving a UOM.
Editing Products
Edit and modify Products by following the steps below:
-
The screen displays a modal to key in the updates in the following fields:
- Name
- Brand
- Category
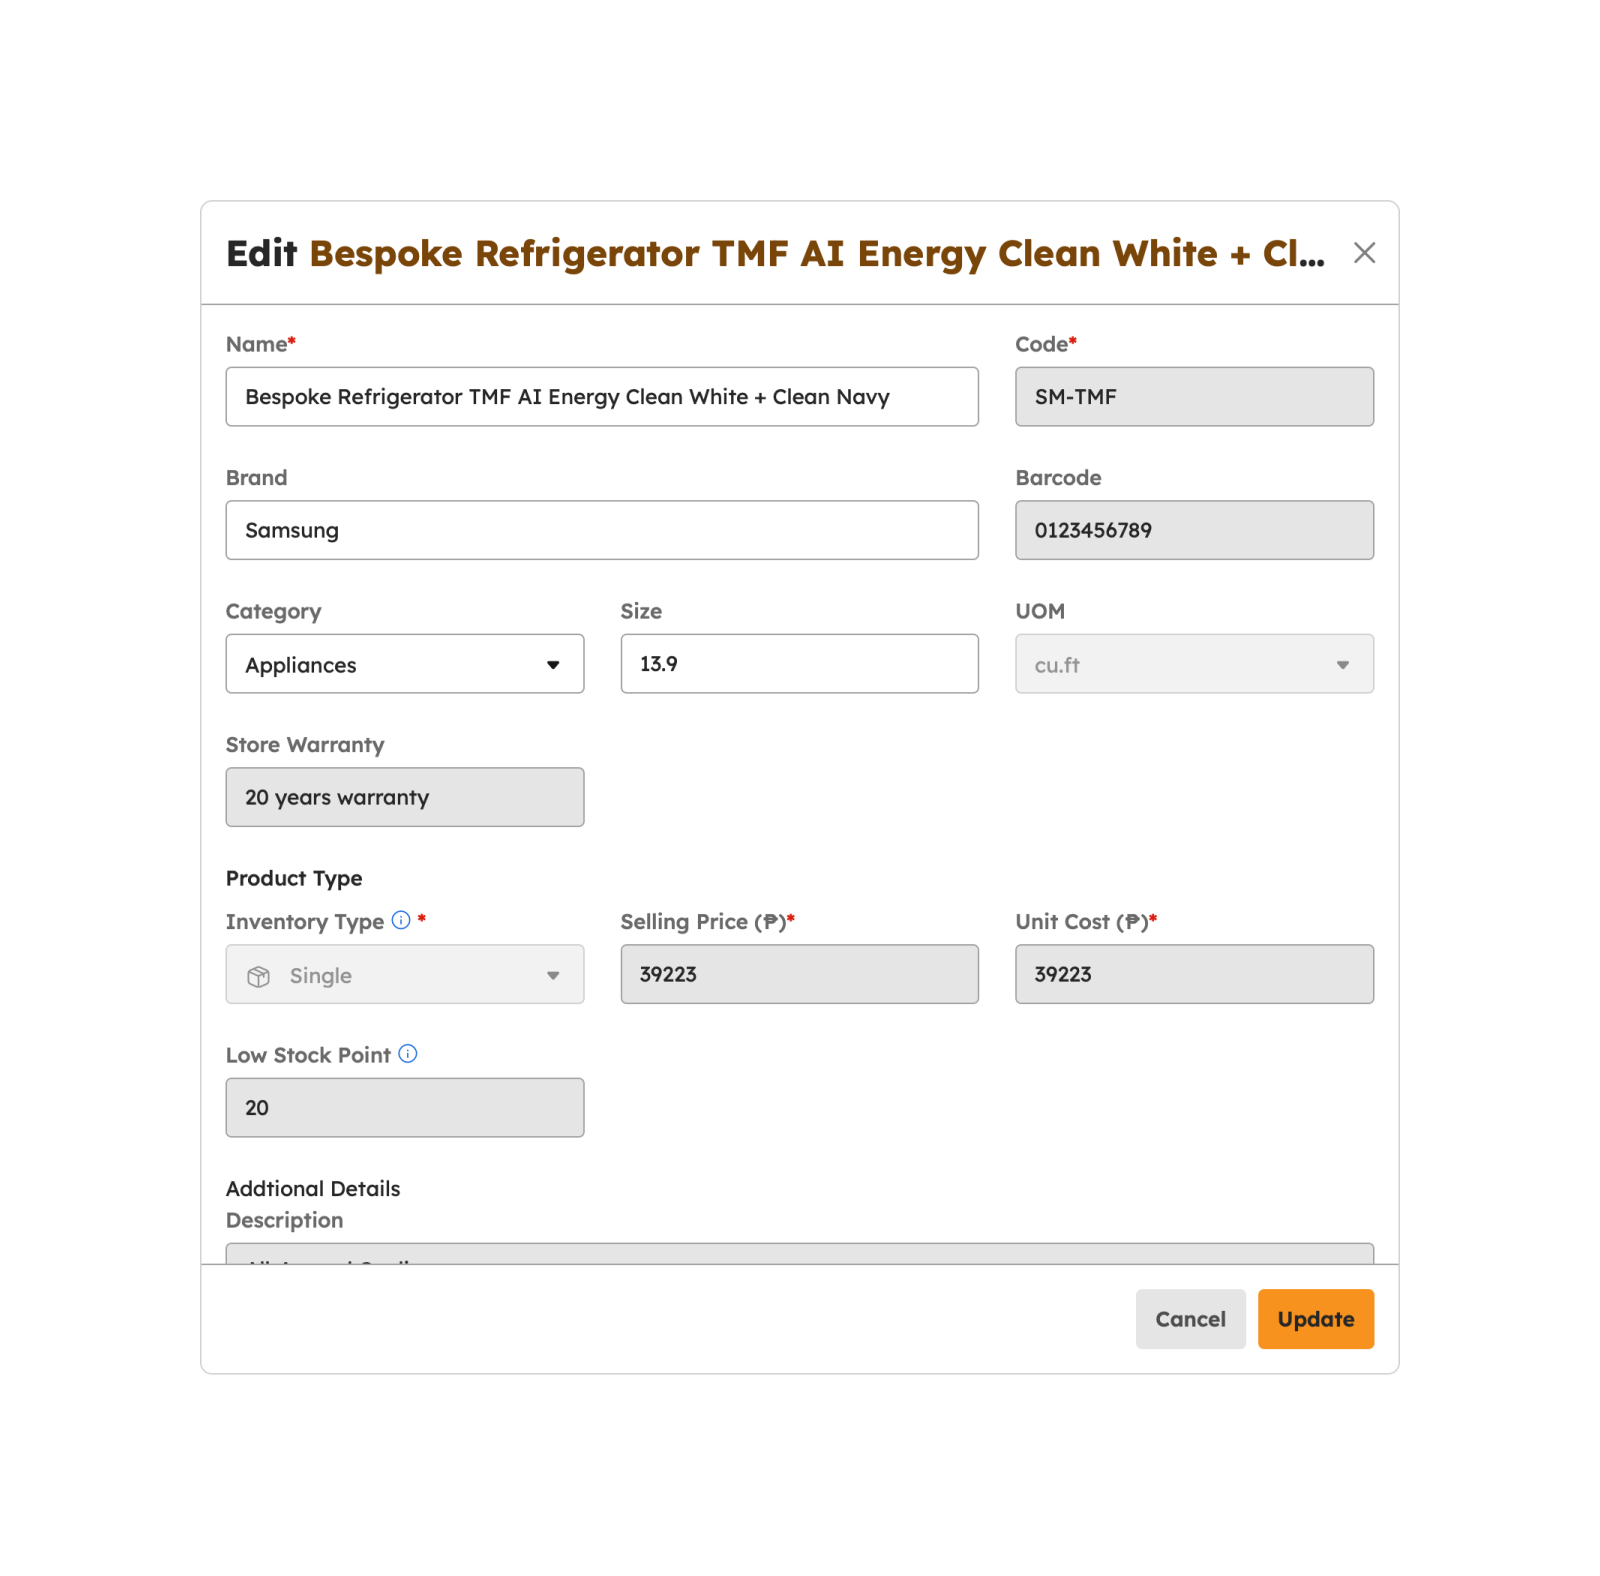
Note
Fields with (*) are required.
-
Click the Update button to update the Product.
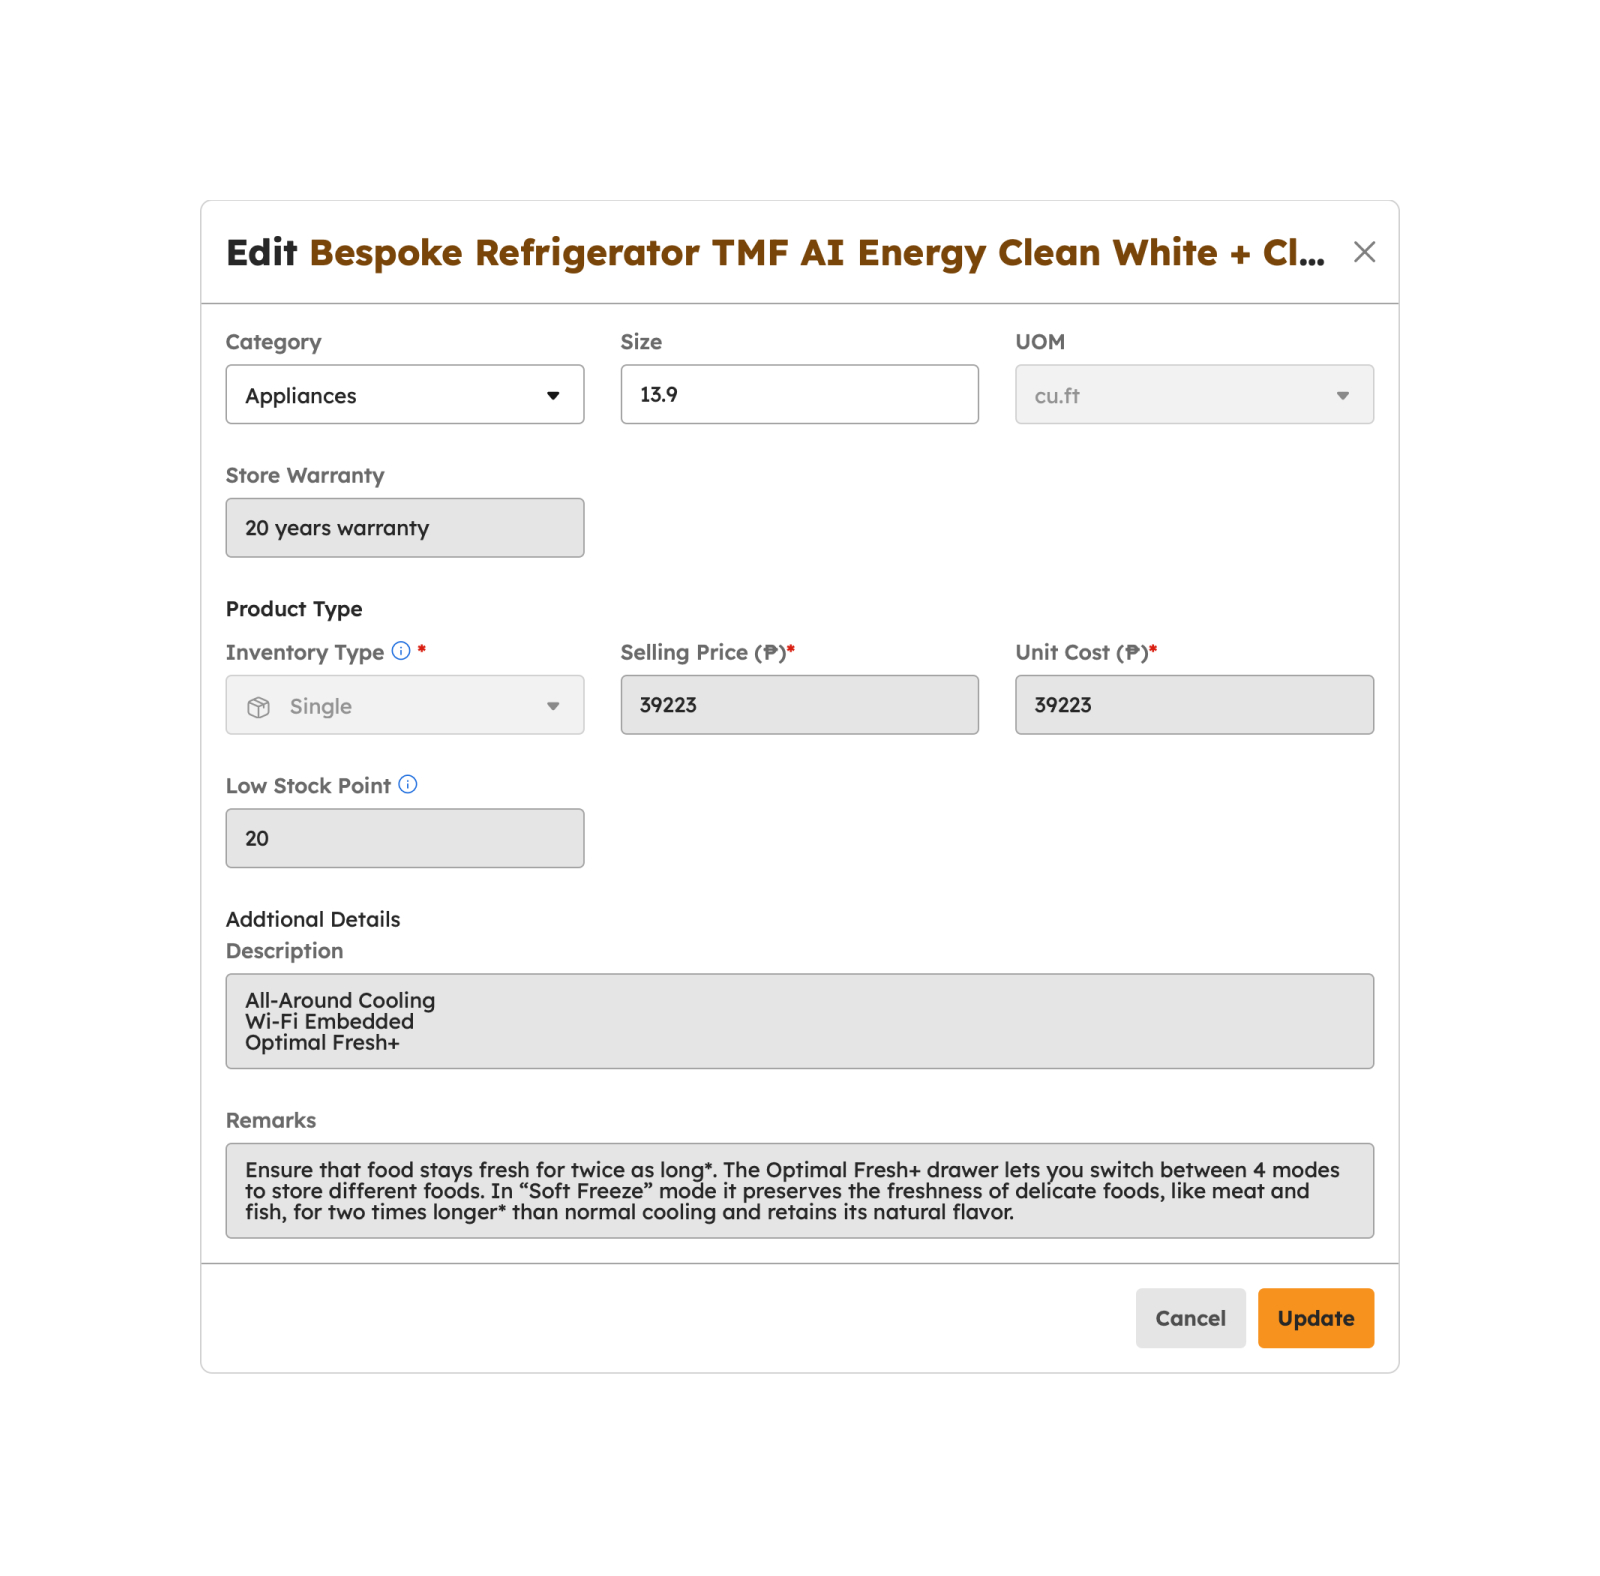
-
Saves the applied changes.
A successful notification message will show:
Product successfully updated
To cancel the update of Product, follow the procedure(s) below:
- Click the Cancel button to cancel the update of the Product.
- The screen closes the modal.
- The system will not proceed with updating and saving a Product.
Deactivating Products
- To deactivate a Product, click on the Deactivate button.
-
Upon clicking the Deactivate button, a confirmation modal will display.
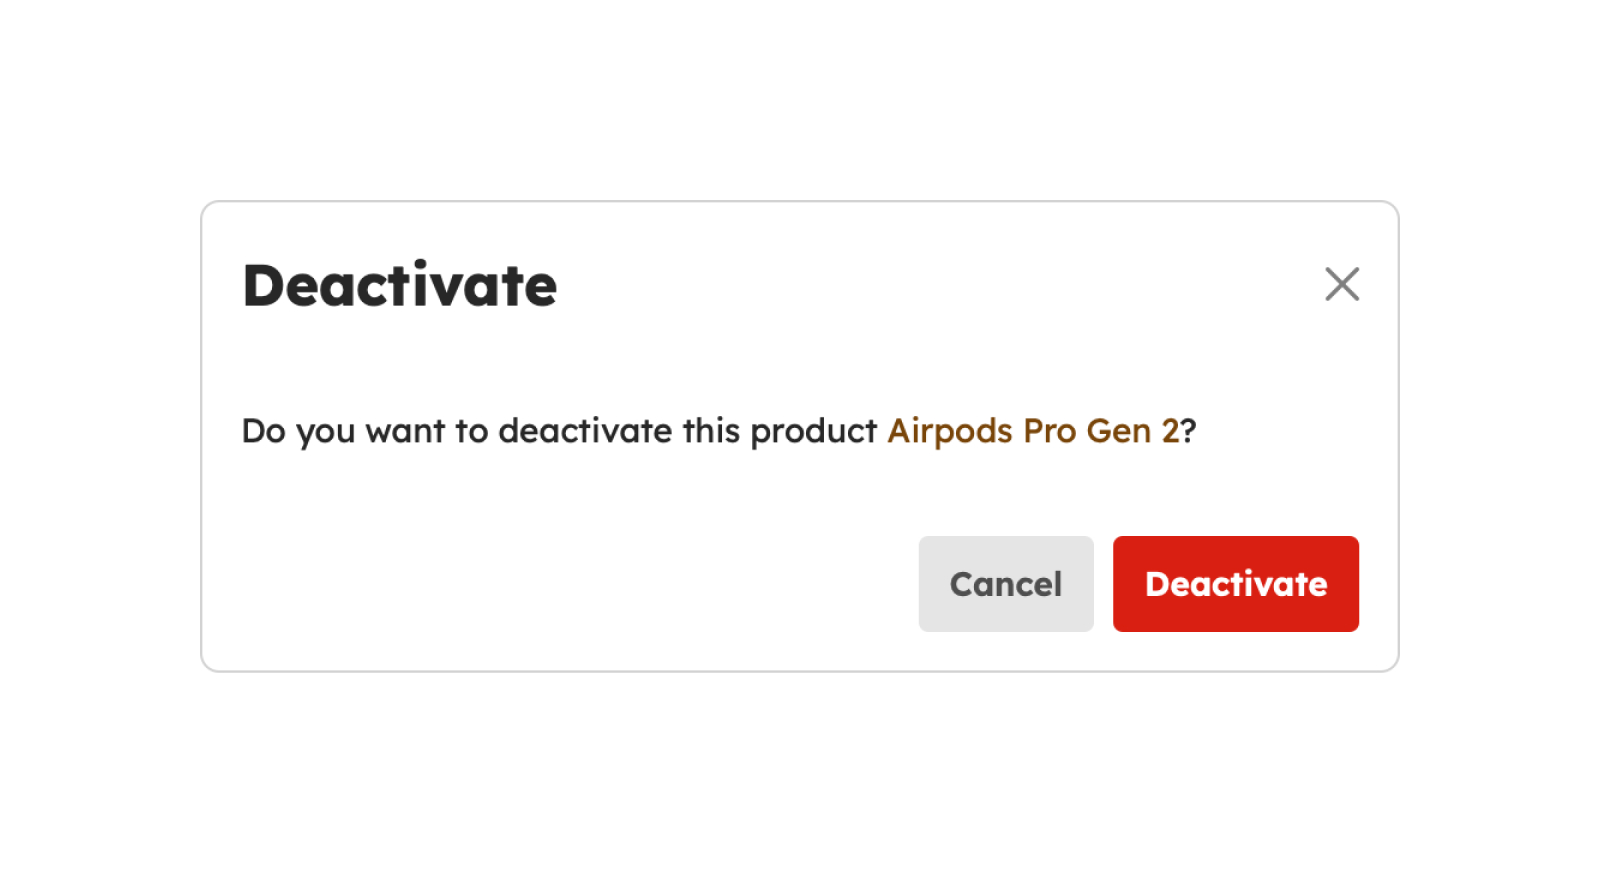
- From the modal, click the Deactivate button to successfully deactivate the vendor.
-
Successful deactivation will show a notification message:
Product successfully deactivated
Activating Products
- To activate a Product, click on the Activate button.
-
Upon clicking Activate button, a confirmation modal will display.
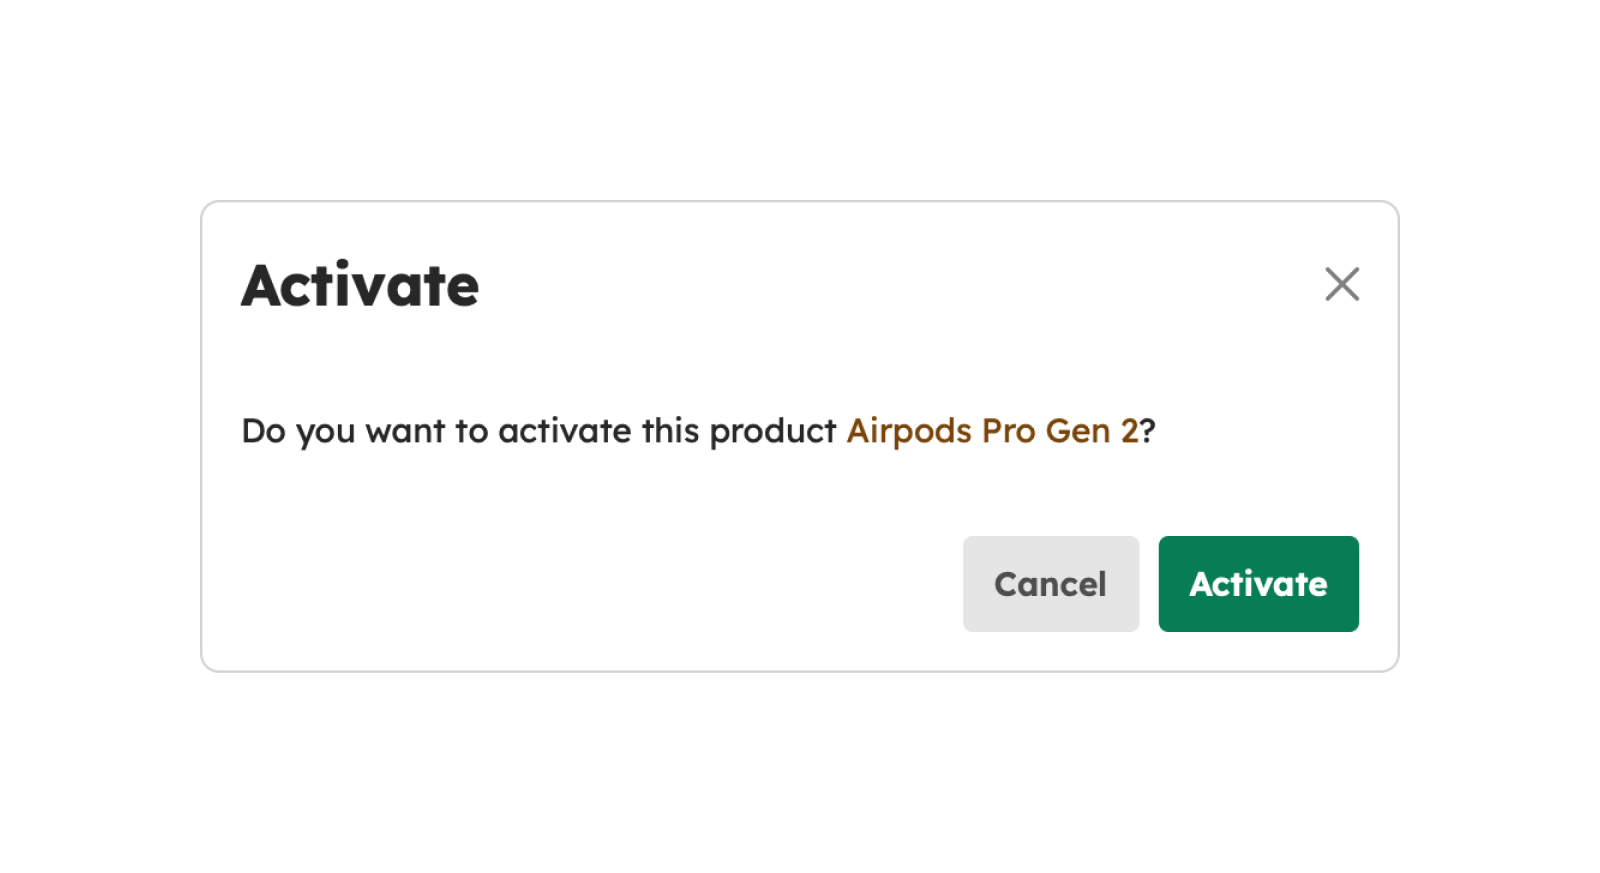
- From the modal, click Activate button to successfully activate the product.
-
Successful activation will show a notification message:
Product successfully activated
Vendors
Introduction to Vendors Page
This page allows for the creation, editing, previewing, activation, and deactivation of vendors.
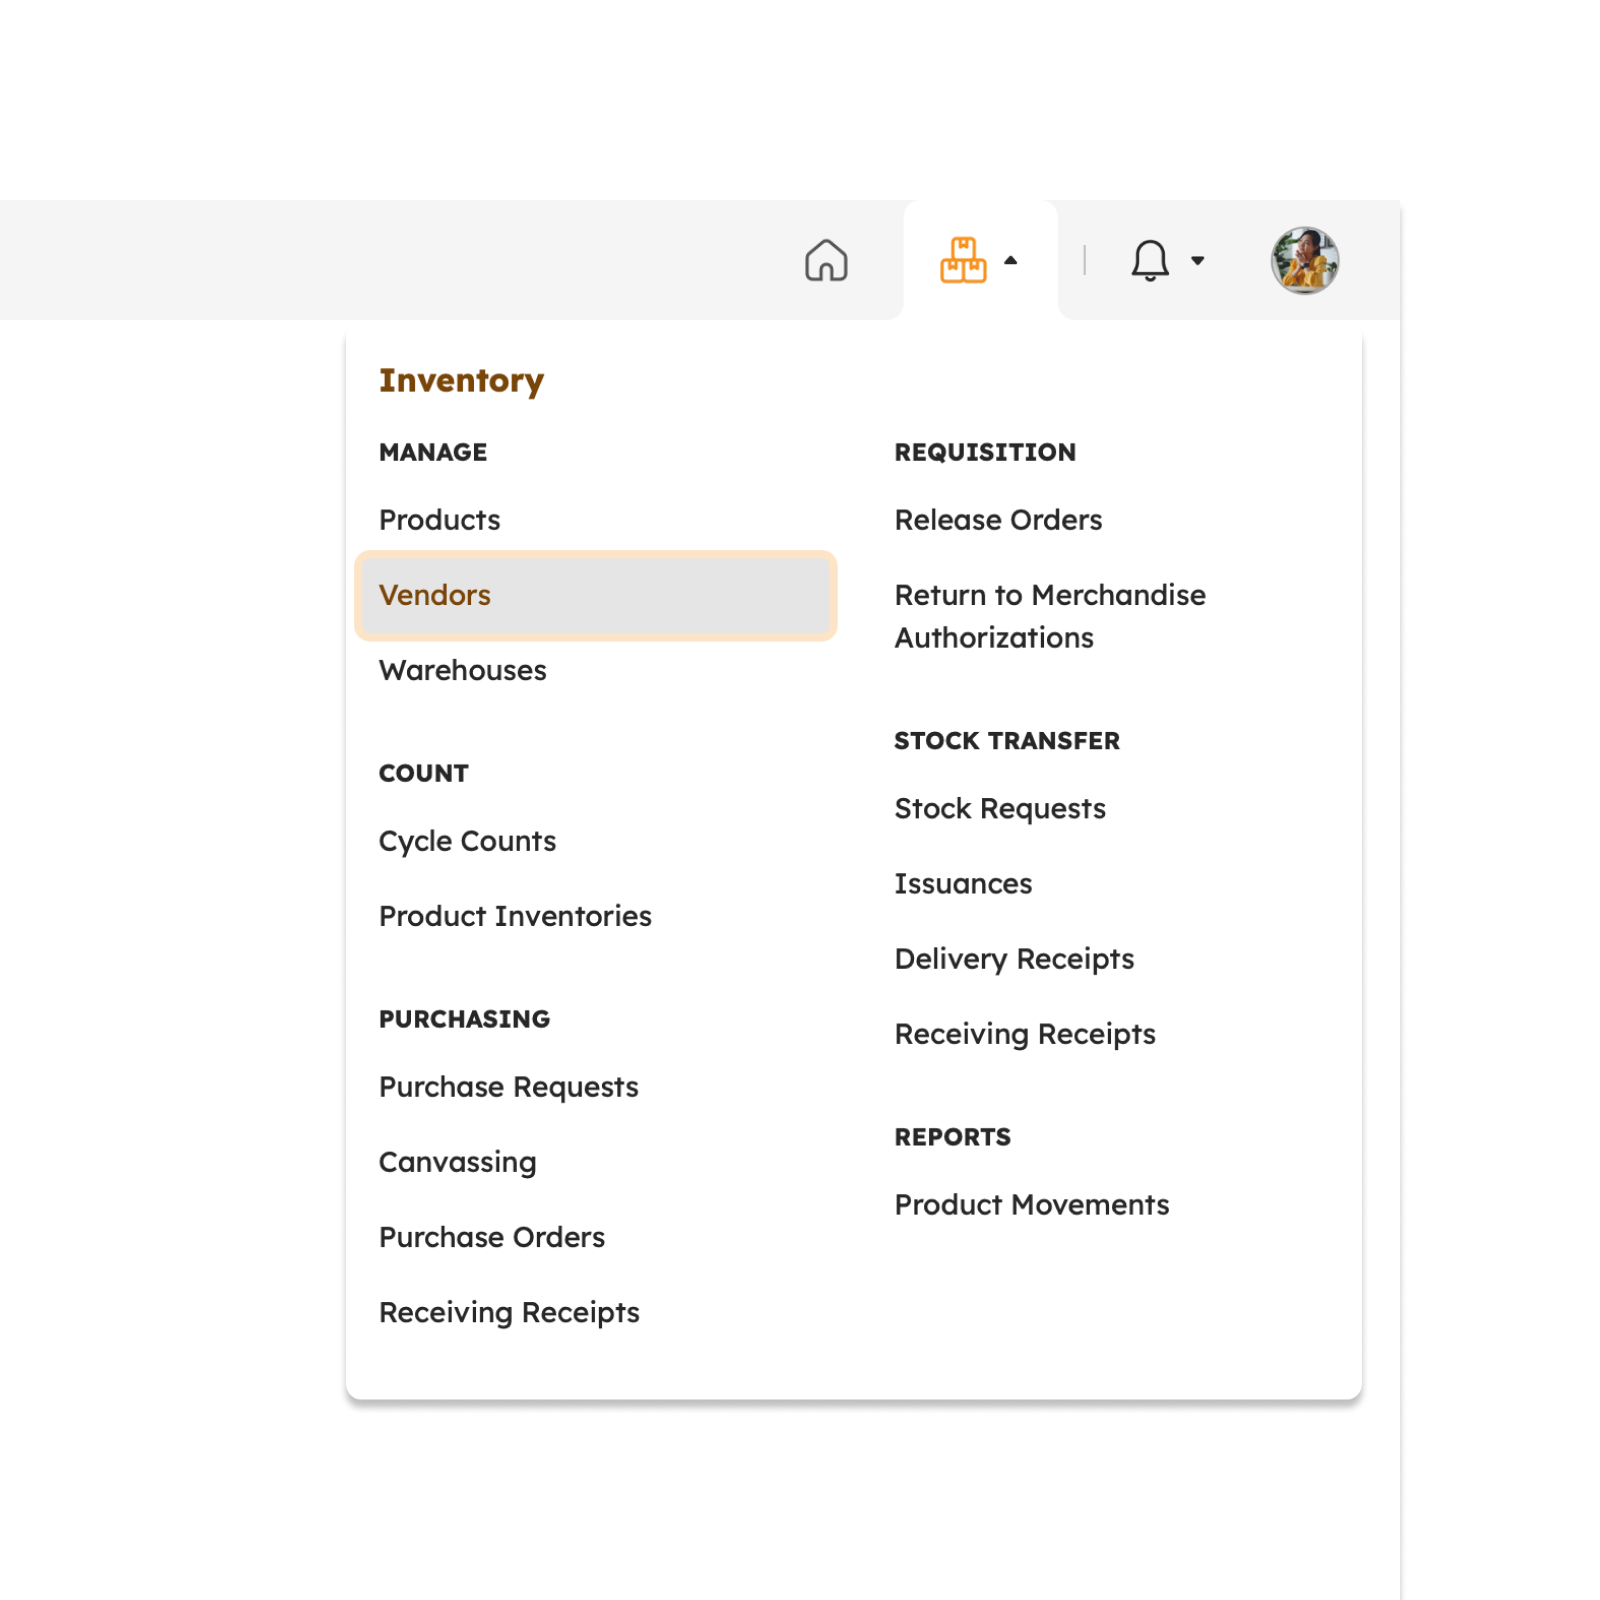
To access this page, navigate to the Inventory Module and click "Vendors" under Manage Submodule, as shown in the image below:
The screen will redirect to the Vendors page, showing several features to use that will be discussed in the next section.
Features in Vendors Page
The image below is the high-level view of the Vendors page along with its built-in features.

Vendors Summary Table
The Vendors Summary Table displays the following columns:
- Vendor number "#"
- Code
- Name
- Address
- Shipment Terms
- Payment Terms
-
Actions
- View Vendor
- Edit Vendor
- Activate and Deactivate Vendor
Searching Vendors
- Key in the name of the Vendors in the Search Bar to look for a particular Vendor.
- The Vendors Summary Table will display the searched Vendors.
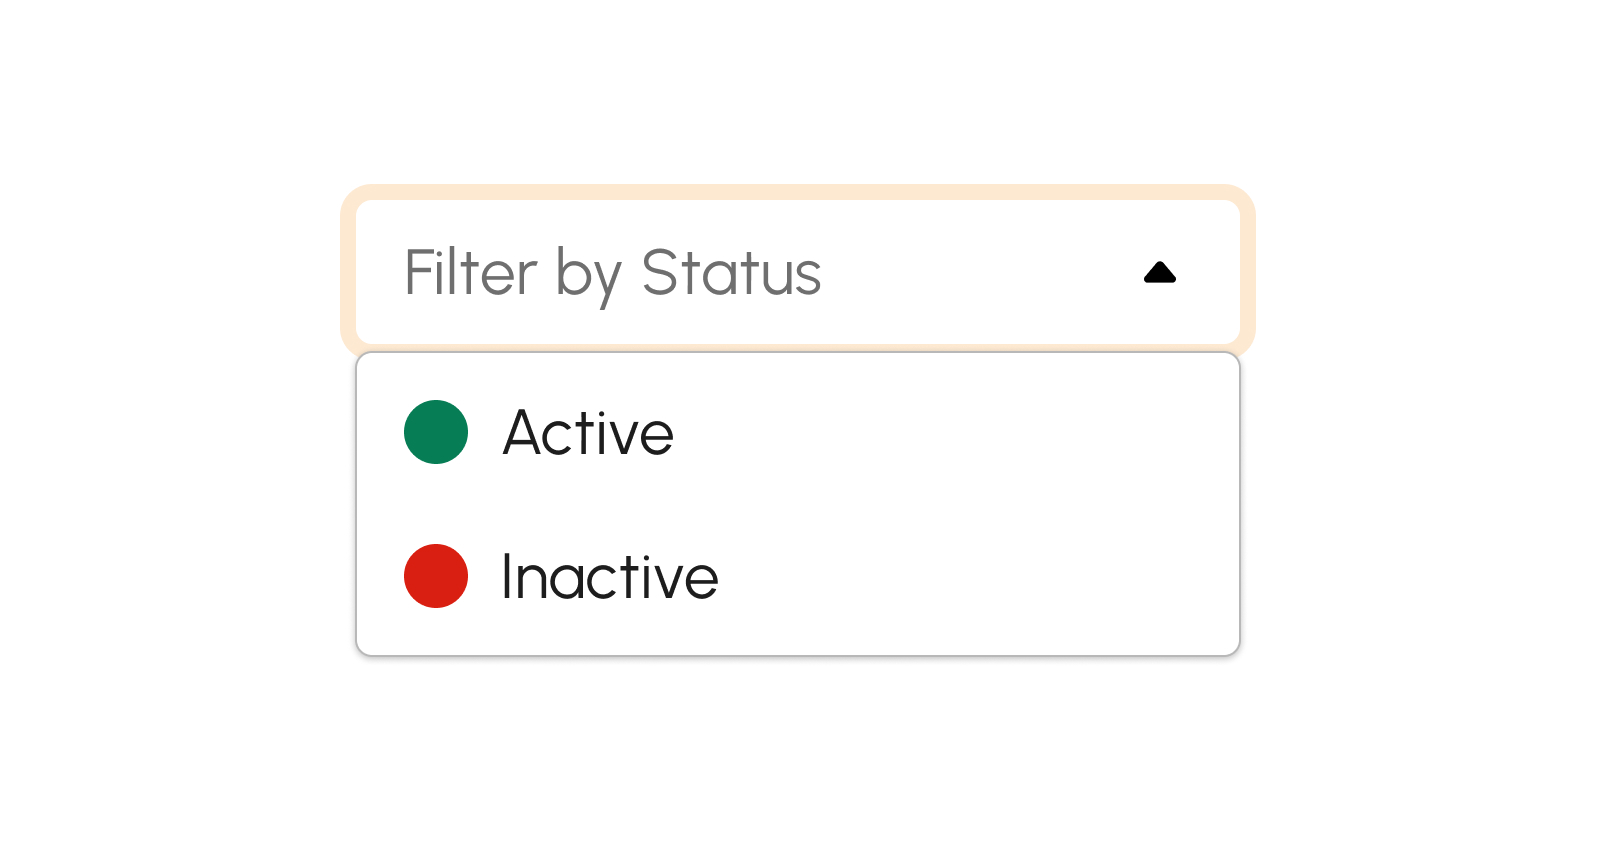
How to Filter Vendors by Status
Click the "Filter by Status" dropdown to display and select the desired status.
Creating Vendors
To begin creating Vendors, follow the procedures below:
-
Click the Create button to create a Vendor.
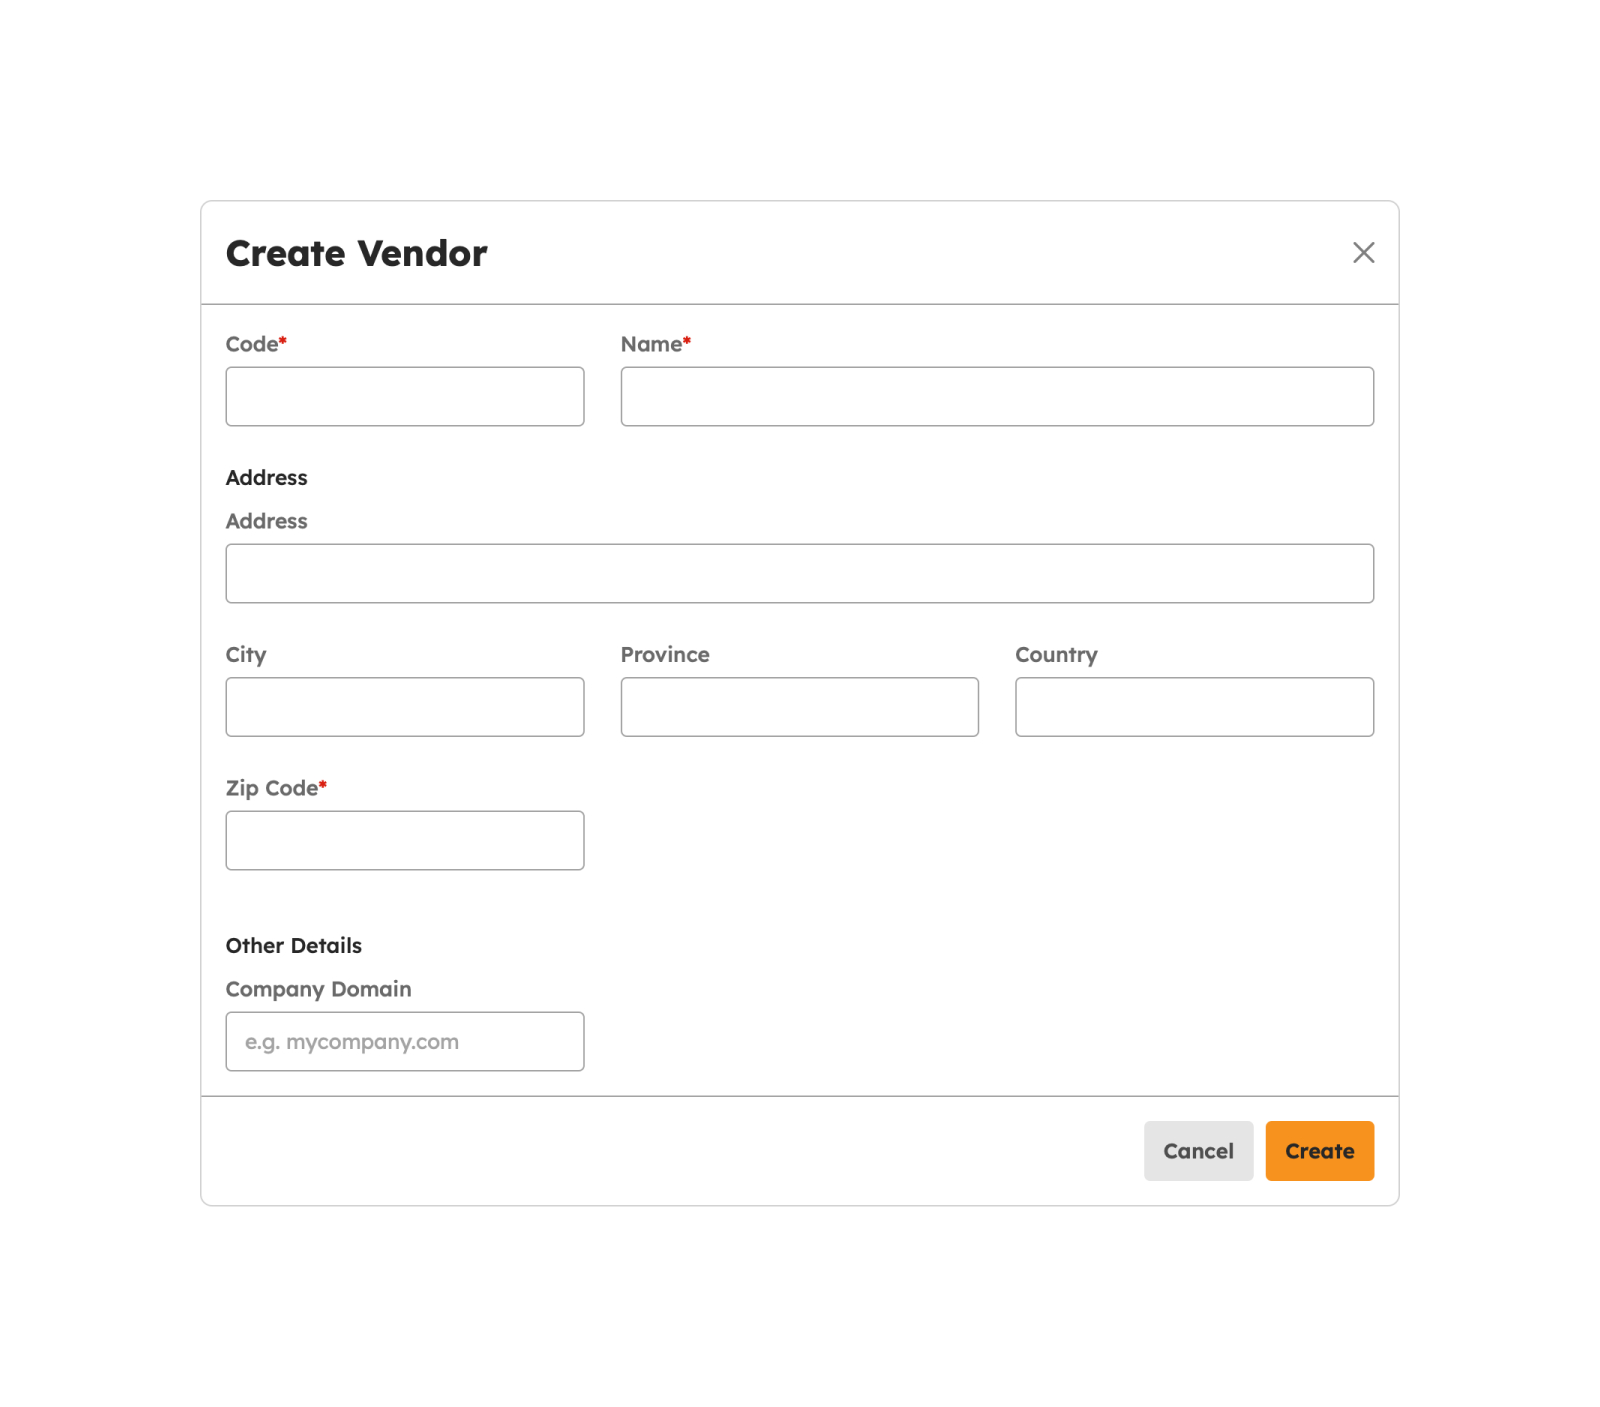
-
The screen displays a modal to key in the required details in the following fields:
- Name
- Code
- City
- Province
- Country
- Address
- Shipment Terms
- Payments Terms
Note
Fields with (*) are required.
- Click the Create button to create the Vendor successfully.
-
A successful notification message will show.
Vendor successfully created
-
Created Vendor will be added to the list of Vendors in the Summary Table.
The default status for newly created Vendor is ”Active”.
To cancel the creation of Vendor, follow the procedures below:
- Click the Cancel button to cancel the creation of the Vendor.
- The screen closes the modal.
- The system will not proceed with creating and saving a Vendor.
Editing Vendors
Edit and modify Vendors by following the steps below:

-
The screen displays a modal to key in the updates in the following fields:
- Name
- Code
- City
- Province
- Country
- Address
- Shipment Terms
- Payments Terms
Note
Fields with (*) are required.
- Click the Update button to update the Vendor.
-
A successful notification message will show.
Vendor successfully updated
-
Saves the applied changes.
The default status for newly created Vendor is ”Active”.
To cancel the update of Vendors, follow the procedure(s) below:
- Click the Cancel button to cancel the update of the Vendor.
- The screen closes the modal.
- The system will not proceed with updating and saving a Vendor.
Deactivating Vendors
- To deactivate a Vendor, click on the Deactivate button.
-
Upon clicking the Deactivate button, a confirmation modal will display.
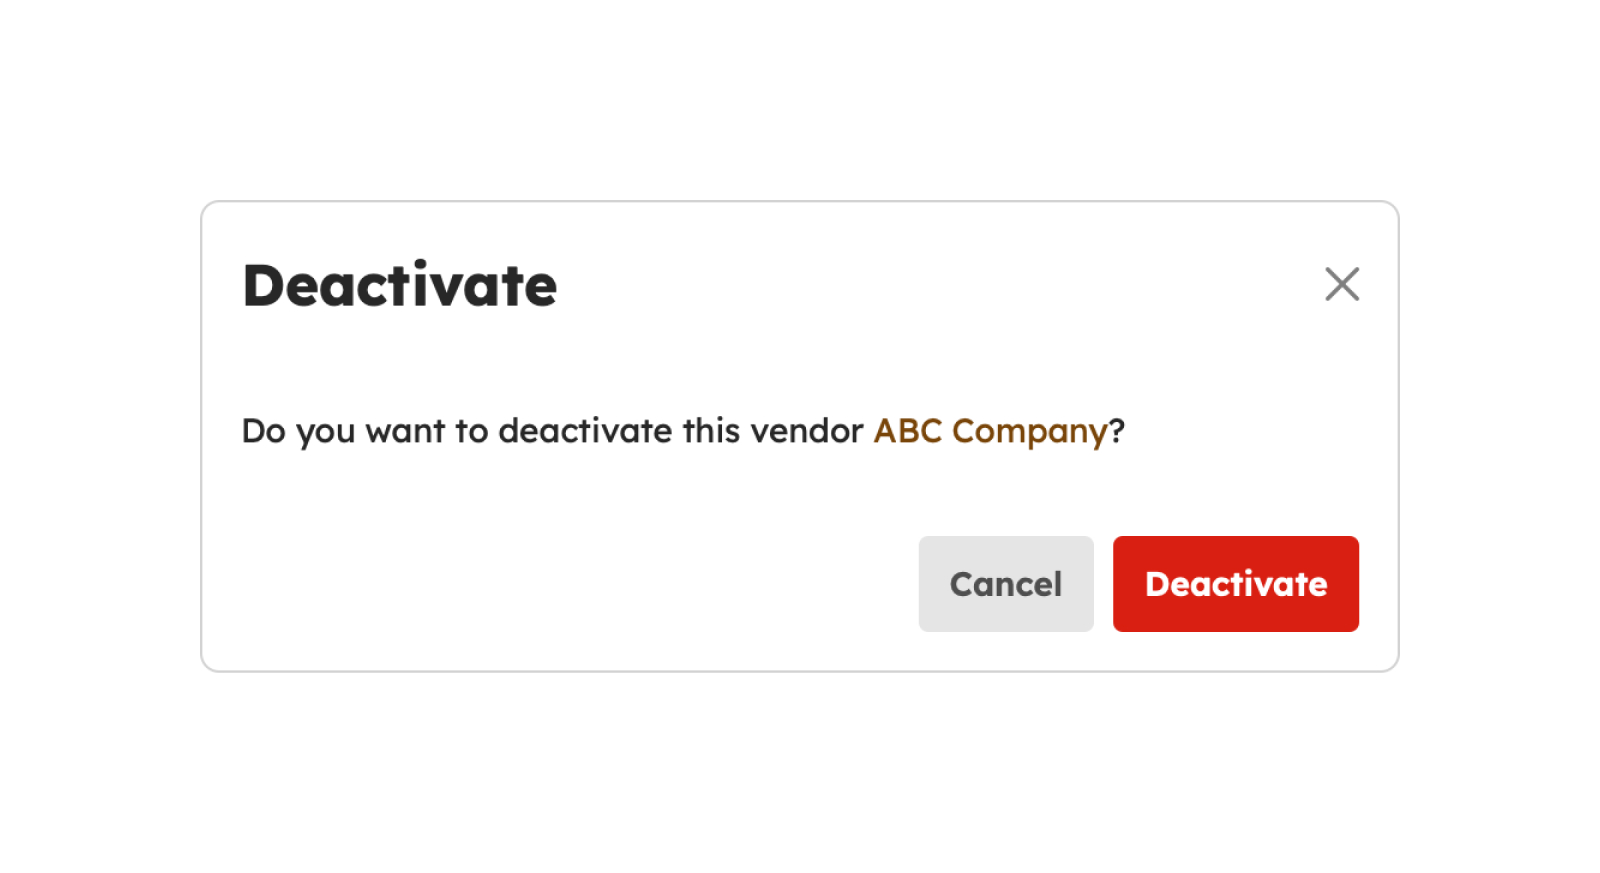
- From the modal, click the Deactivate button to successfully deactivate the vendor.
-
Successful deactivation will show a notification message:
Vendor successfully deactivated
Activating Vendors
- To activate a Vendor, click on the Activate button.
-
Upon clicking Activate button, a confirmation modal will display.
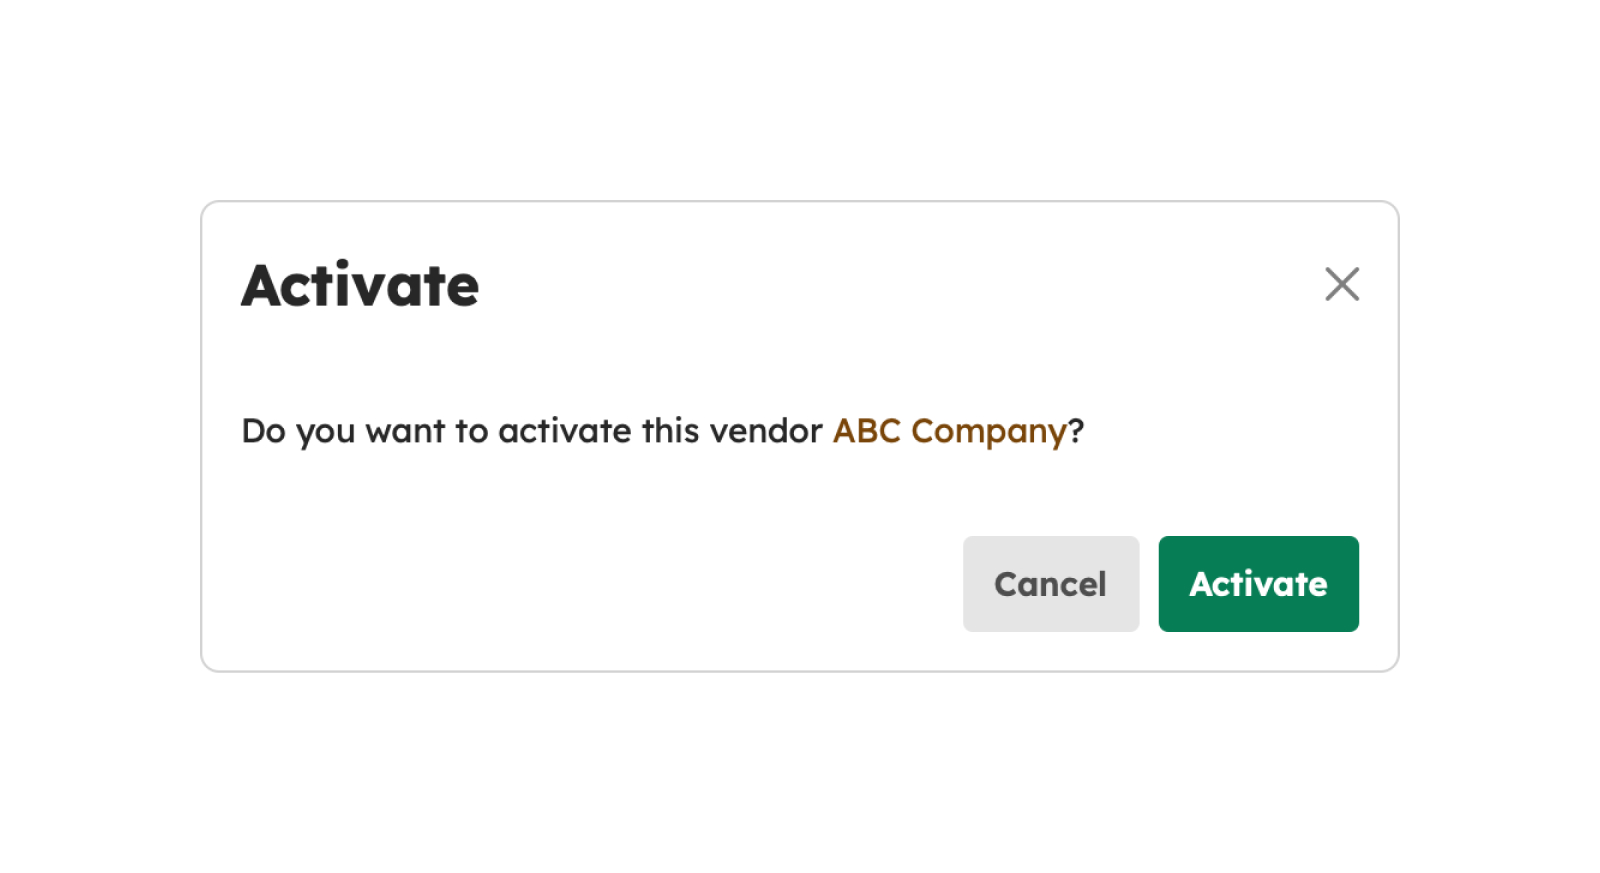
- From the modal, click Activate button to successfully activate the vendor.
-
Successful activation will show a notification message:
Vendor successfully activated
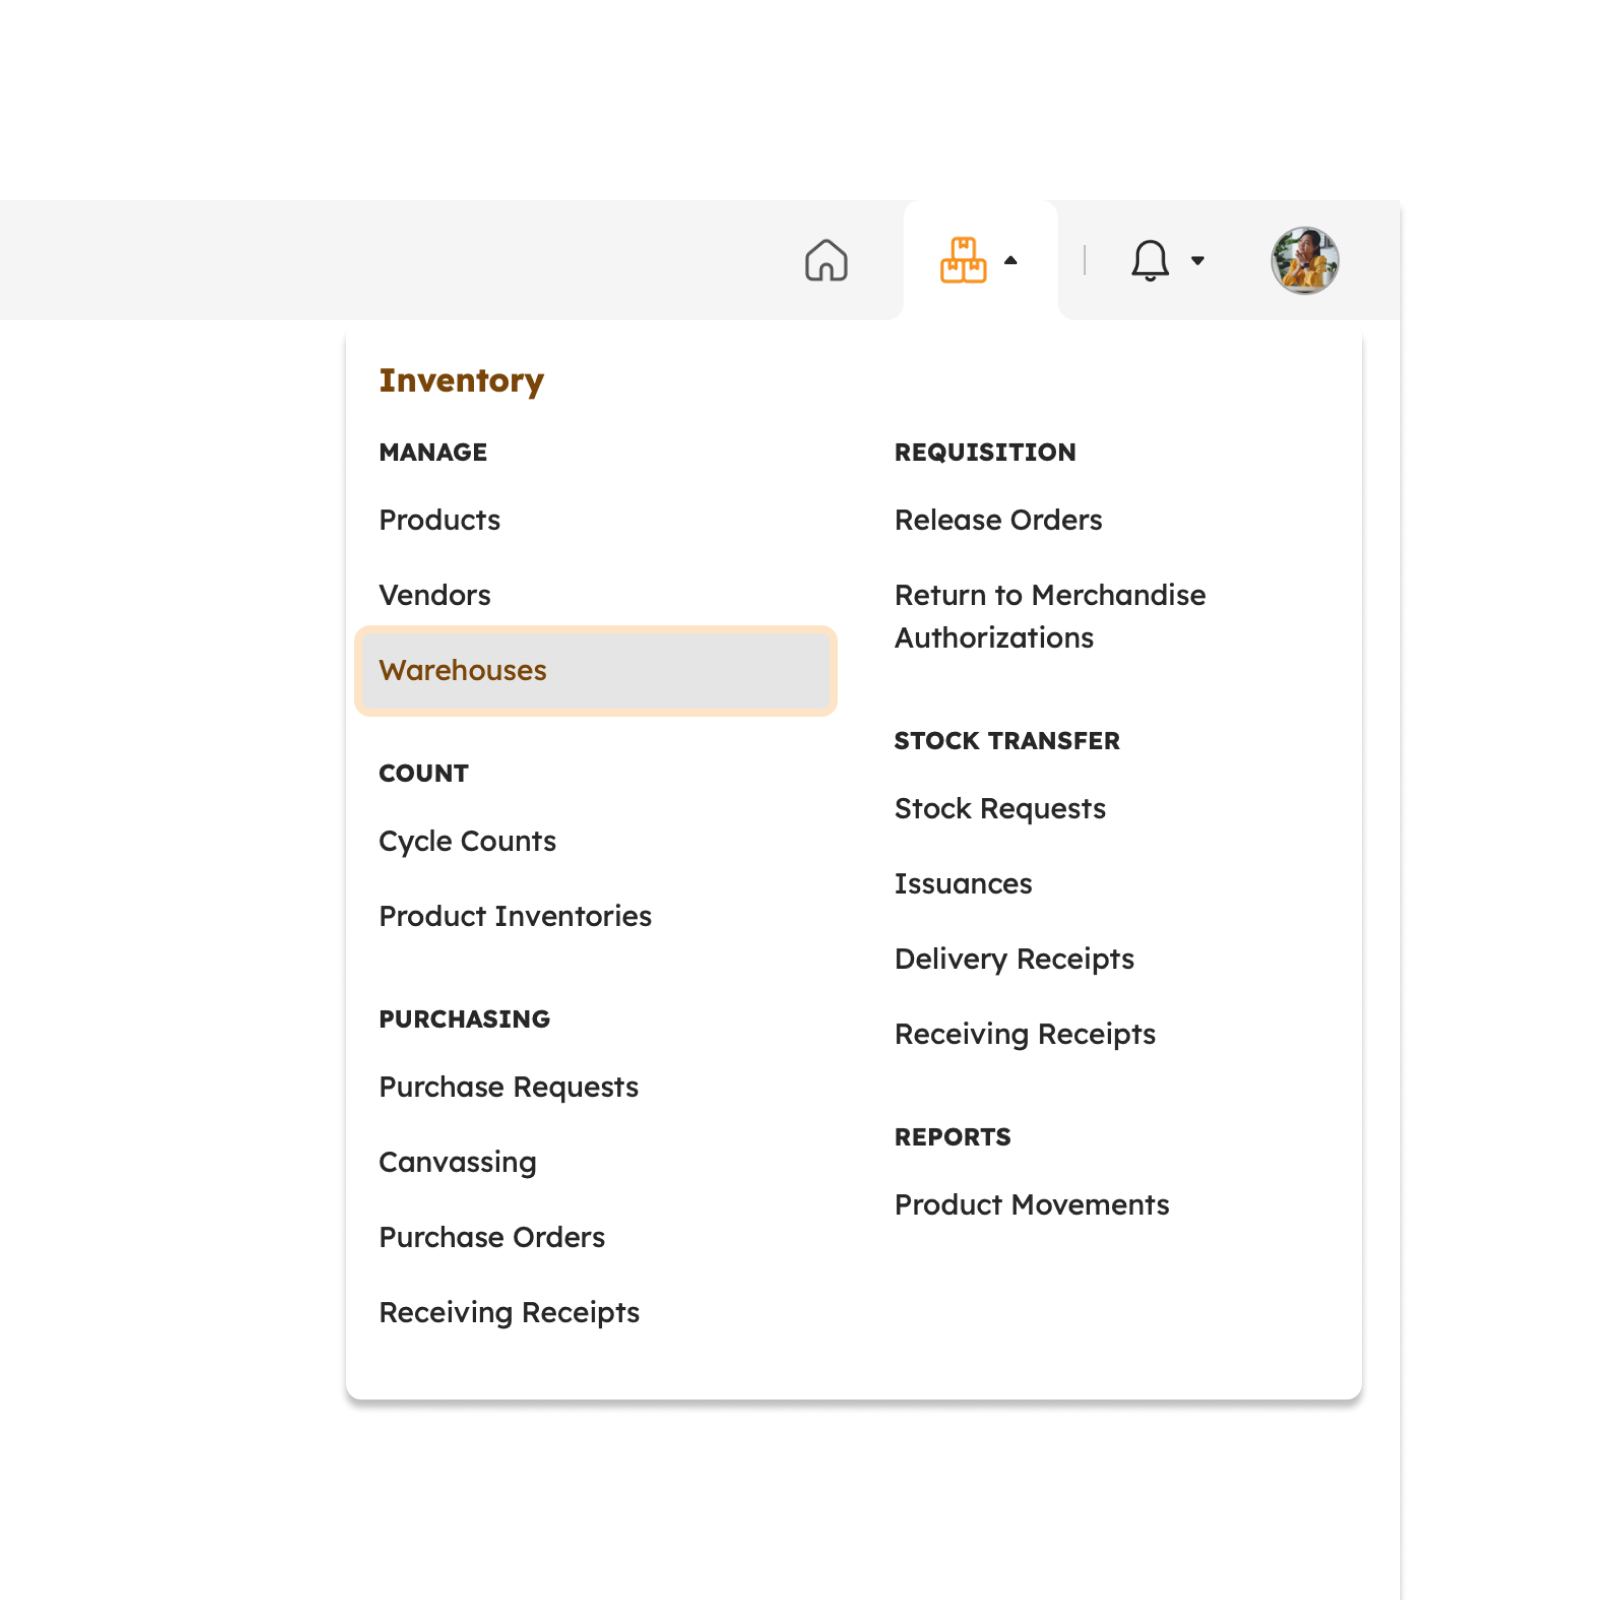
Warehouses
Introduction to Warehouses Page
This page allows for the creation, editing, previewing, activation, and deactivation of Warehouses.
To access this page, navigate to the Inventory Module and click "Warehouses" under Manage Submodule, as shown in the image below:
The screen will redirect to the Warehouses page, showing several features to use that will be discussed in the next section.
Features in Warehouses Page
The image below is the high-level view of the Warehouses page along with its built-in features.
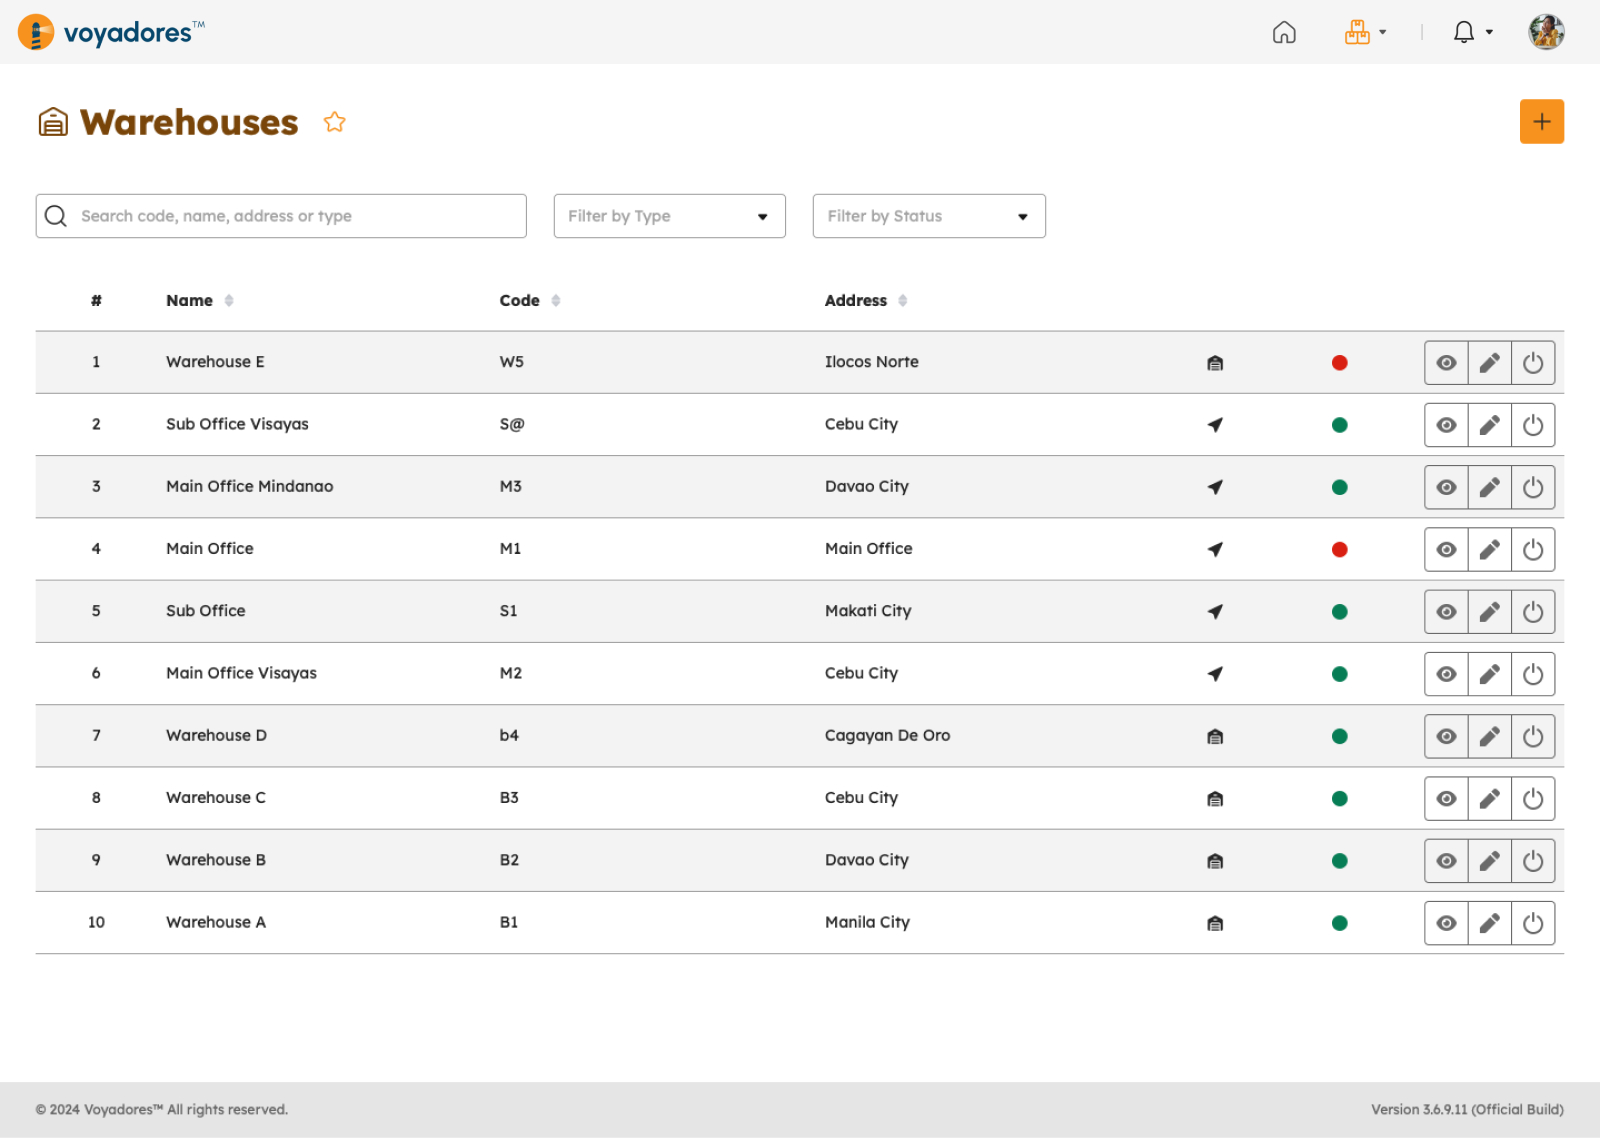
Warehouses Summary Table
The Warehouses Summary Table displays the following columns:
- Warehouses number "#"
- Name
- Code
- Address
-
Actions
- View Warehouse
- Edit Warehouse
- Activate and Deactivate Warehouse
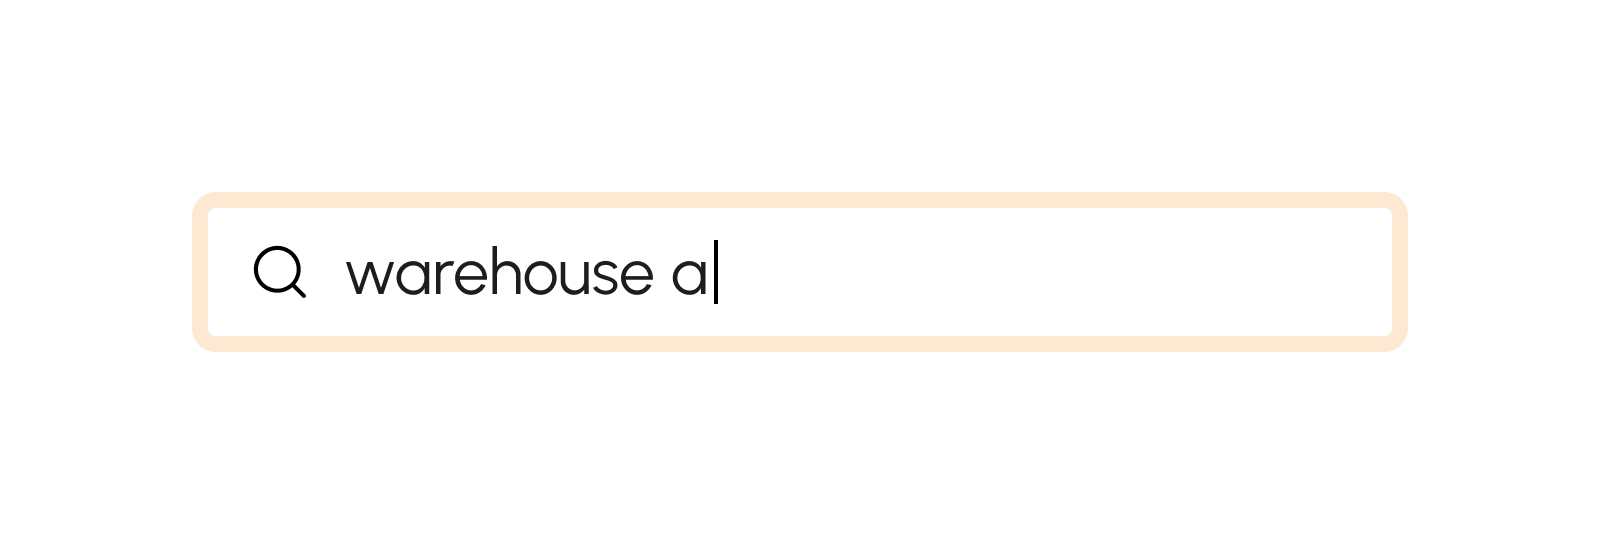
Searching Warehouses
- Key in the name of the Warehouses in the Search Bar to look for a particular Warehouse.
- The Warehouse Summary Table will display the searched Warehouse.
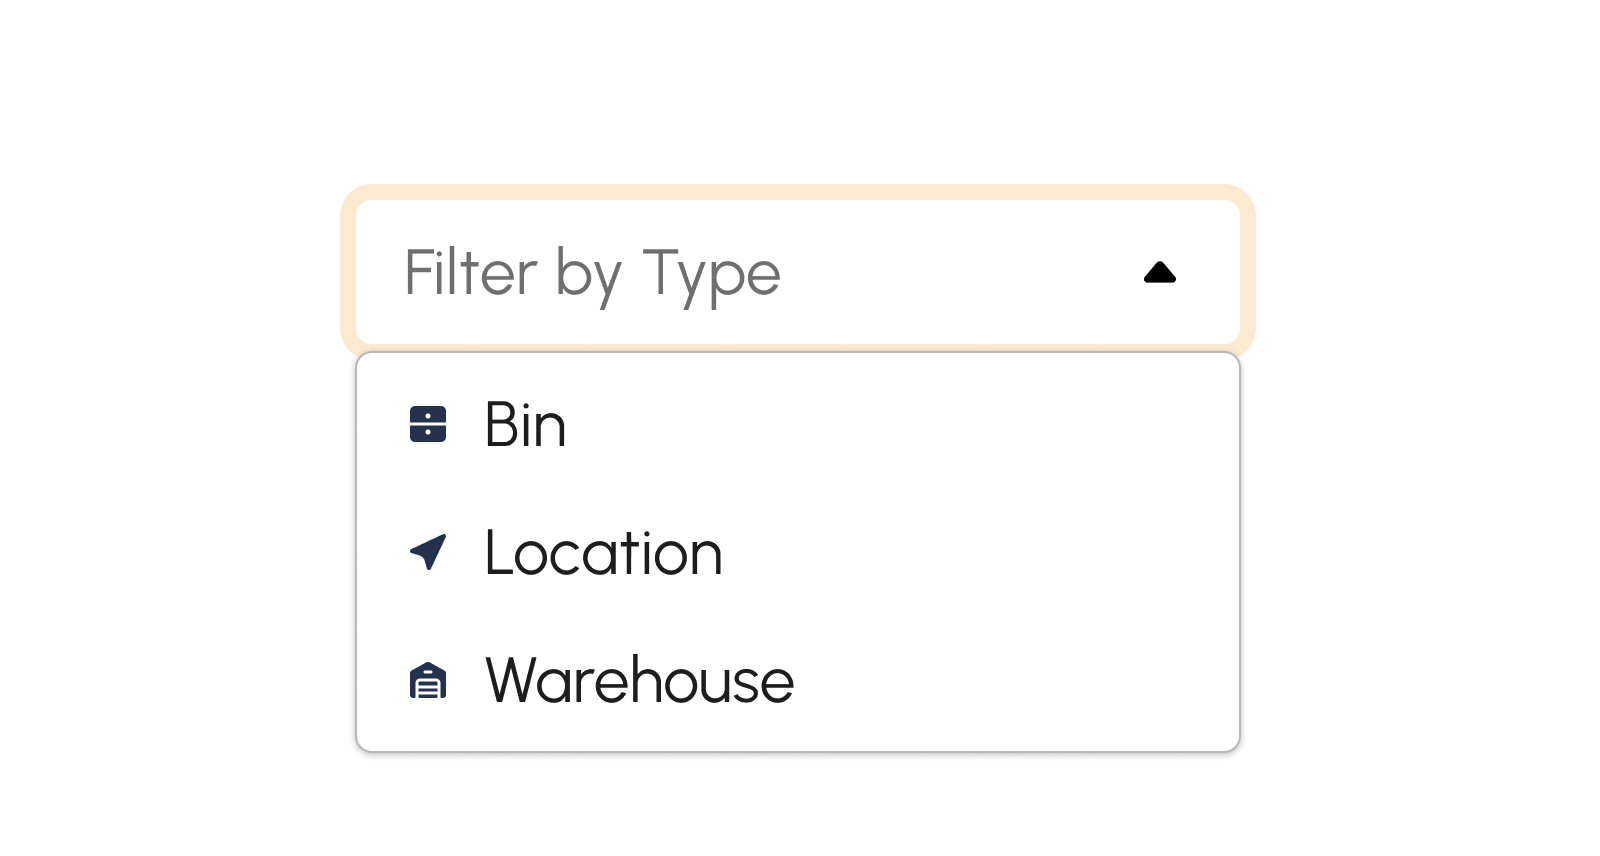
How to Filter Warehouse by Status
Click the "Filter by Status" or "Filter by Type" dropdown to display and select the desired status.

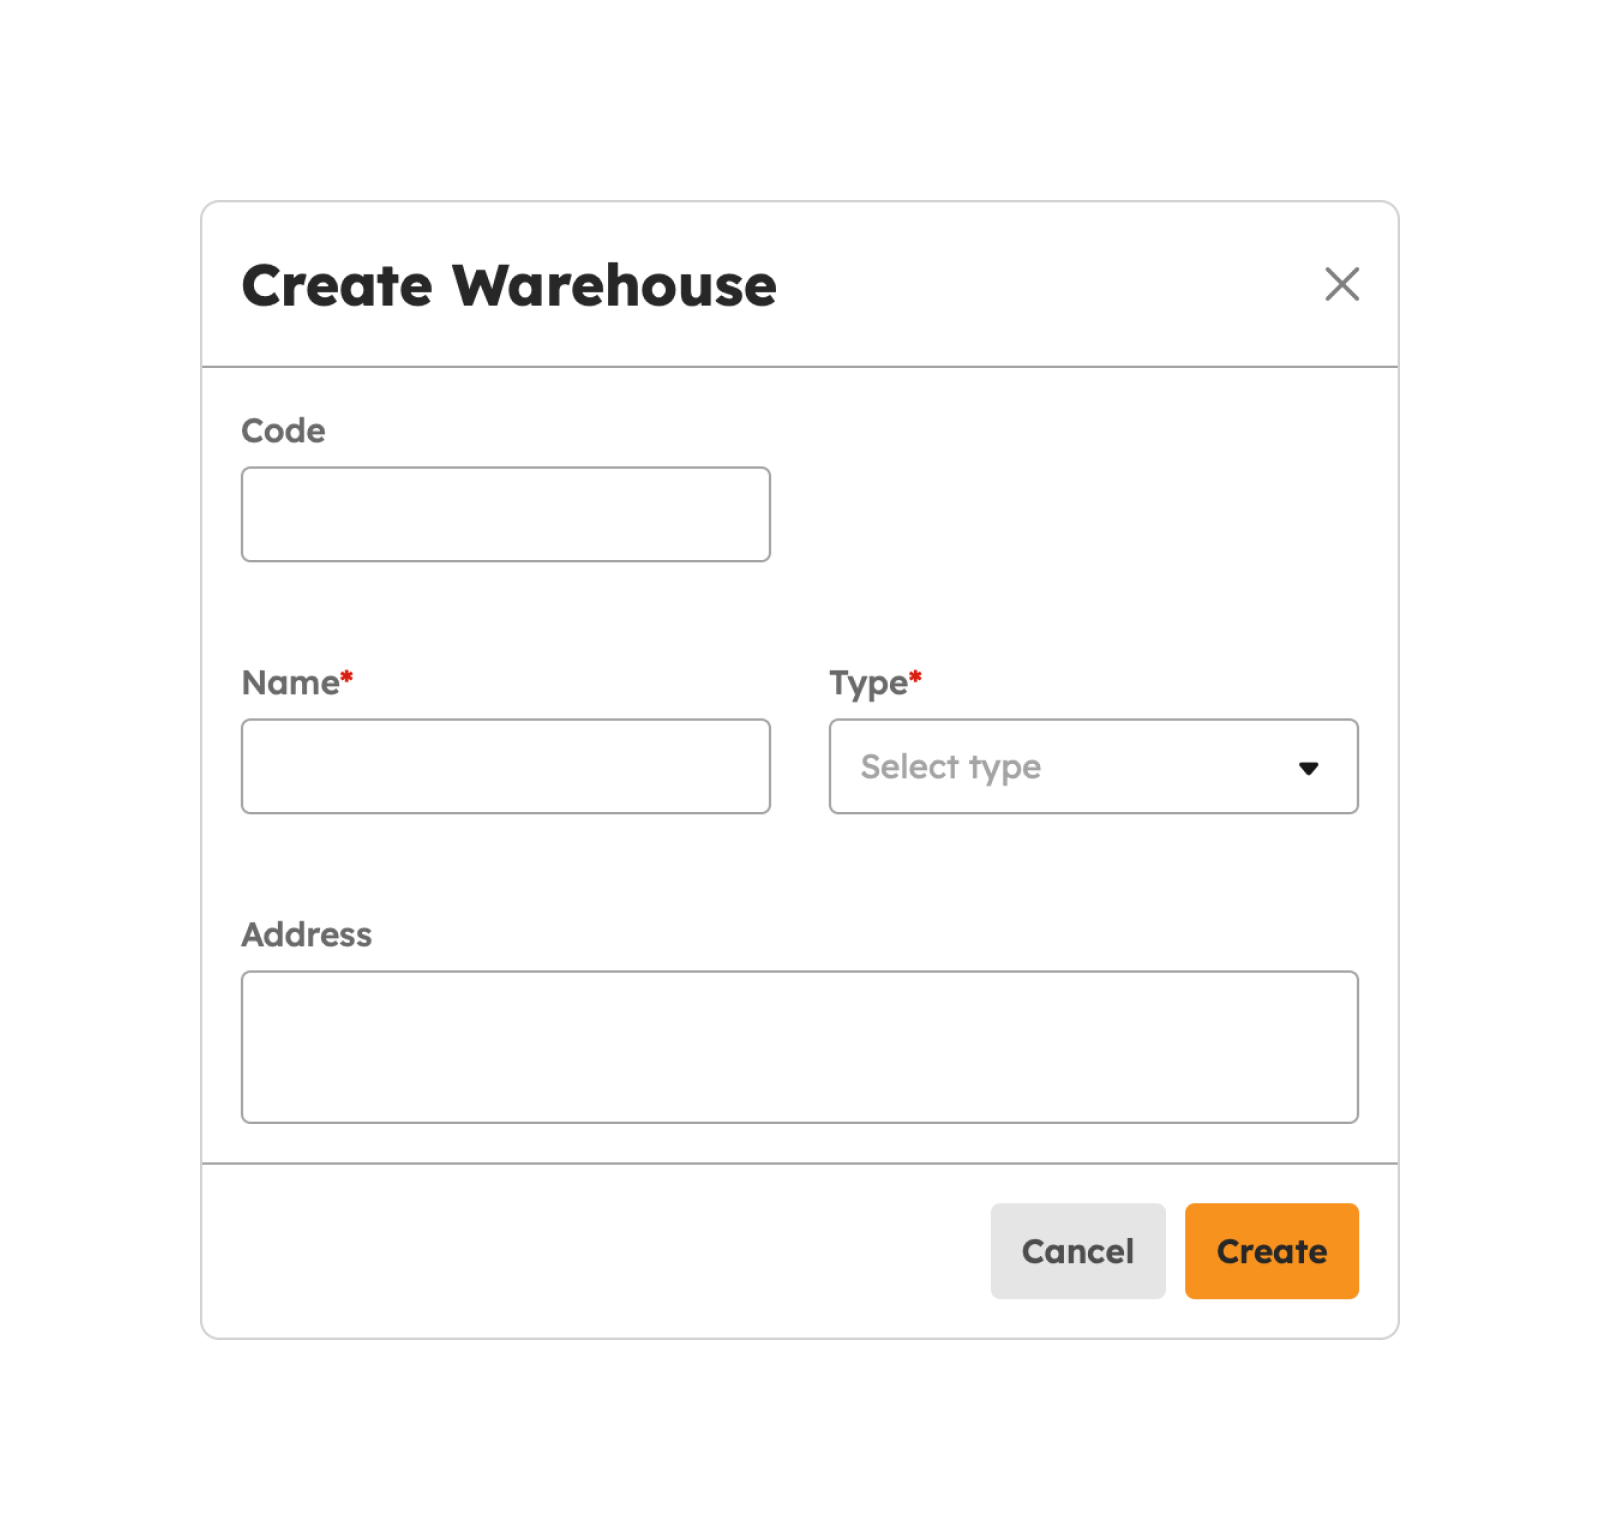
Creating Warehouses
To begin creating Warehouses, follow the procedures below:
-
Click the Create button to create a Warehouse.
-
The screen displays a modal to key in the required details in the following fields:
- Name
- Code
- Type
- Address
Note
Fields with (*) are required.
- Click the Create button to create the warehouse successfully.
-
A successful notification message will show.
Warehouse successfully created
-
Created Warehouse will be added to the list of warehouses in the Summary Table.
The default status for newly created warehouse is ”Active”.
To cancel the creation of Warehouse, follow the procedure(s) below:
- Click the Cancel button to cancel the creation of the Warehouse.
- The screen closes the modal.
- The system will not proceed with creating and saving a Warehouse.
Editing Warehouses
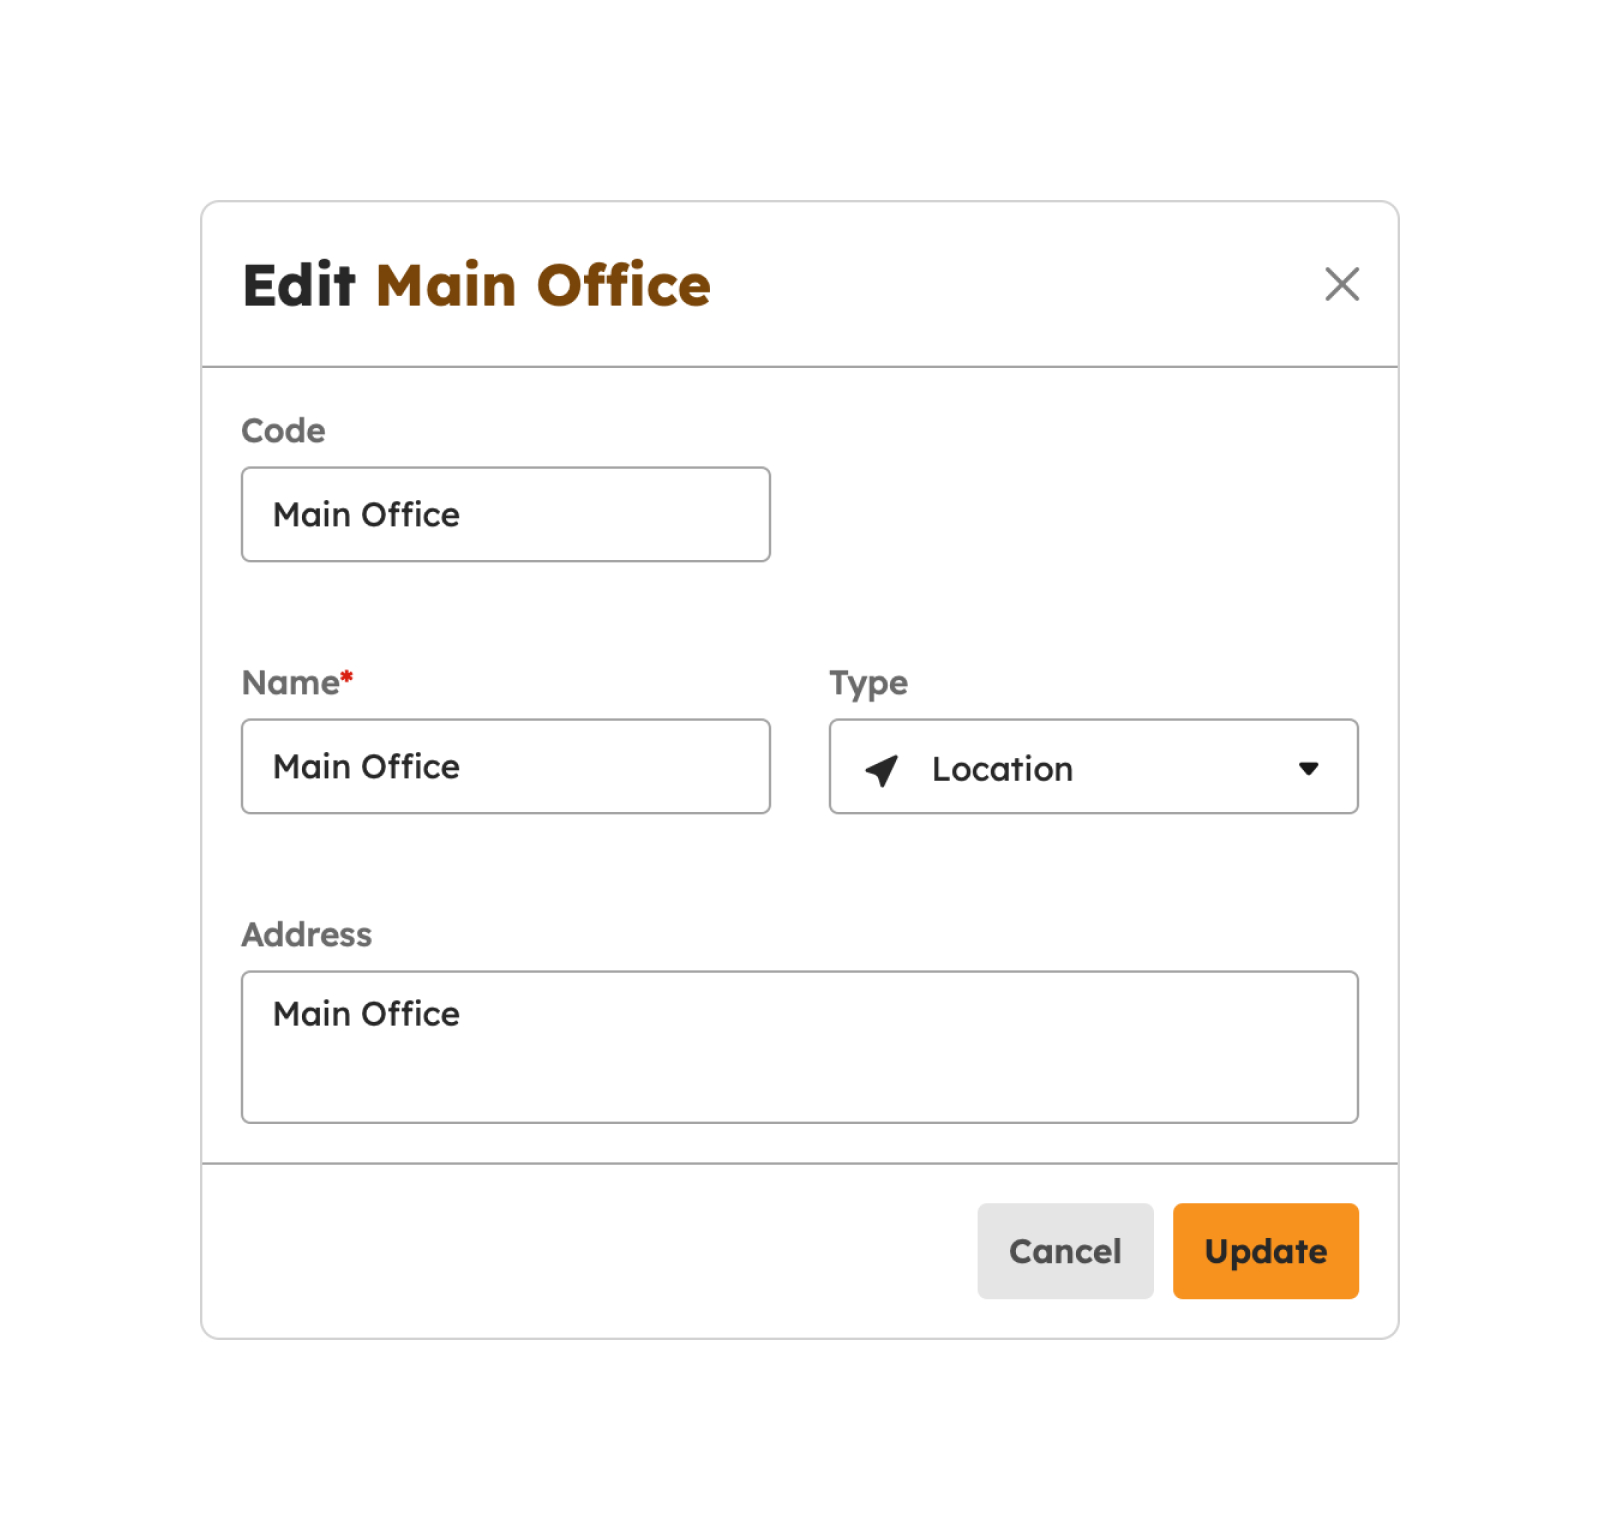
Edit and modify Warehouses by following the steps below:
-
The screen displays a modal to key in the updates in the following fields:
- Name
- Code
- Type
- Address
Note
Fields with (*) are required.
- Click the Update button to update the Warehouse.
-
A successful notification message will show.
Warehouse successfully updated
- Saves the applied changes.
To cancel the update of Warehouse, follow the procedures below:
- Click the Cancel button to cancel the update of the Warehouse.
- The screen closes the modal.
- The system will not proceed with updating and saving a Warehouse.
Deactivating Warehouses
- To deactivate a Warehouse, click on the Deactivate button.
-
Upon clicking the Deactivate button, a confirmation modal will display.

- From the modal, click the Deactivate button to successfully deactivate the warehouse.
-
Successful deactivation will show a notification message:
Warehouse successfully deactivated
Activating Warehouses
- To activate a Warehouse, click on the Activate button.
-
Upon clicking Activate button, a confirmation modal will display.
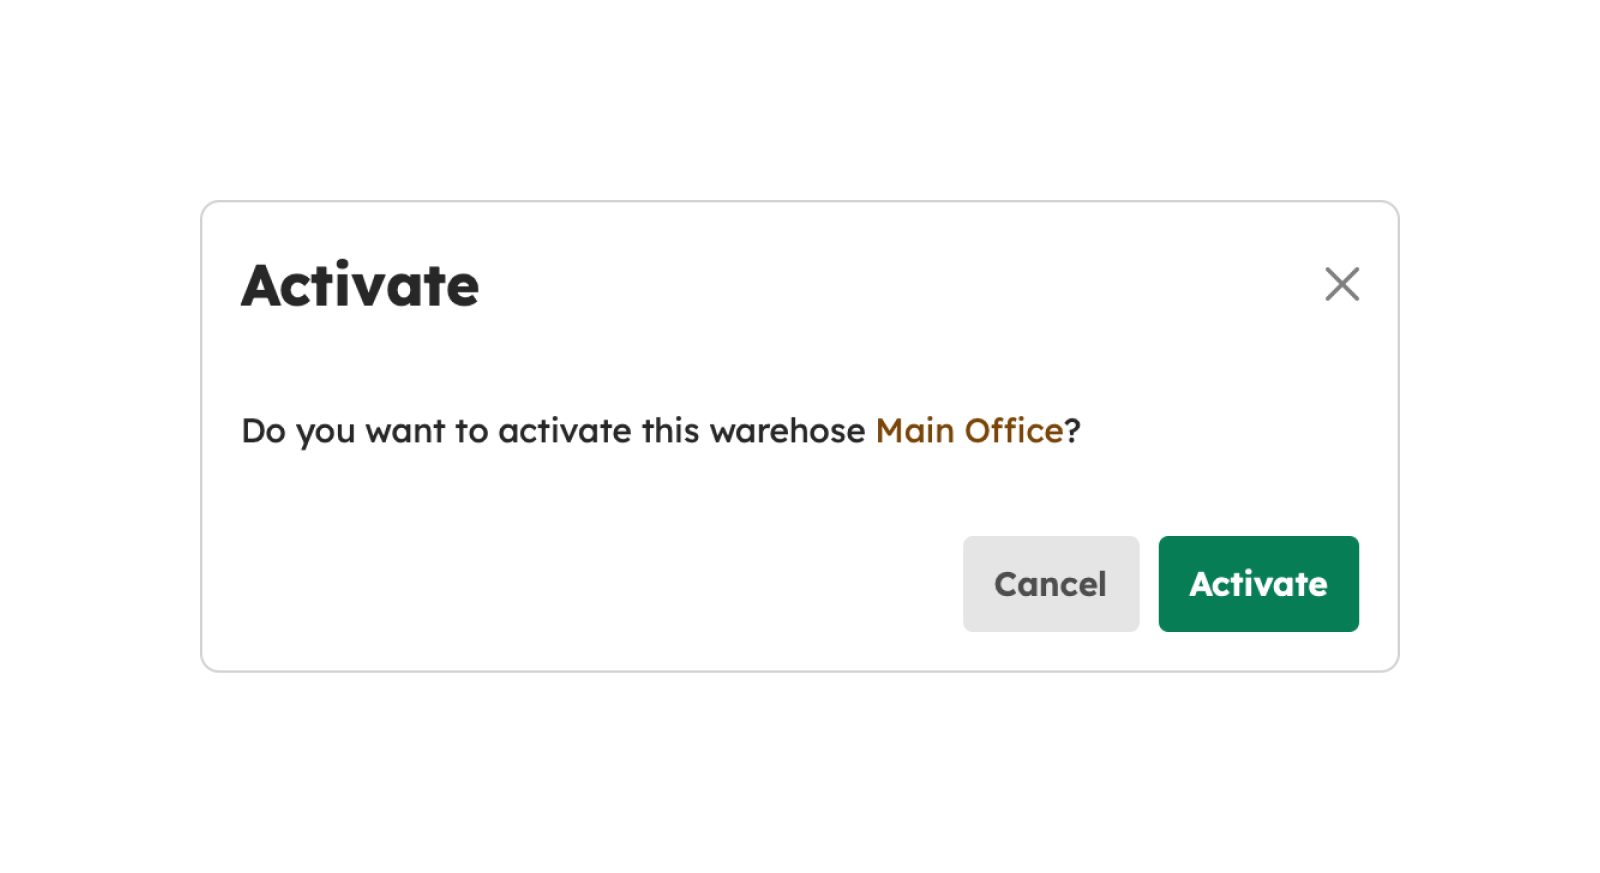
- From the modal, click Activate button to successfully activate the warehouse.
-
Successful activation will show a notification message:
Warehouse successfully activated