Purchasing
Who can use this feature
Anyone with an Administrator, Purchasing Officer, Canvasser, Purchasing Manager, Warehouse Staff, and Receiver role can access the Inventory module
Introduction
The Purchasing submodule helps users handle different procurement tasks efficiently. With this submodule, users can create and manage purchase requests, compare suppliers, process purchase orders, and track receipts. This functionality ensures smooth purchasing processes, accurate order fulfillment, and keeps information current across the system.
Definition of Terms
- Purchase Request. This page focuses on creating purchase requests, viewing existing requests, canvassing for quotes, and closing purchase requests. It provides a comprehensive overview of each stage in the purchase request process, ensuring that all steps are managed efficiently.
- Canvassing. This page provides tools for viewing and approving canvass details.
- Purchase Orders. This page covers the creation, receipt, viewing, downloading, and cancellation of purchase orders.
- Receiving Receipts. This page enables users to view and download PDF's of received goods or items.
Roles and Permissions
| Functions | Administrator | Canvasser | Purchasing Manager | Purchasing Officer | Warehouse Staff | Receiver |
|---|---|---|---|---|---|---|
| Purchase Requests | ||||||
| Search | ||||||
| Filter by status | ||||||
| Filter by Type | ||||||
| Create Purchase Requests | ||||||
| View Purchase Requests | ||||||
| Close Purchase Requests | ||||||
| Create Canvass for Purchase Requests | ||||||
| Create Canvass Item | ||||||
| Canvassing | ||||||
| Search | ||||||
| Filter by Status | ||||||
| Start Date | ||||||
| End Date | ||||||
| View Canvass | ||||||
| Approve Canvass | ||||||
| Purchase Orders | ||||||
| Search | ||||||
| Filter by Vendor | ||||||
| Start Date | ||||||
| End Date | ||||||
| Filter by Status | ||||||
| Create Purchase Order | ||||||
| Receive Purchase Order | ||||||
| Location | ||||||
| Receive Date | ||||||
| Vendor Invoice | ||||||
| Remarks | ||||||
| View Purchase Order | ||||||
| Purchase Order PDF | ||||||
| Cancel Purchase Order | ||||||
| Receiving Receipts | ||||||
| Search | ||||||
| Filter by Vendor | ||||||
| Filter by location | ||||||
| View Receiving Receipts | ||||||
| Receiving Receipts PDF | ||||||
Features
Purchase Requests
Introduction to Purchase Requests Page
This page facilitates the management of purchase requests within the company. Its key functions include creating, viewing, closing, and canvassing purchase requests.
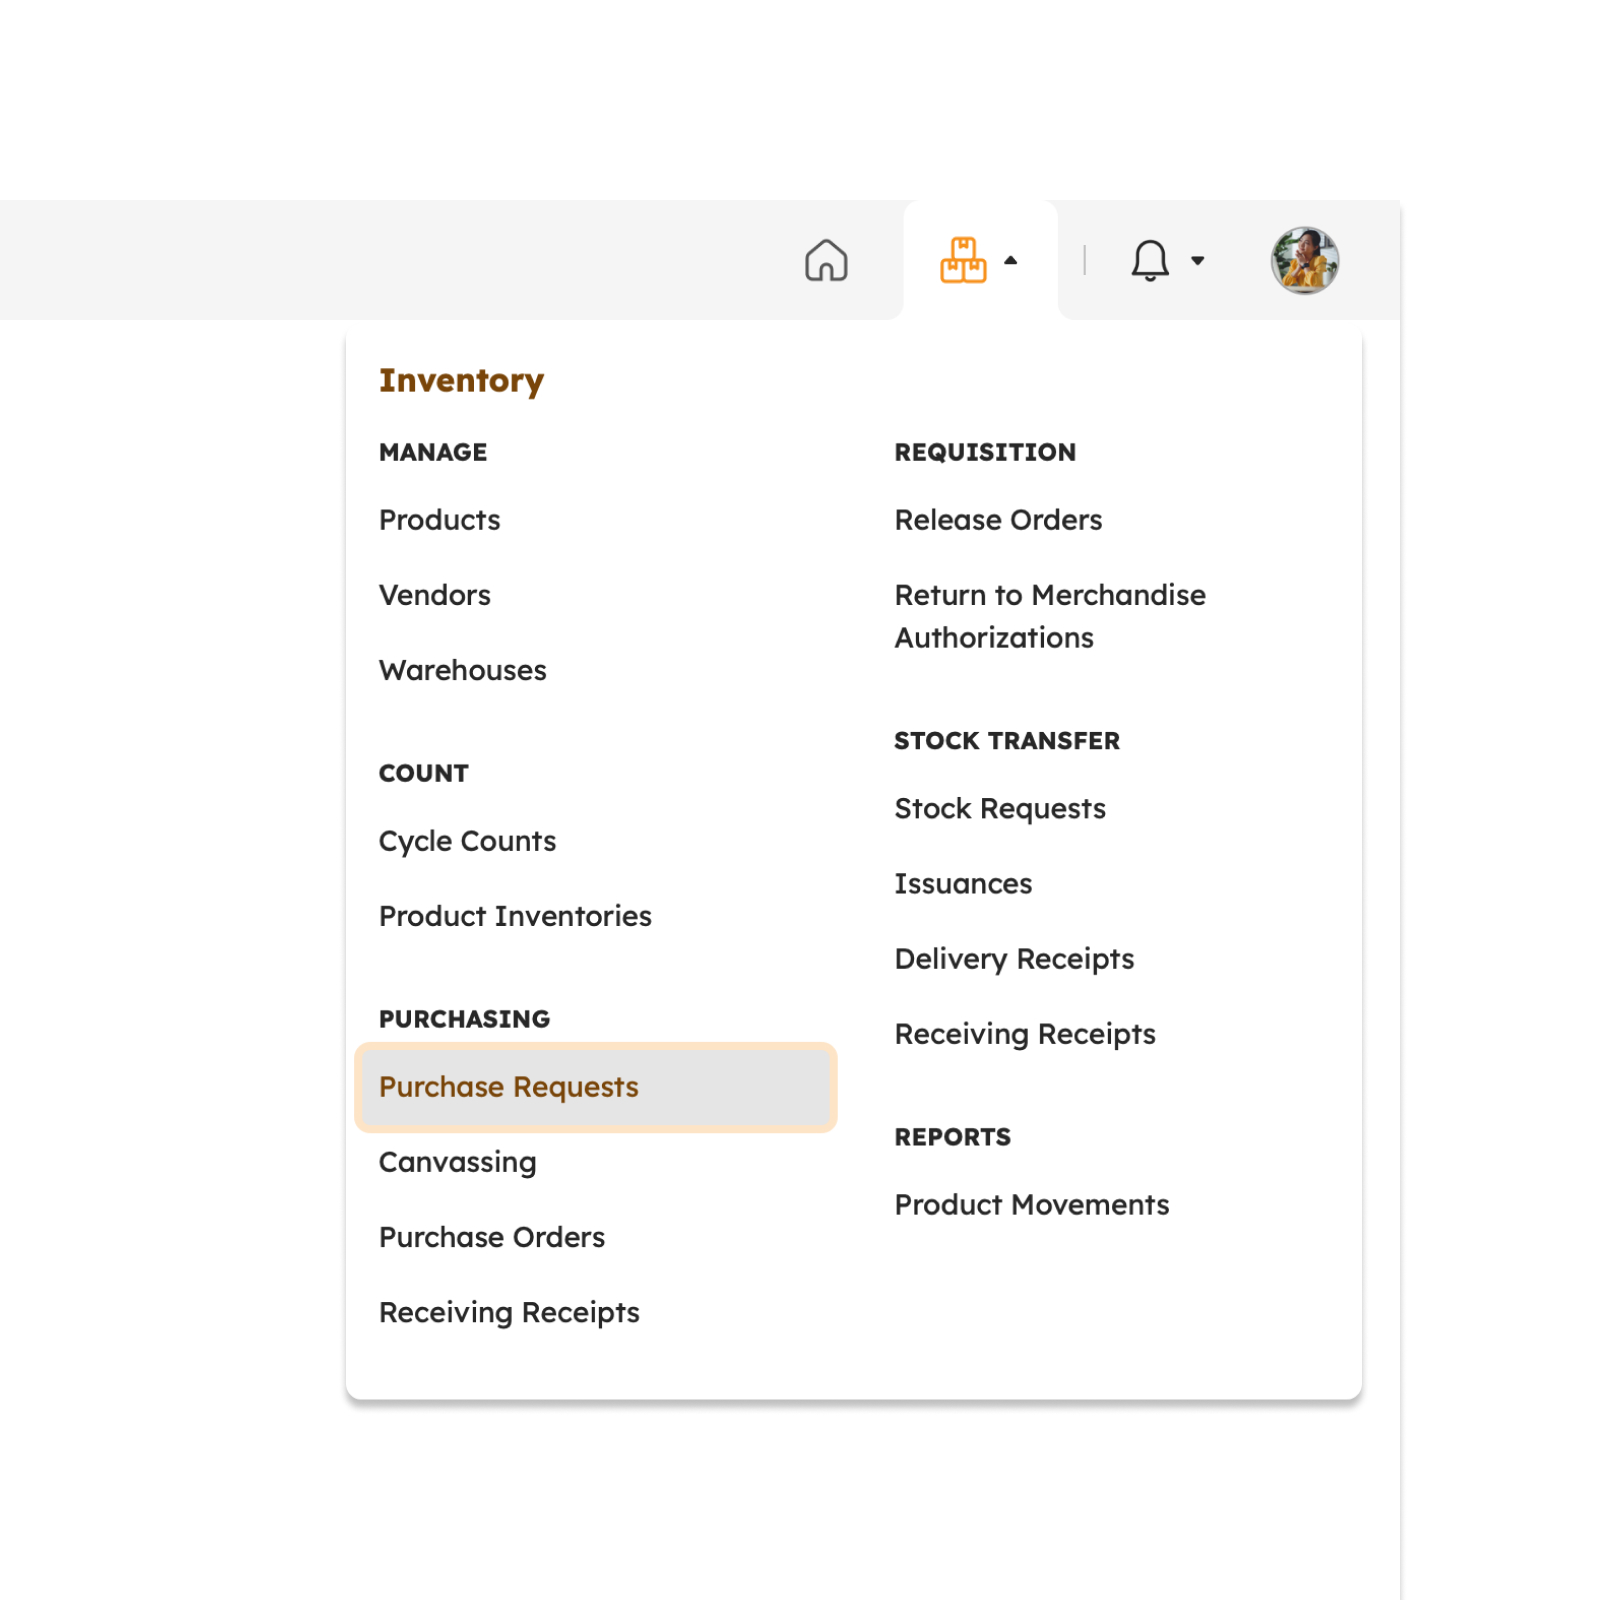
To access this page, navigate to the Inventory Module and click "Purchase Request" under the Purchasing Submodule, as shown in the image below:
The screen will redirect to the Purchase Request page, showing several features to use that will be discussed in the next section.
Features in Purchase Requests Page
The image below is the high-level view of the Purchase Request page along with its built-in features.
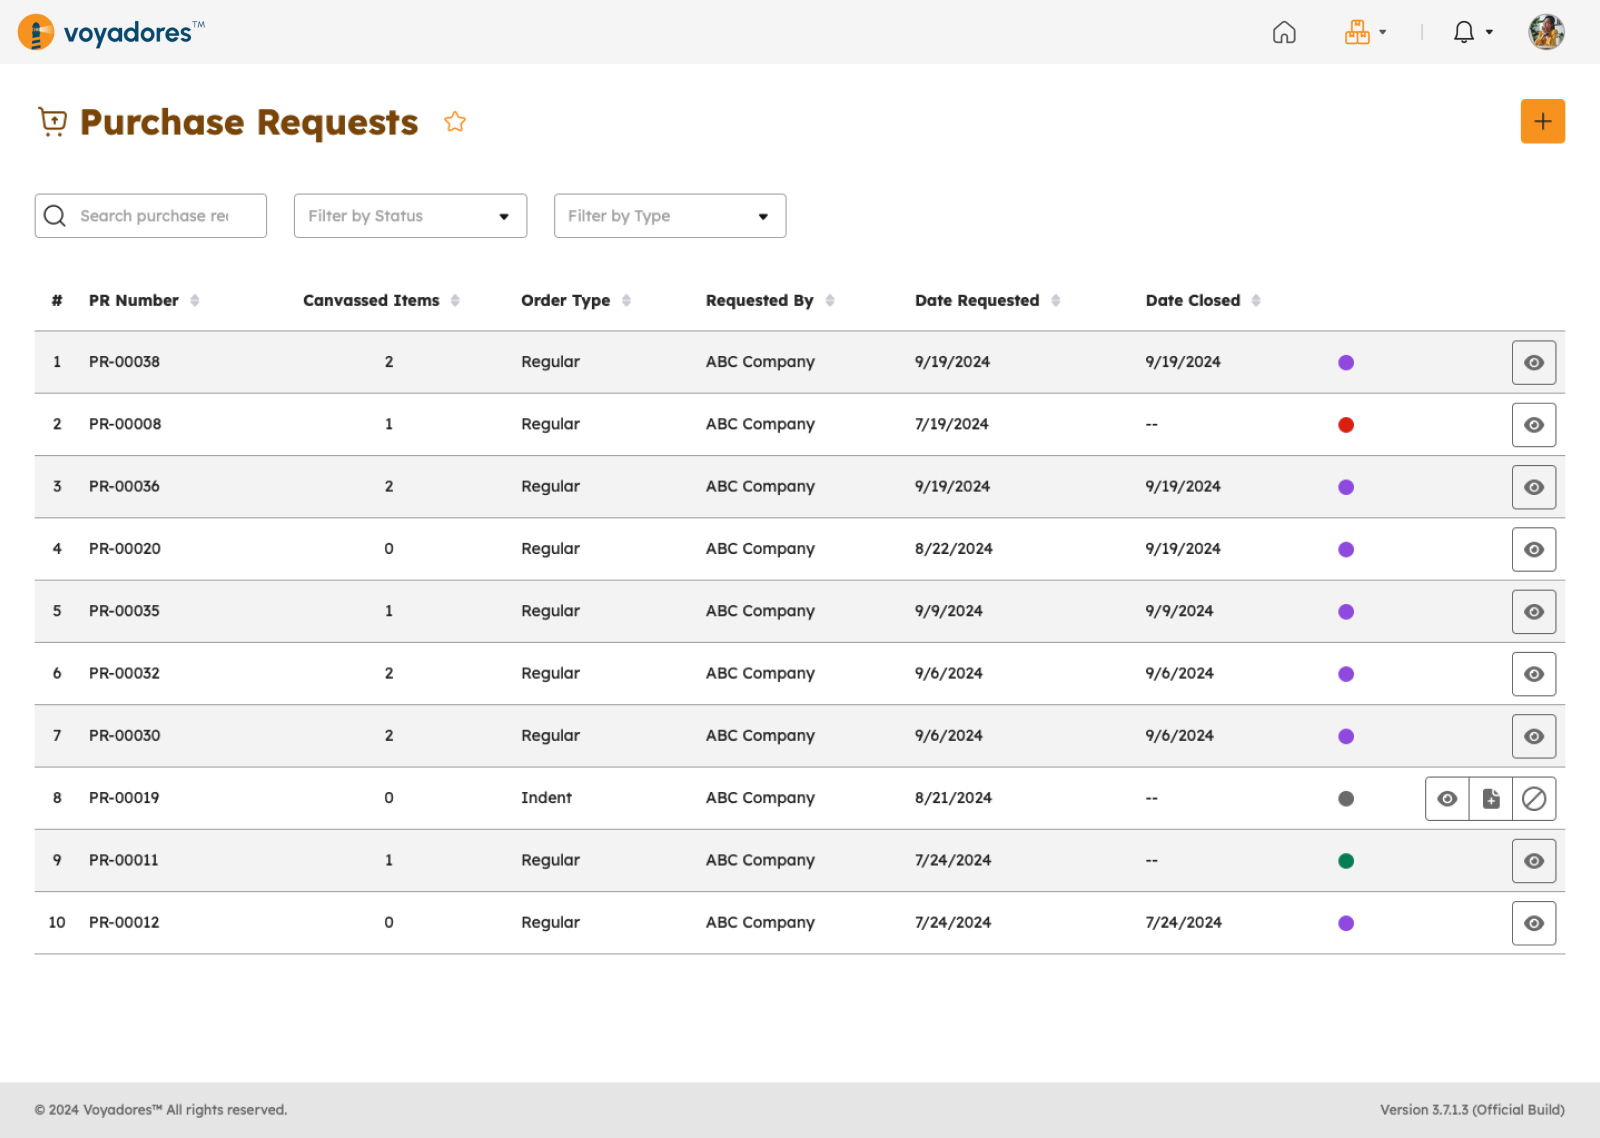
Purchase Requests Summary Table
The Purchase Request Summary Table displays the following columns:
- Item number "#"
- PR Number
- Canvassed Items
- Order Type
- Requested By
- Date Requested
- Date Closed
-
Actions
- Create PR
- View PR
- Close PR
- Create Canvass for PR
Searching Purchase Request
-
Key in the PR number of the Purchase Request in the Search Bar to look for a particular Purchase Request.
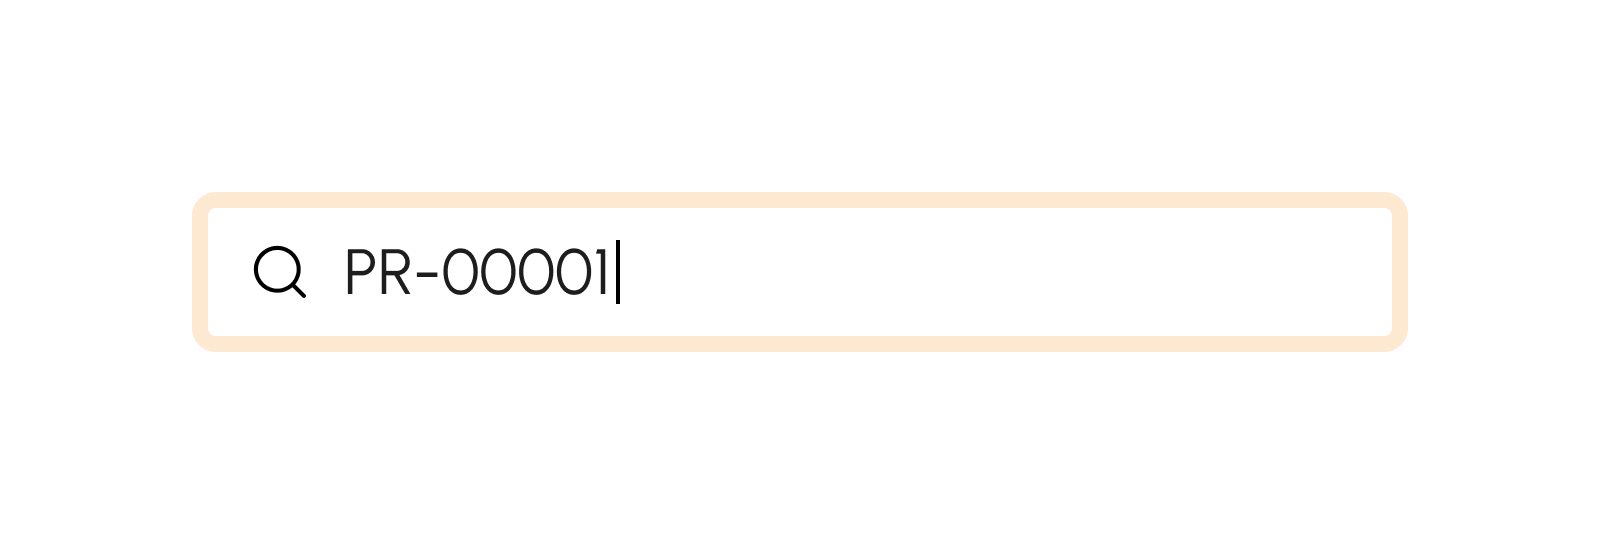
- The Purchase Request Summary Table will display the searched PR number.
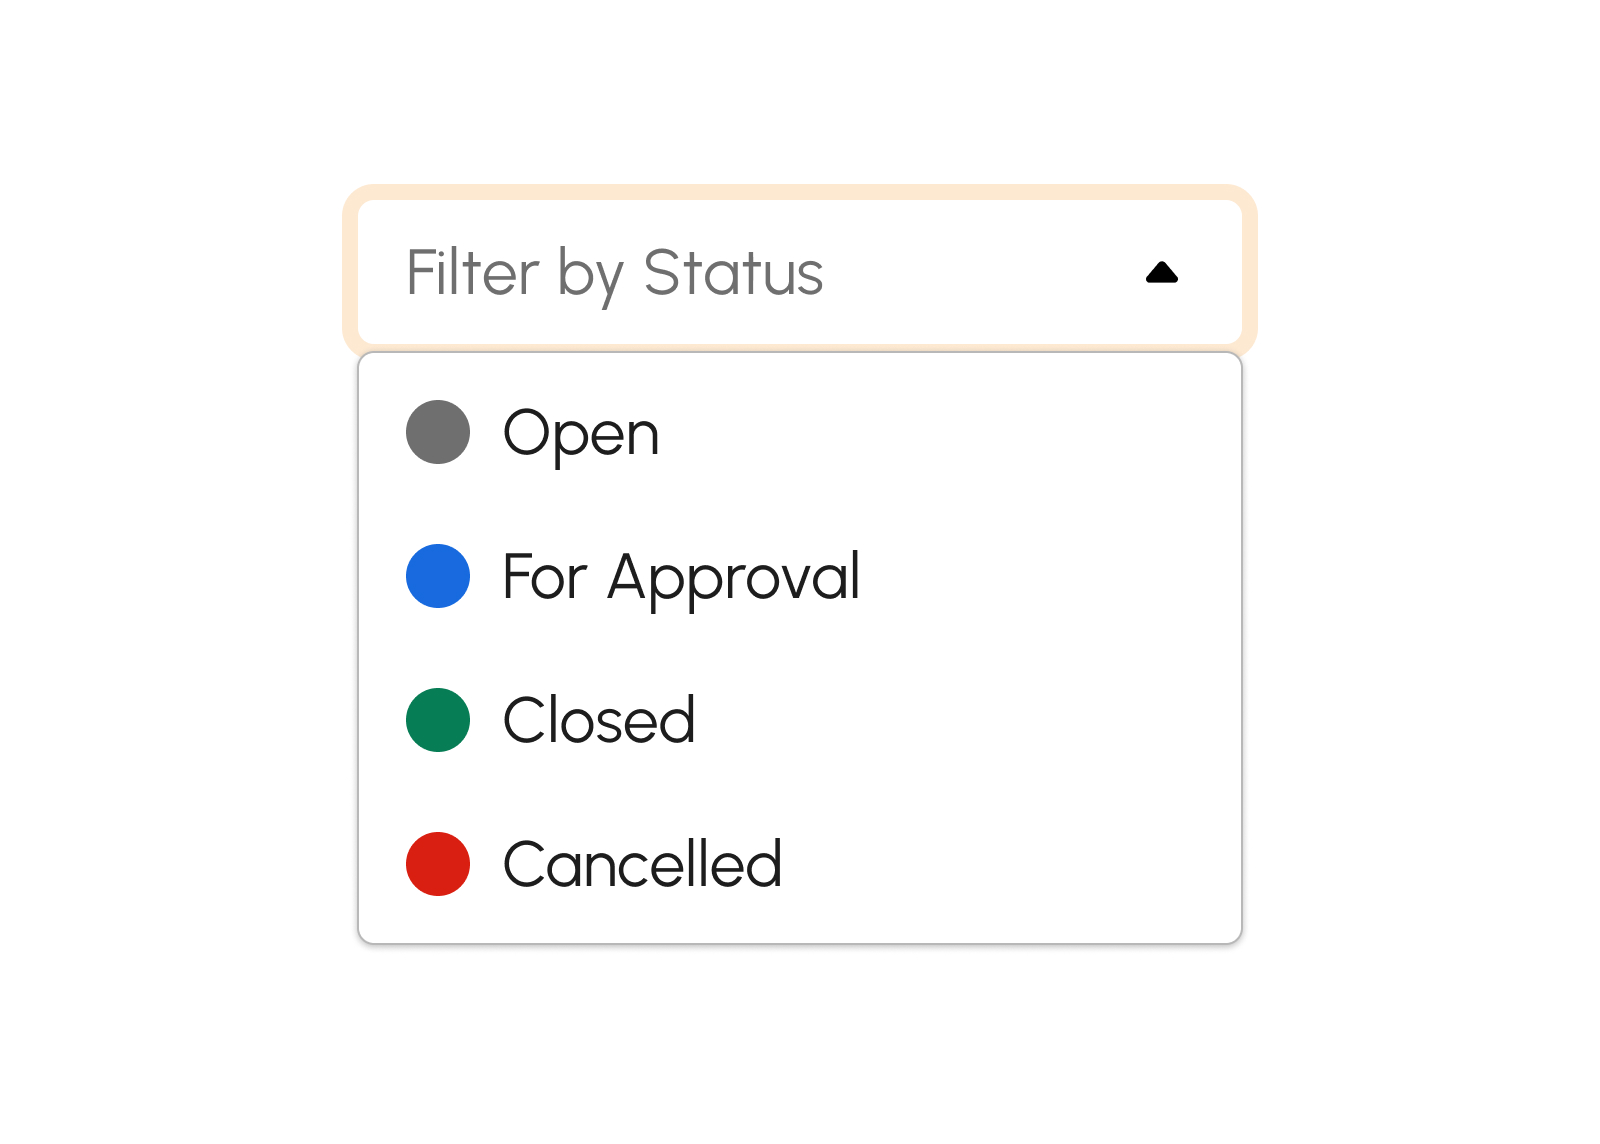
How to Filter Purchase Request by Status
Click the filter by status drop-down to display and select the desired status.
There are several statuses as follows:
- Open. This status shows the open Purchase Request. Click the filter by status drop-down and select "Open".
- For Approval. This status shows the for approval Purchase Request. Click the filter by status drop-down and select "For Approval".
- Closed. This status shows the closed Purchase Request. Click the filter by status drop-down and select "Closed".
- Cancelled. This status shows the cancelled Purchase Request. Click the filter by status drop-down and select "Cancelled".
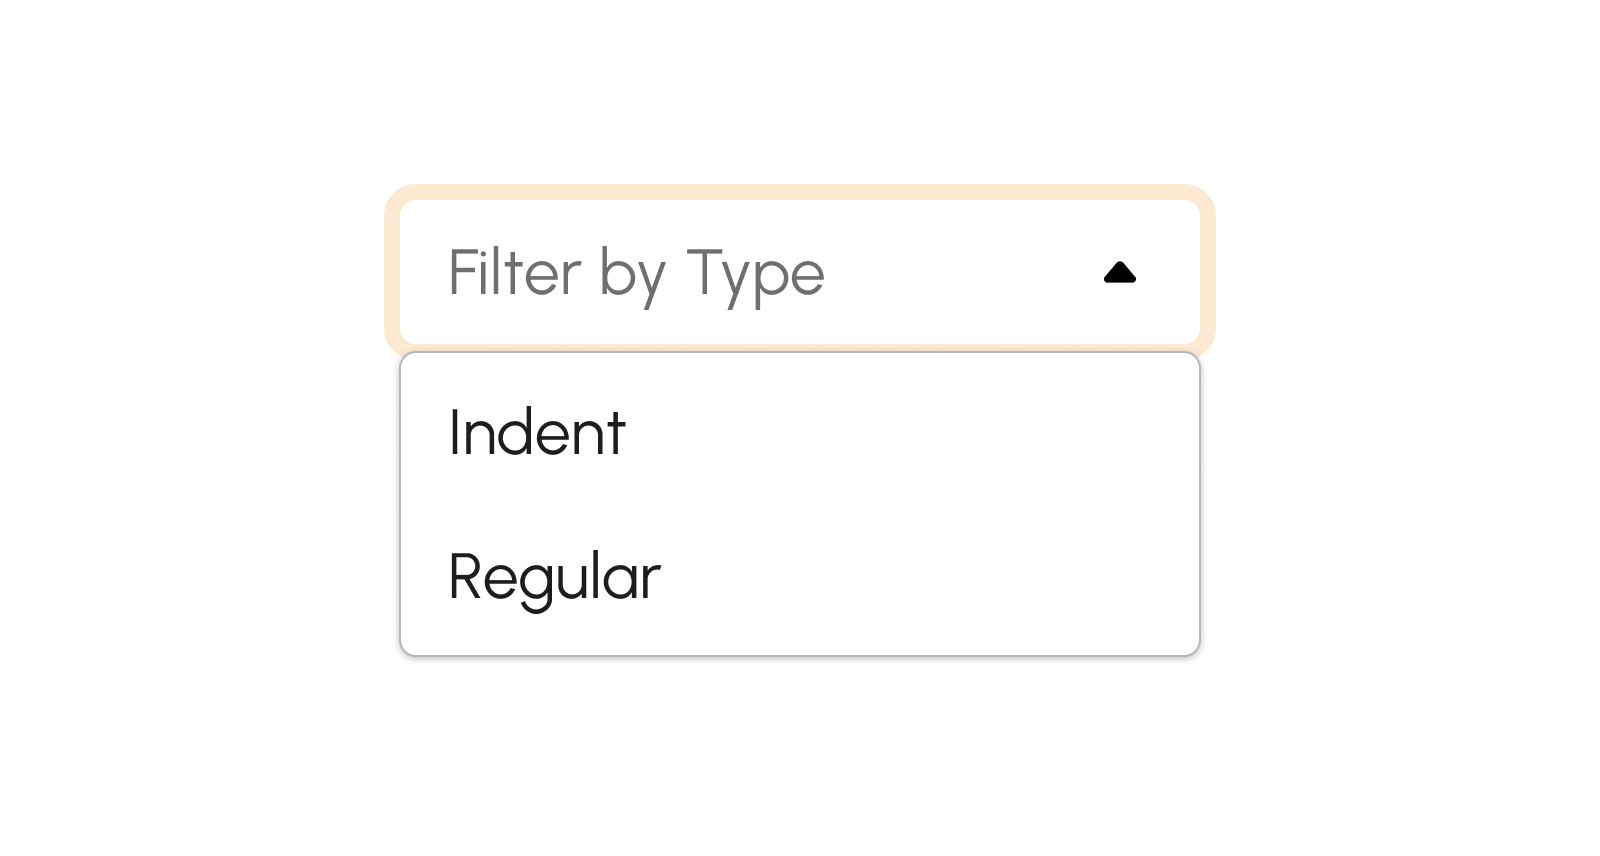
How to Filter Purchase Request by Type
Click the filter by type dropdown to display and select the desired type.
There are several type, as follows:
- Indent. This status shows the indent Purchase Request. Click the filter by status drop-down and select "Indent".
- Regular. This status shows the regular Purchase Request. Click the filter by status drop-down and select "Regular".
Creating Purchase Request
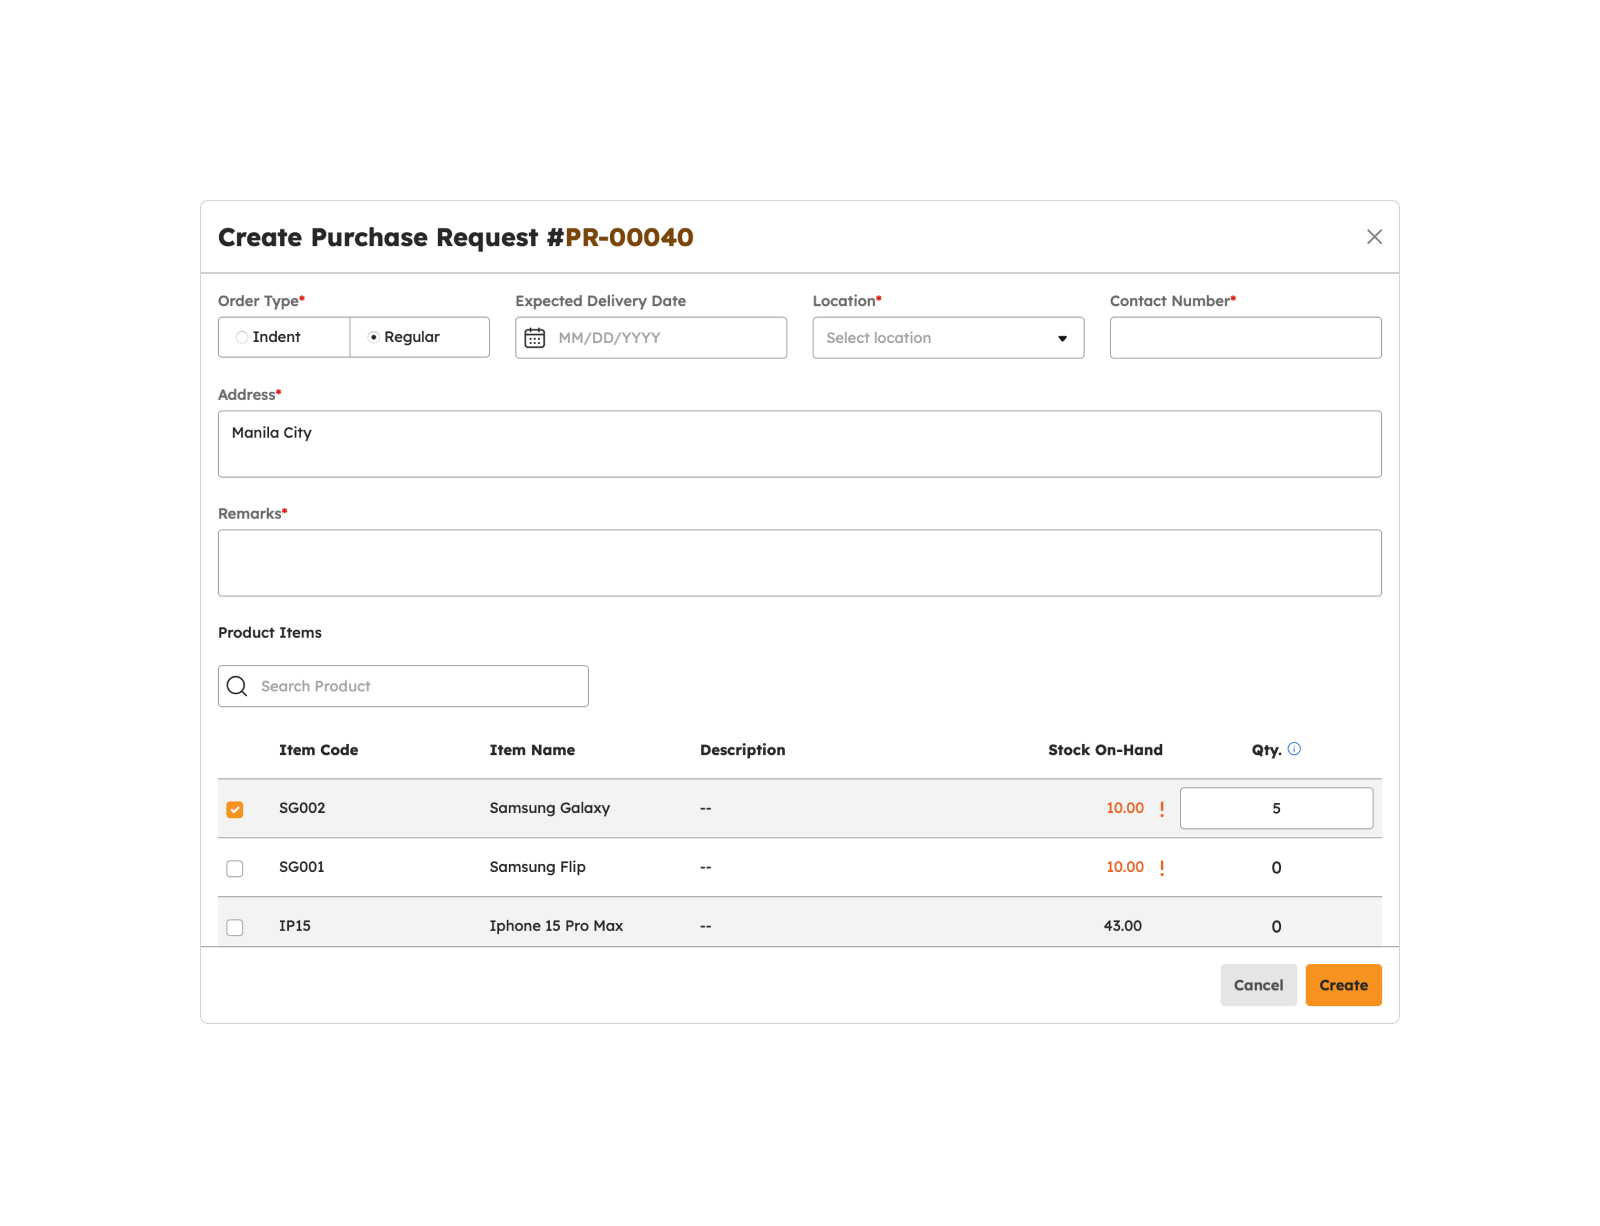
To begin creating Purchase Request follow the procedure below:
-
Click Create button to create Purchase Request.
-
The screen displays a modal below to key in the required details in the following fields:
-
Order Type
- Indent
- Regular
- Expected Delivery Date
- Location
- Contact Number
- Address
- Remarks
- Products
Note
Fields with (*) are required.
-
Order Type
- Click Create button to create the Purchase Request successfully.
-
A successful notification message will show:
Purchase Request successfully created
- A created purchase request will be added to the list of Purchase Requests in the Summary Table.
- The purchase request can be viewed and closed by simply clicking the corresponding button.
To cancel the creation of Purchase Request, follow the procedures below:
- Click Cancel button to cancel the creation of Purchase Request.
- The screen closes the modal.
- The system will not proceed with creating and saving a Purchase Request.
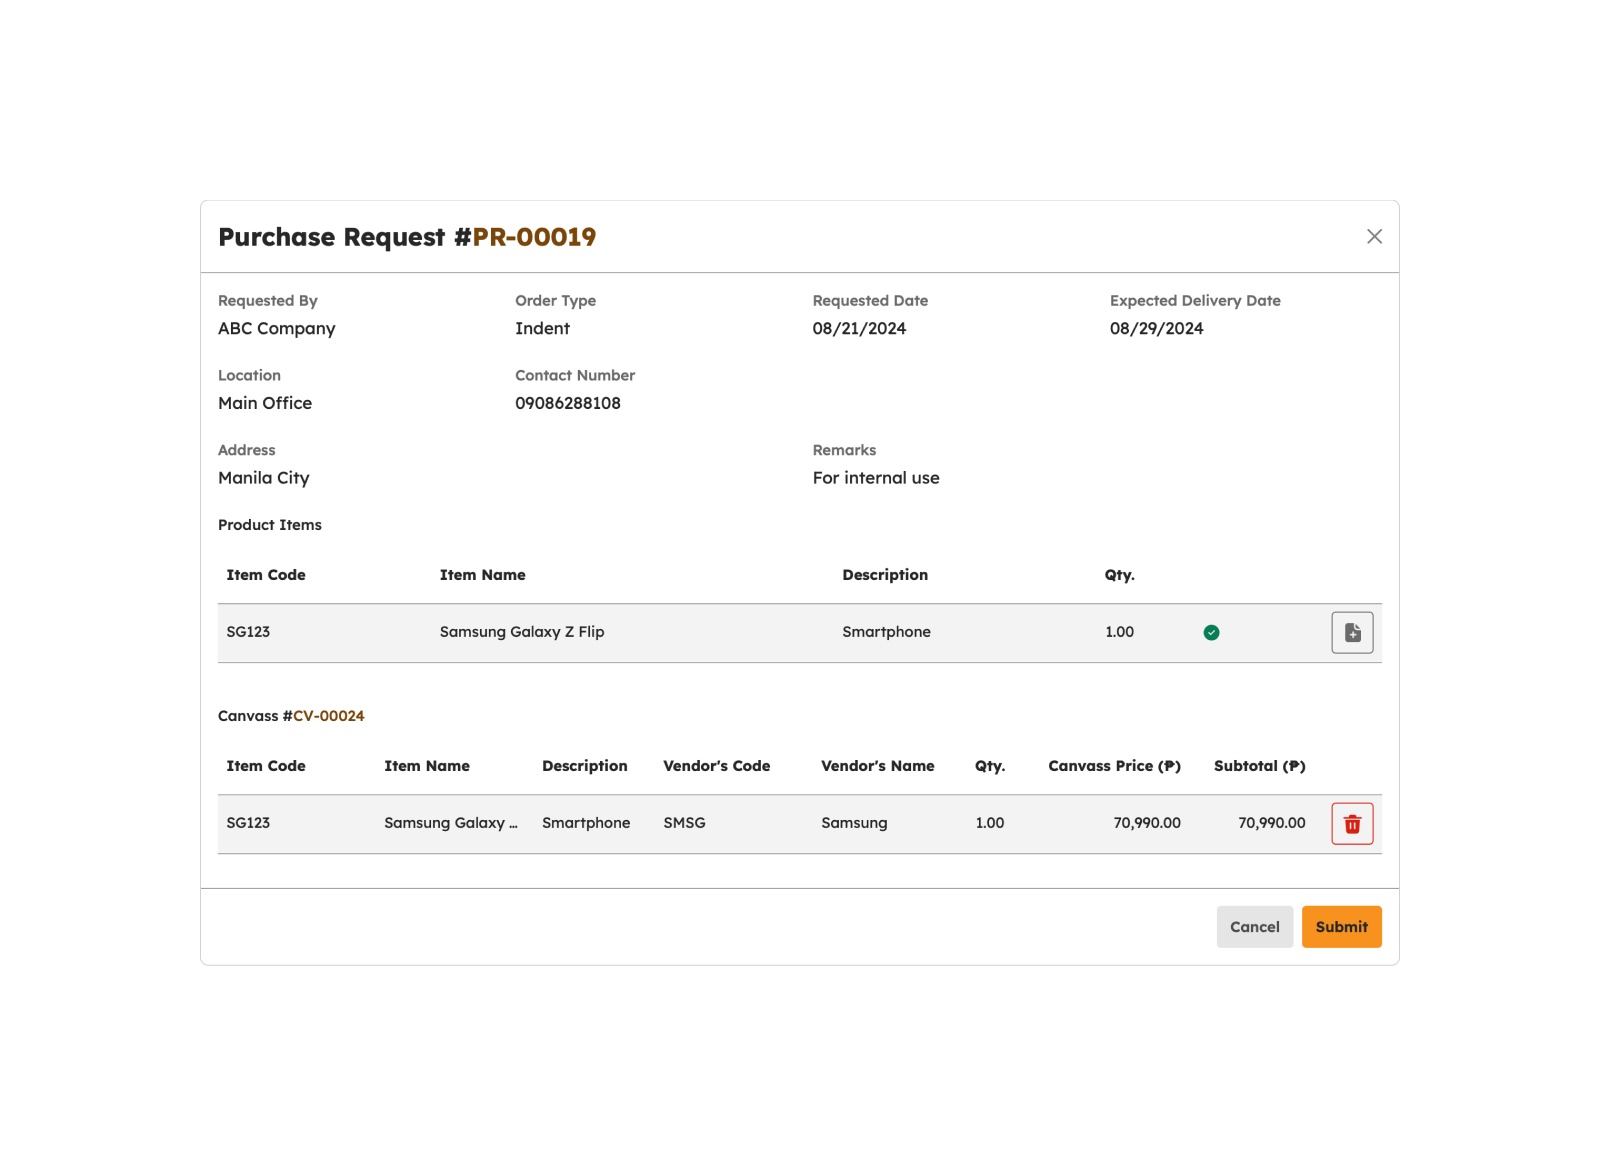
Creating Canvass for Purchase Request
To begin creating Canvass for Purchase Request follow the procedure below:
-
Click Create Canvass button to create a canvass for Purchase Request.
-
The screen displays a modal below to start the canvassing process:
-
Click Create Canvass Item button to create the canvass item for purchase request.
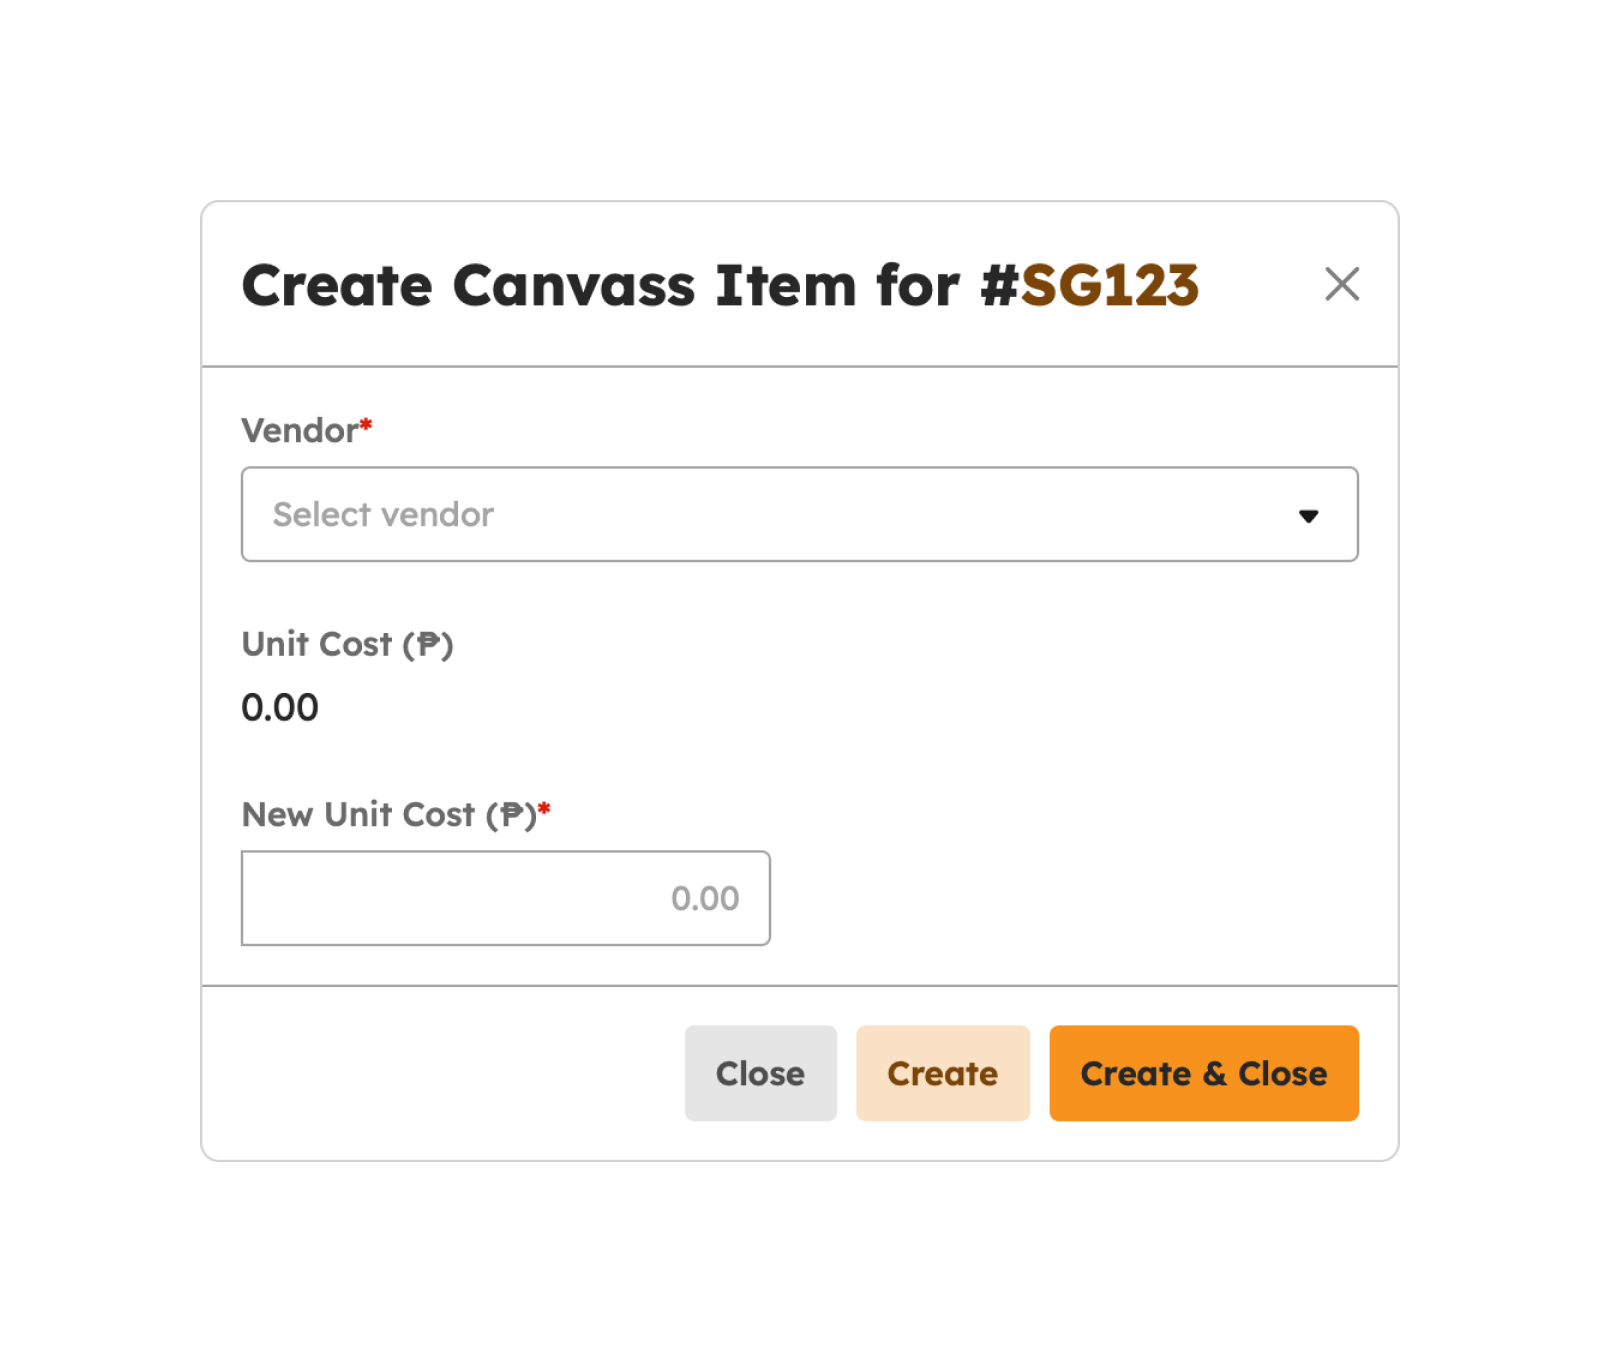
-
The screen displays a modal below to key in the required details in the following fields:
- Vendor
- New Unit Cost
Note
Fields with (*) are required.
- Click the Create or Create & Close button to create canvass item for purchase request successfully. Users can create canvassing entries from different vendors.
-
A successful notification message will show:
Product Item successfully added
-
Click Create Canvass Item button to create the canvass item for purchase request.
- Created canvass will be added to the list of Canvass in the Summary Table.
- Click the Submit button to submit the Canvass for Purchase Request successfully.
To cancel the creation of Canvass for Purchase Request, follow the procedures below:
- Click the Cancel button to cancel the creation of Canvass for Purchase Request.
- The screen closes the modal.
- The system will not proceed with creating and saving a Canvass for Purchase Request.
Canvassing
Introduction to Canvassing
This page facilitates the management of the canvassing process within the company. Its key functions include viewing and managing canvasses from different vendors, as well as approving and updating the ordered quantity of each canvass.
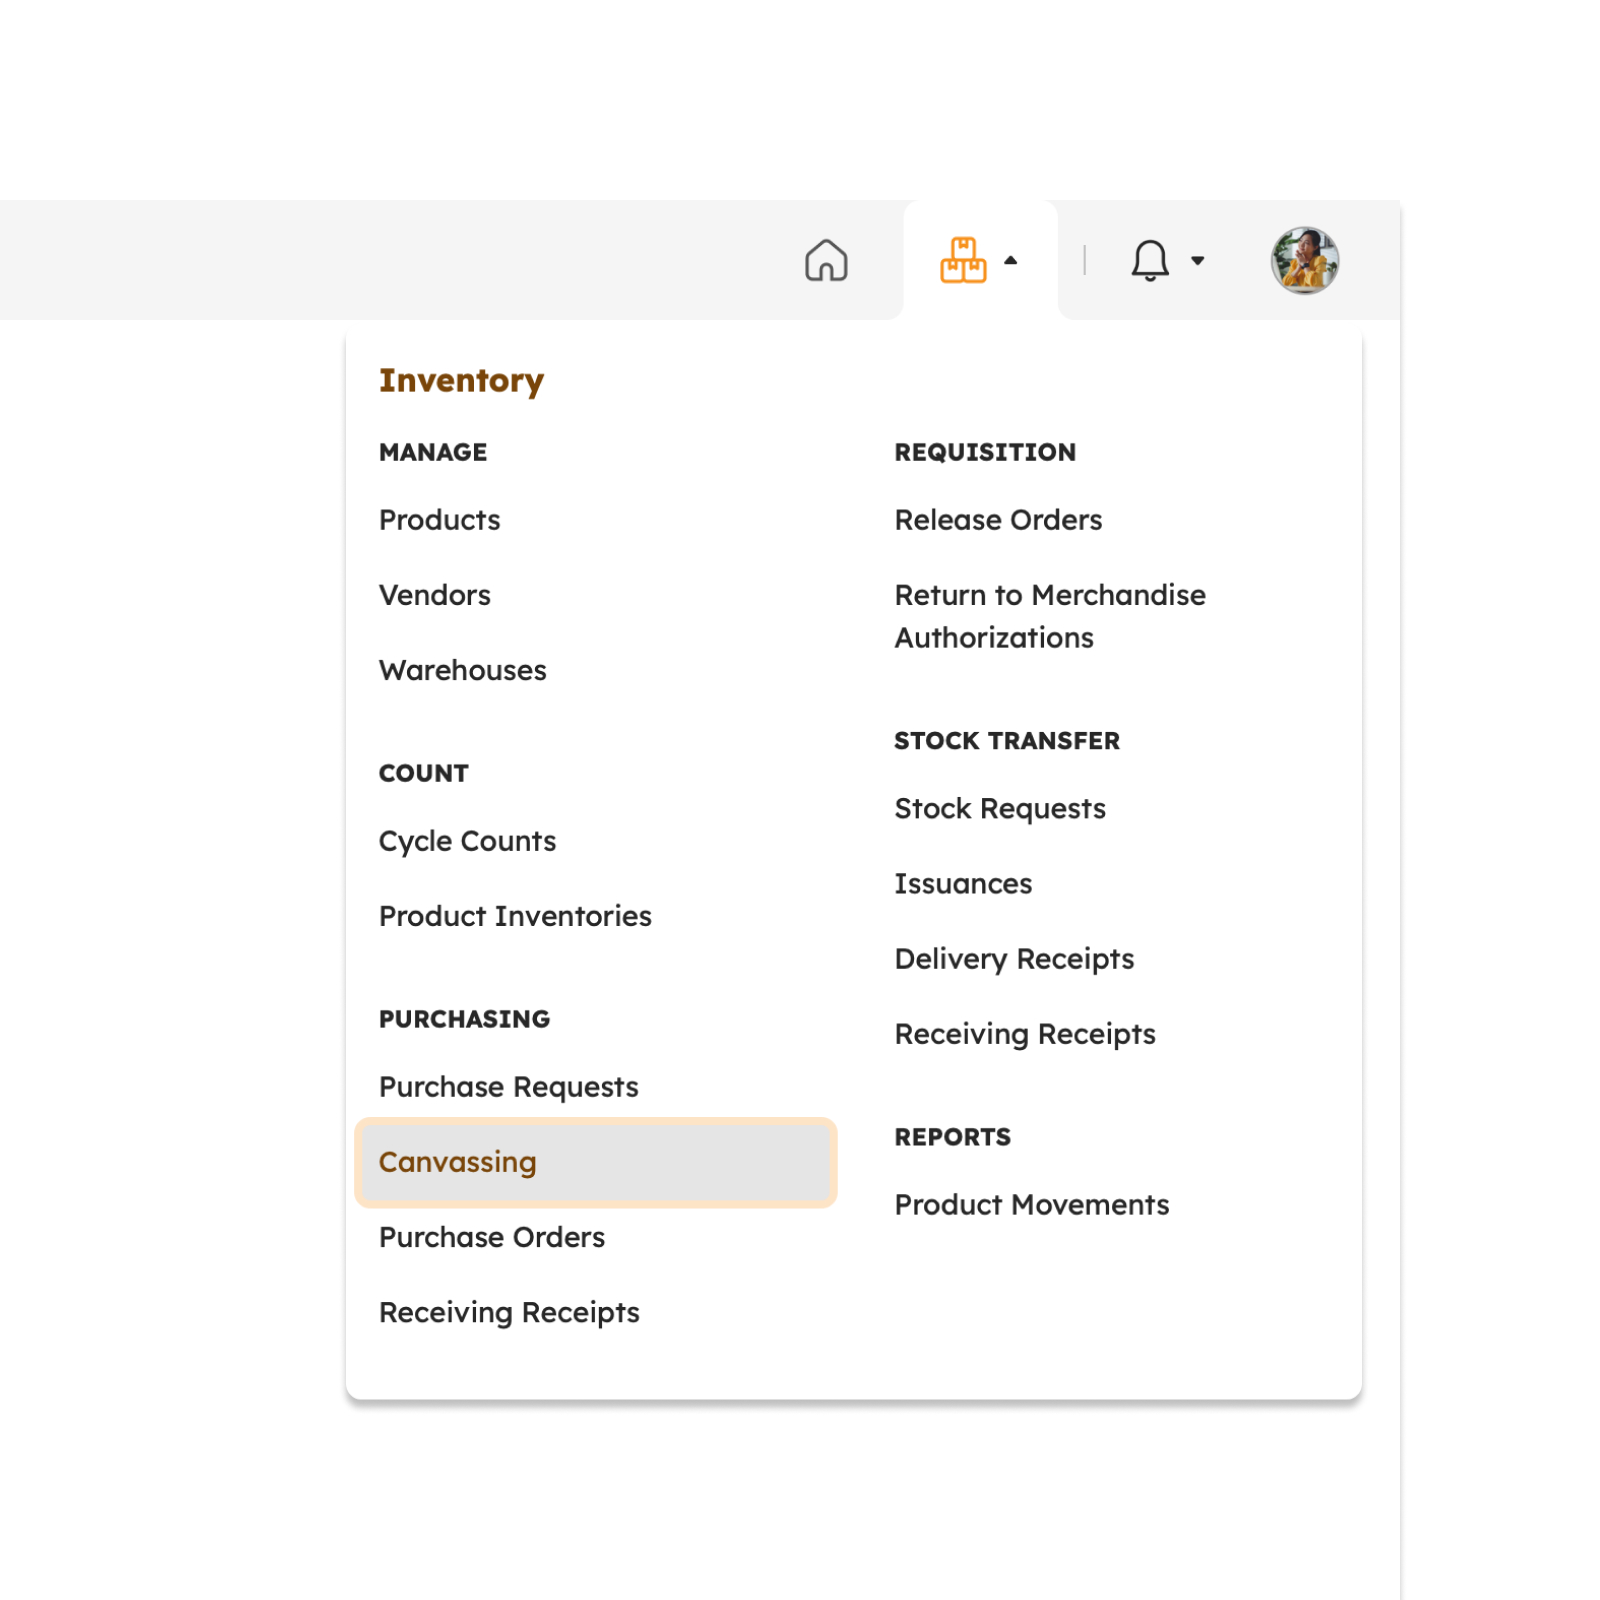
To access this page, navigate to the Inventory Module and click "Canvassing" under Purchasing Submodule, as shown in the image below:
The screen will redirect to the Canvassing page, showing several features to use that will be discussed in the next section.
Features in Canvassing Page
The image below is the high-level view of Canvassing page along with its built-in features.
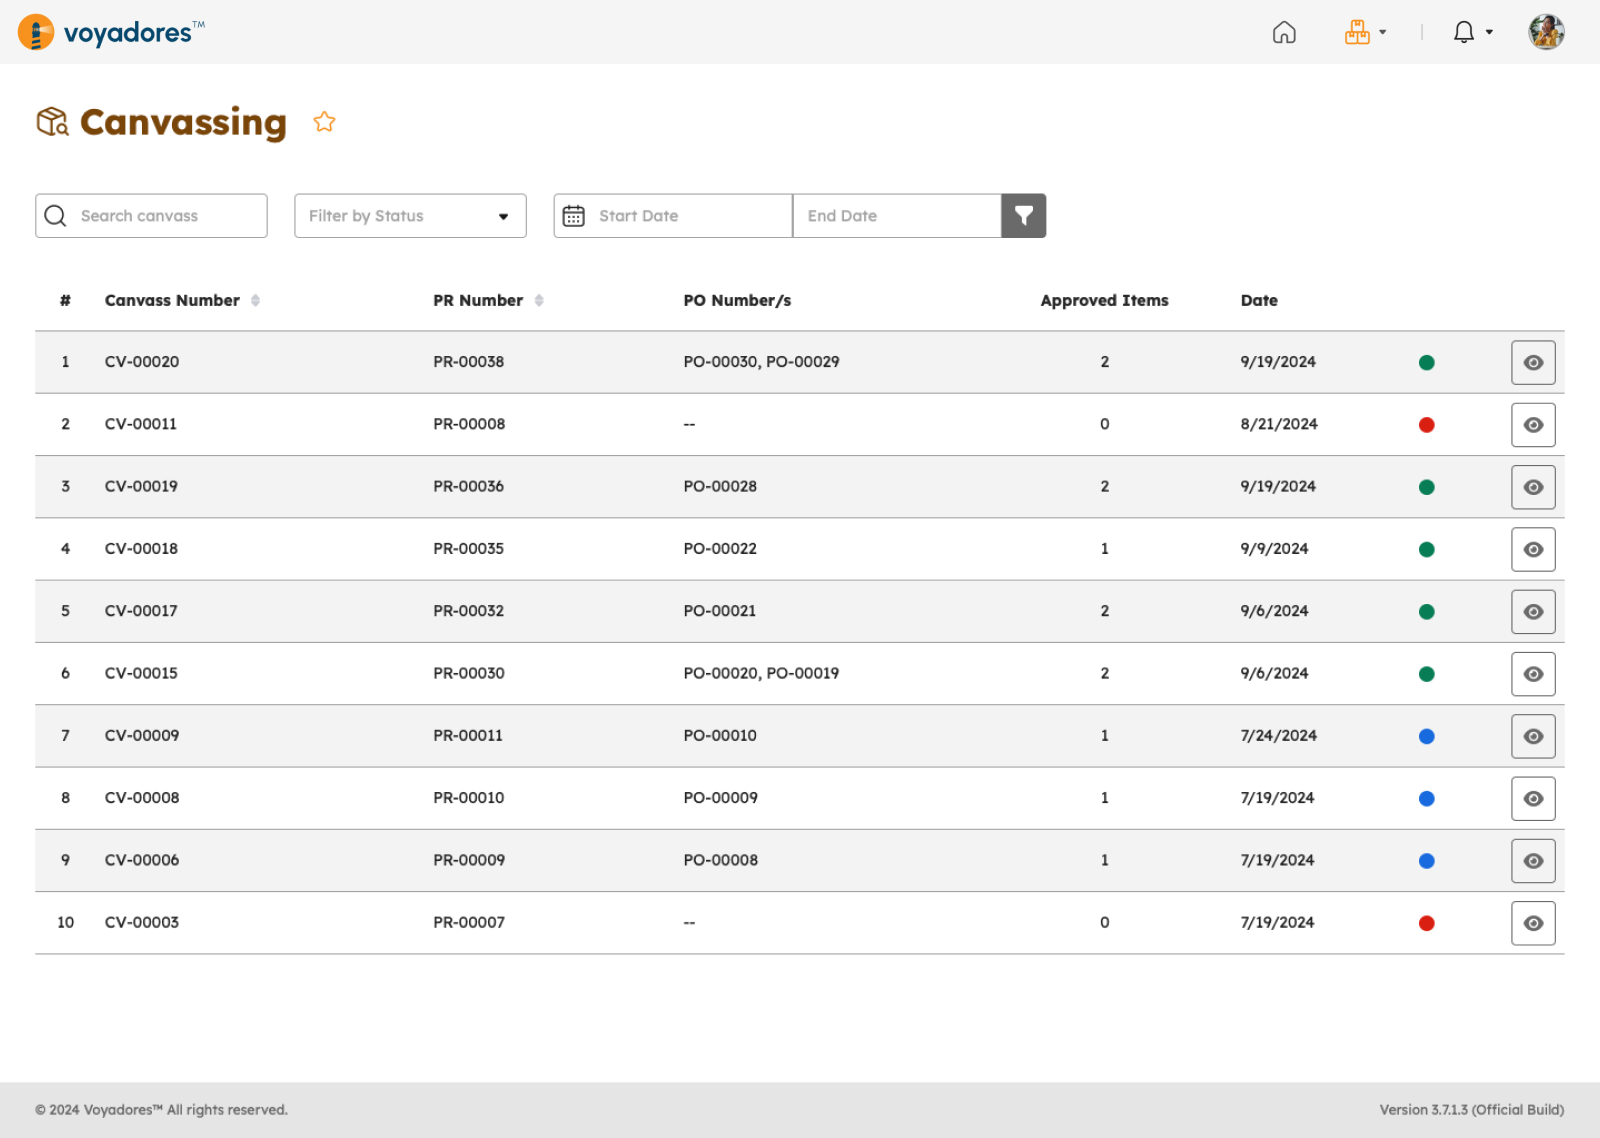
Canvassing Summary Table
The Canvassing Summary Table displays the following columns:
- Item number "#"
- Canvass Number
- PR Number
- PO Number/s
- Approved Items
- Date
-
Actions
- View Canvass
- Approve Canvass
Searching Canvass
- Key in the Canvass number in the Search Bar to look for a particular Canvass.
- The Canvassing Summary Table will display the searched Canvass number.

How to Filter Canvassing by Status
-
Click the filter by status drop-down to display and select the desired status.
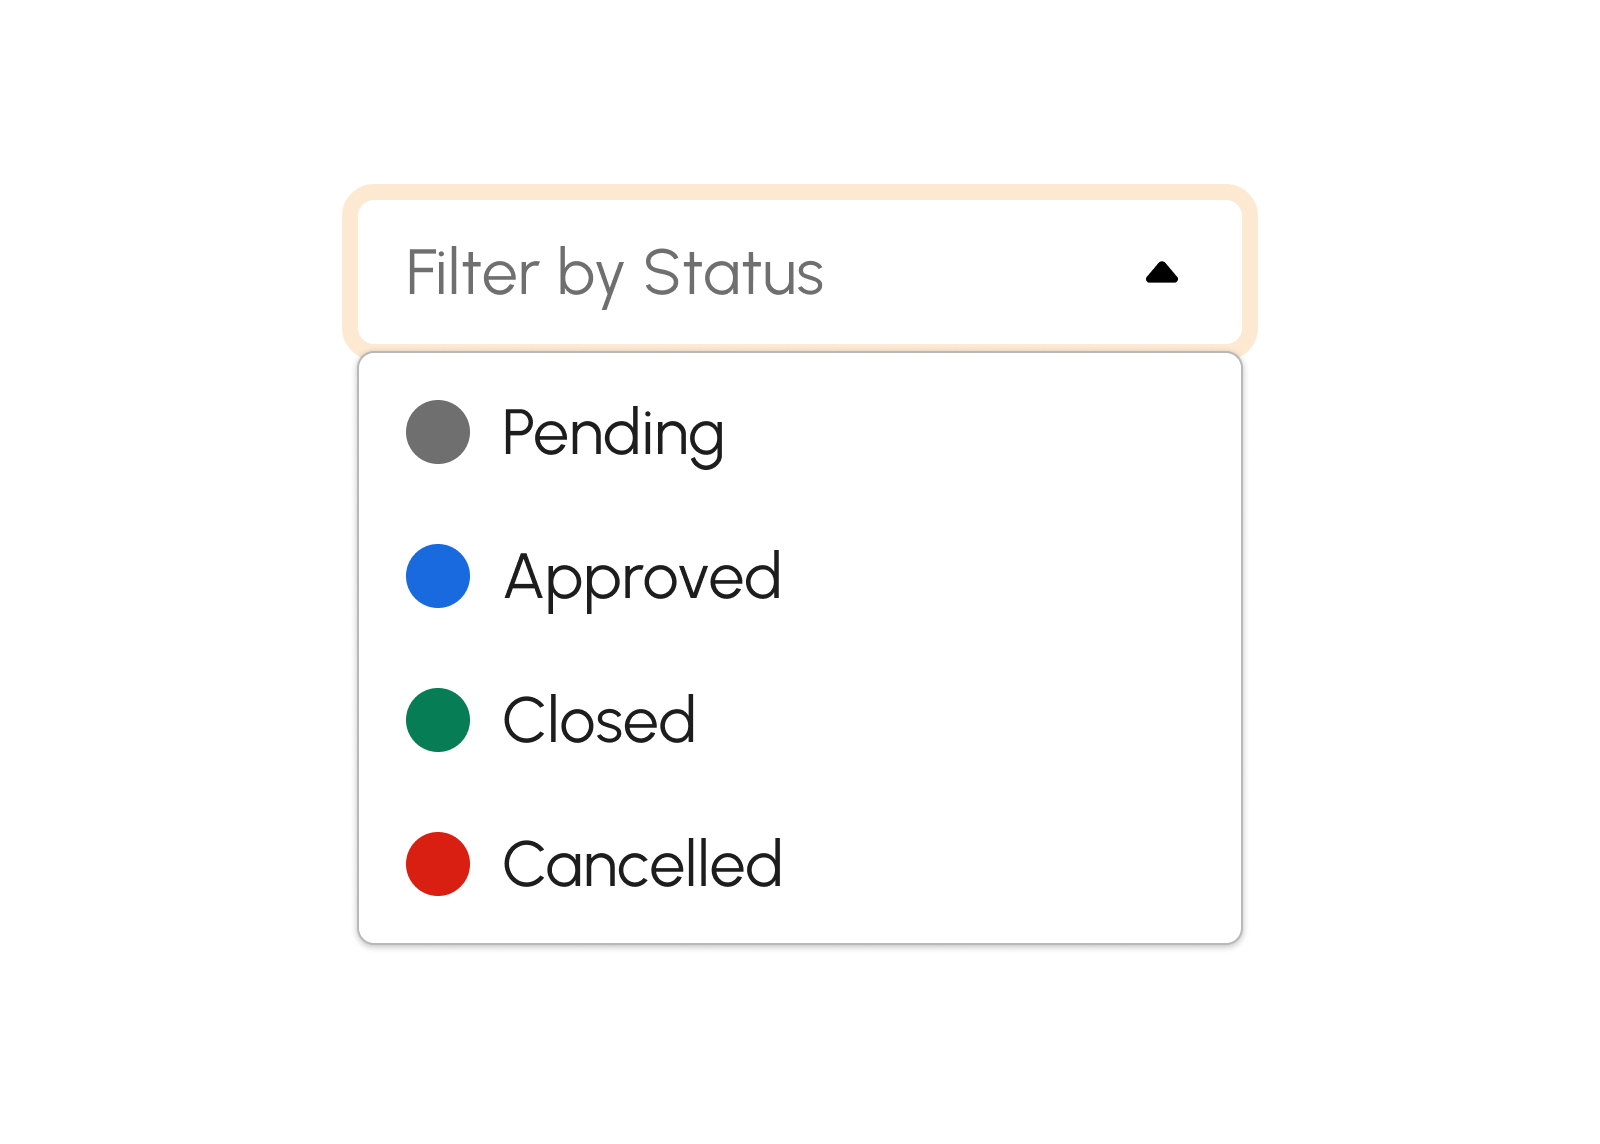
-
There are several statuses as follows:
- Pending. This status shows the pending canvass. Click the filter by status drop-down and select "Pending".
- Approved. This status shows the approved canvass. Click the filter by status drop-down and select "Approved".
- Closed. This status shows the closed canvass. Click the filter by status drop-down and select "Closed".
- Cancelled. This status shows the cancelled canvass. Click the filter by status drop-down and select "Cancelled".
How to Filter Canvassing by Date Range
Users can also filter searches by specifying a start date and end date.

Approving Canvass
- Click Approve Canvass button to approve the canvass.
-
The screen displays a modal below to review before approving the Approve Canvass.
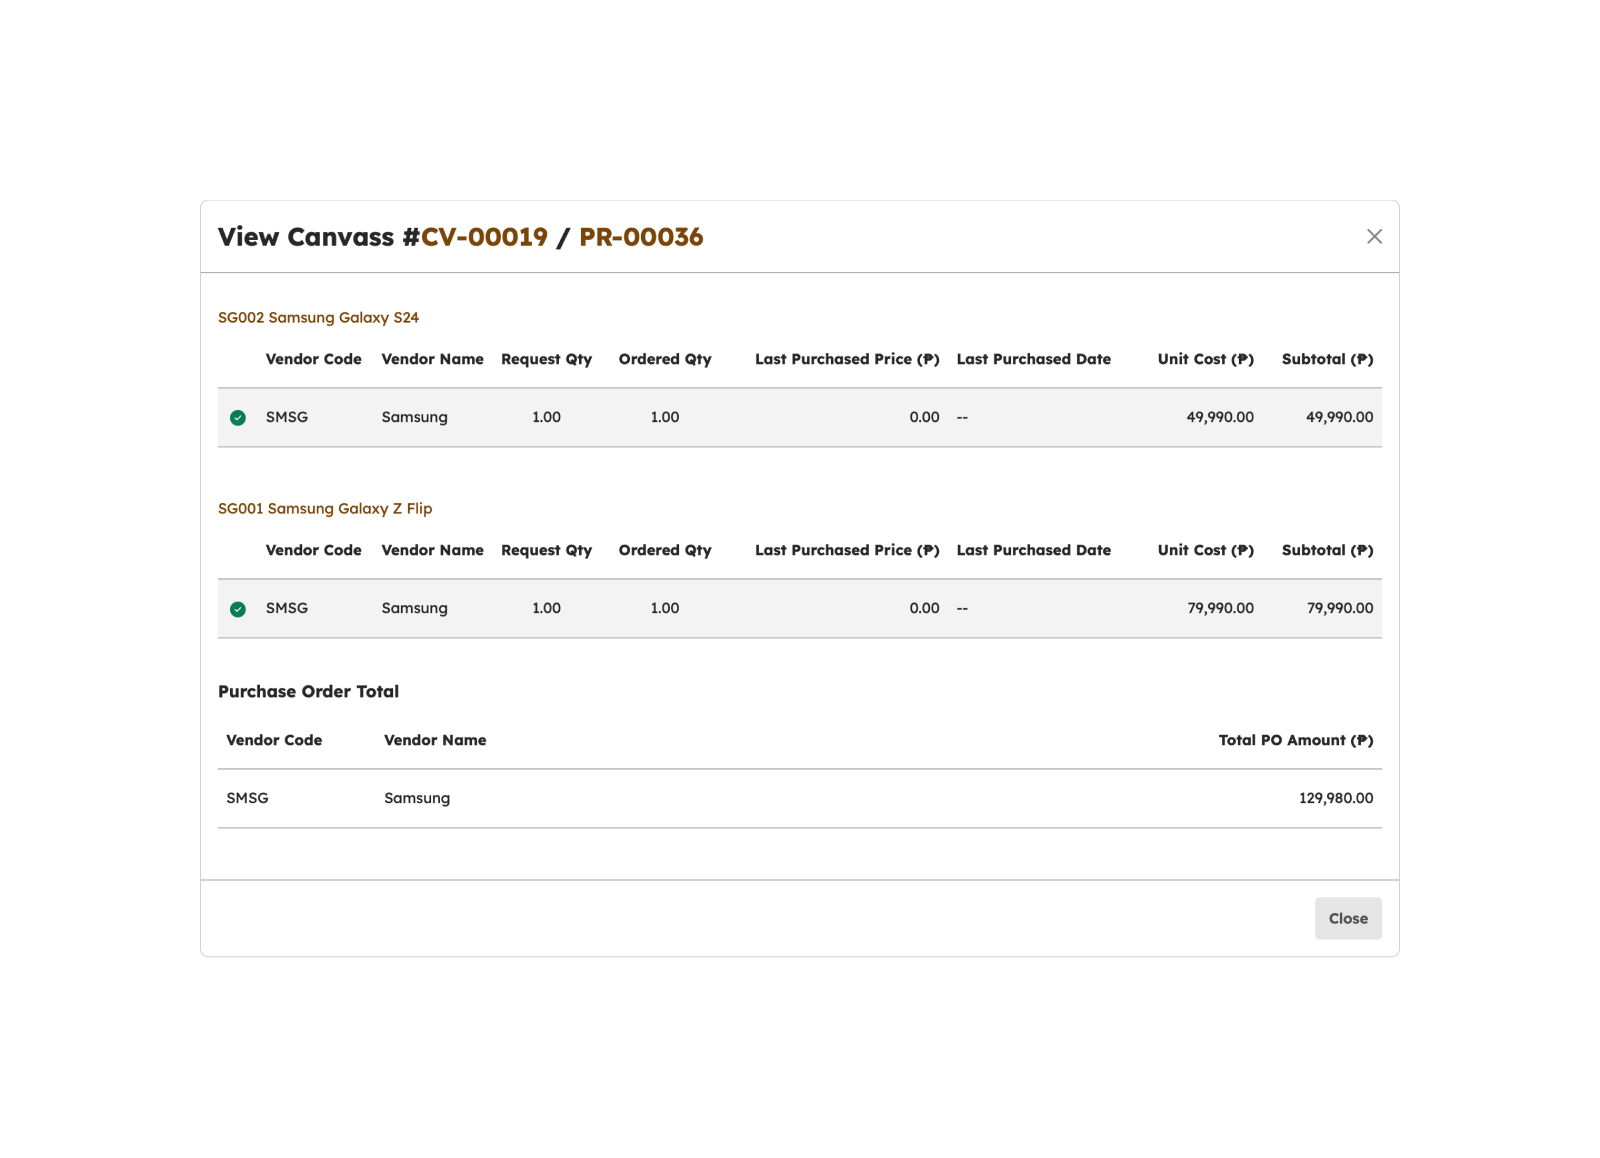
- The Approver can adjust the Ordered Quantity before approving the canvass.
- Click Approve button to approve the canvass successfully.
- Click Cancel button to cancel the canvass.
To close the Approve Canvass, follow the procedures below:
- Click Close button to close the Approved Canvass.
- The screen closes the modal.
- The system will not proceed with approving or cancelling a canvass.
Purchase Orders
Introduction to Purchase Orders
This page facilitates the management of purchase orders within the company. Its key functions include creating, viewing, and managing purchase orders, tracking order statuses, and updating order details as needed.
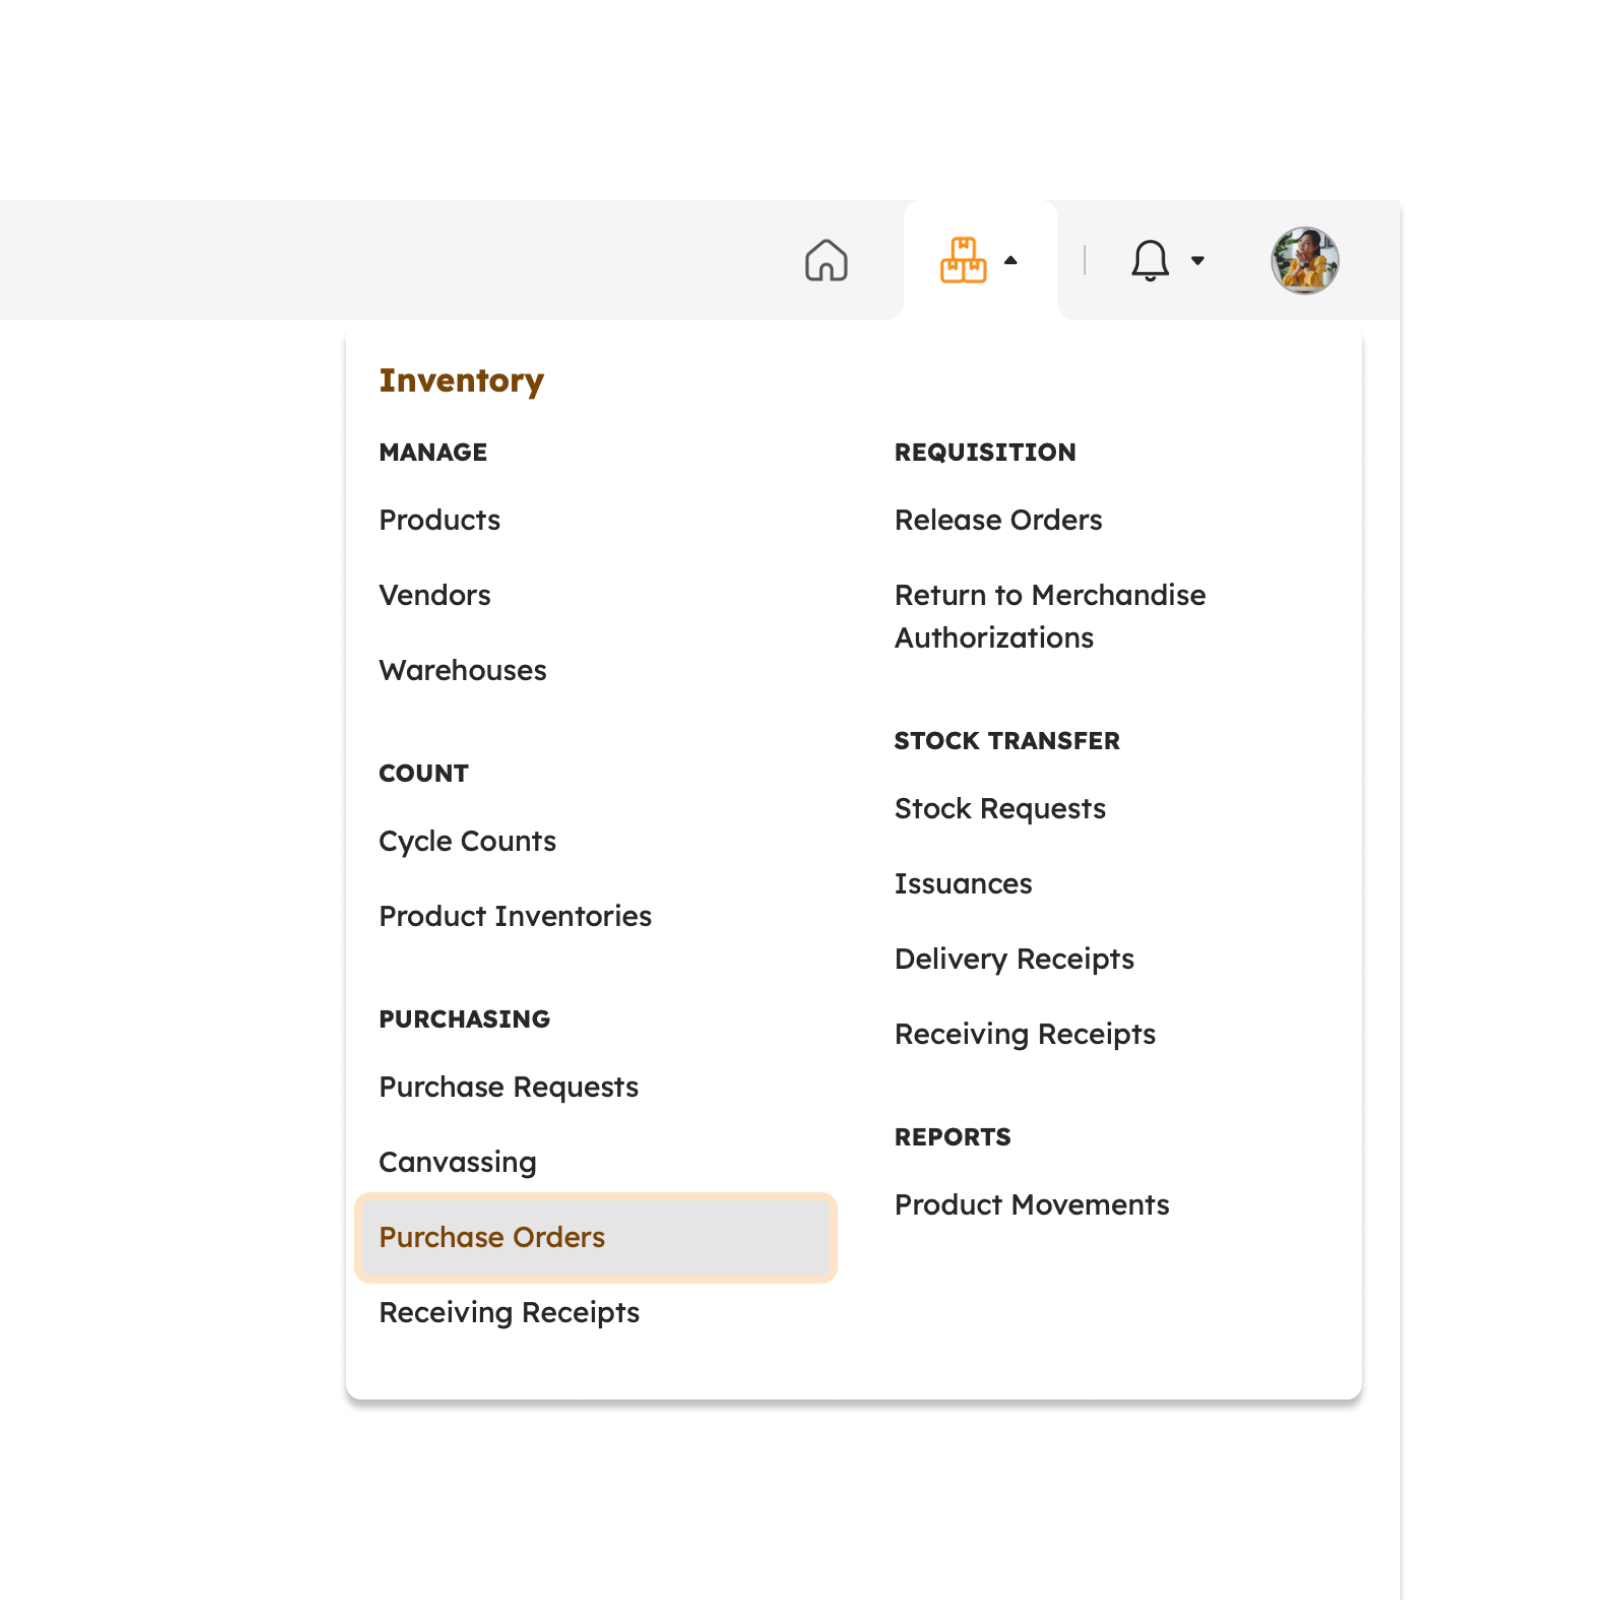
To access this page, navigate to the Inventory Module and click "Purchase Orders" under the Purchasing Submodule, as shown in the image below:
The screen will redirect to the Purchase Orders page, showing several features to use that will be discussed in the next section.
Features in Purchase Orders Page
The image below is the high-level view of the Purchase Orders page along with its built-in features.
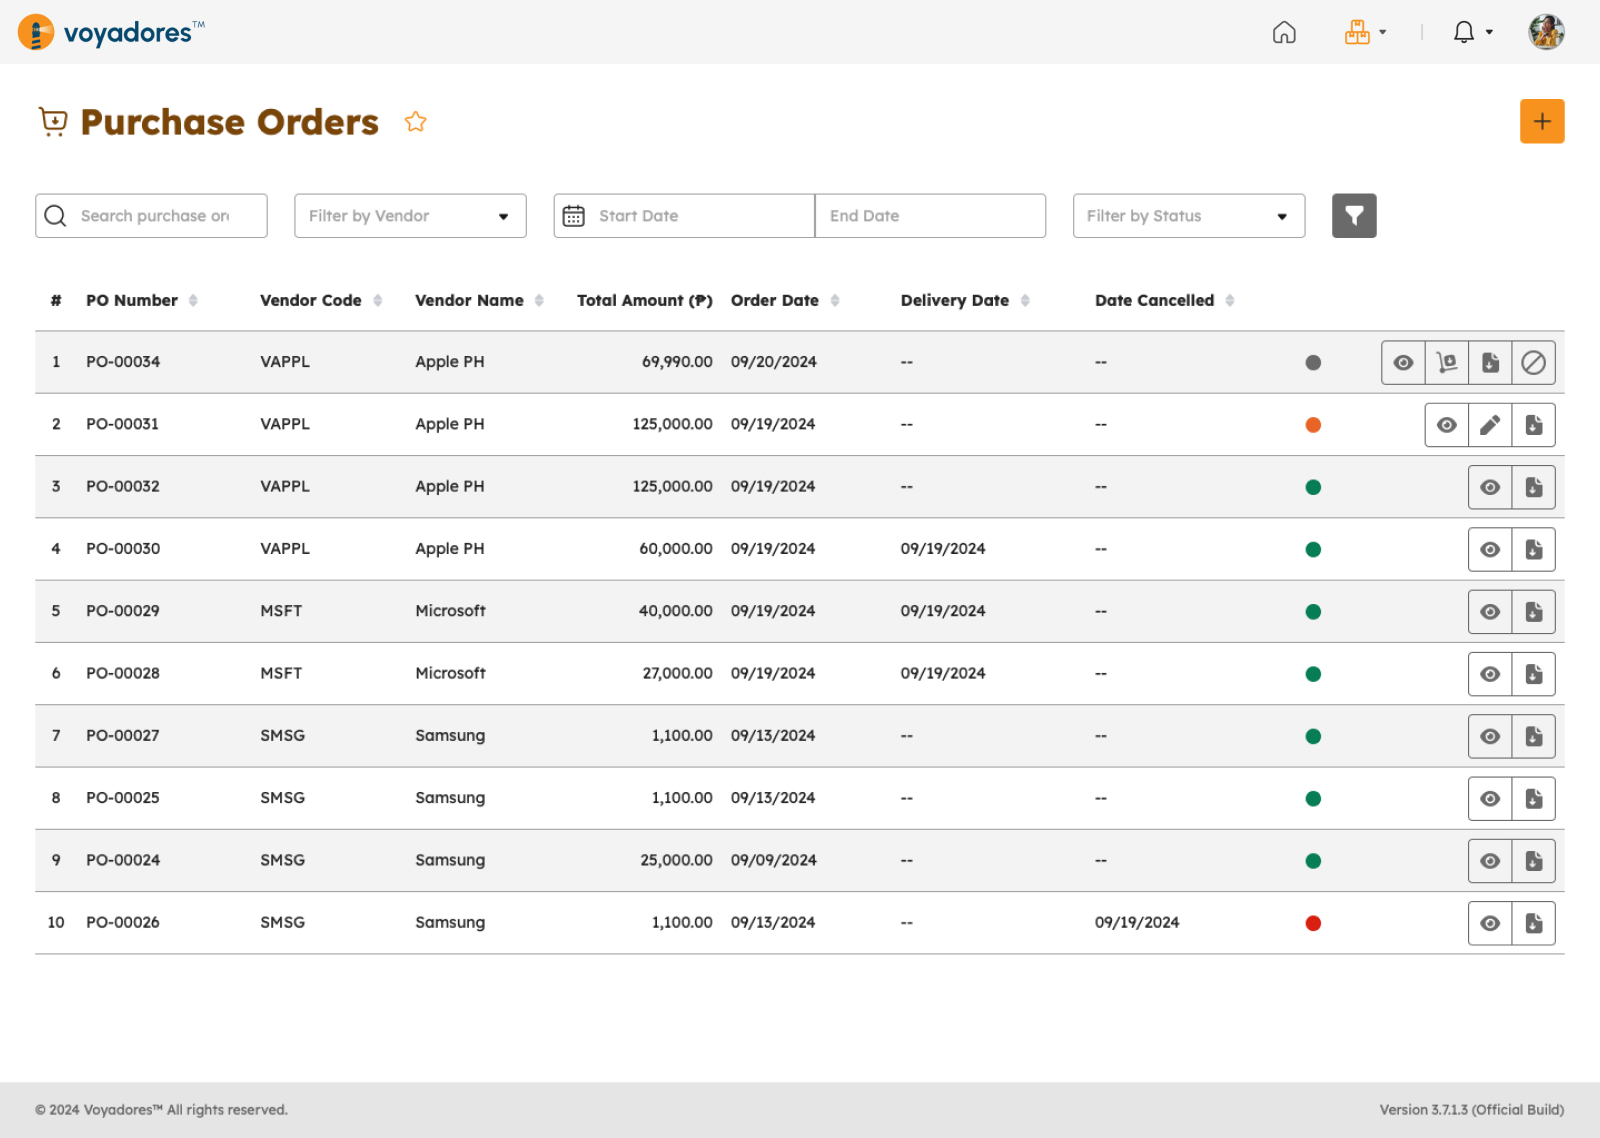
Purchase Orders Summary Table
The Purchase Orders Summary Table displays the following columns:
- Item number "#"
- PO Number
- Vendor Code
- Vendor Name
- Total Amount
- Order Date
- Delivery Date
- Date Cancelled
-
Actions
- Create PO
- Receive PO
- View PO
- PO PDF
- Cancel PO
Searching Purchase Orders
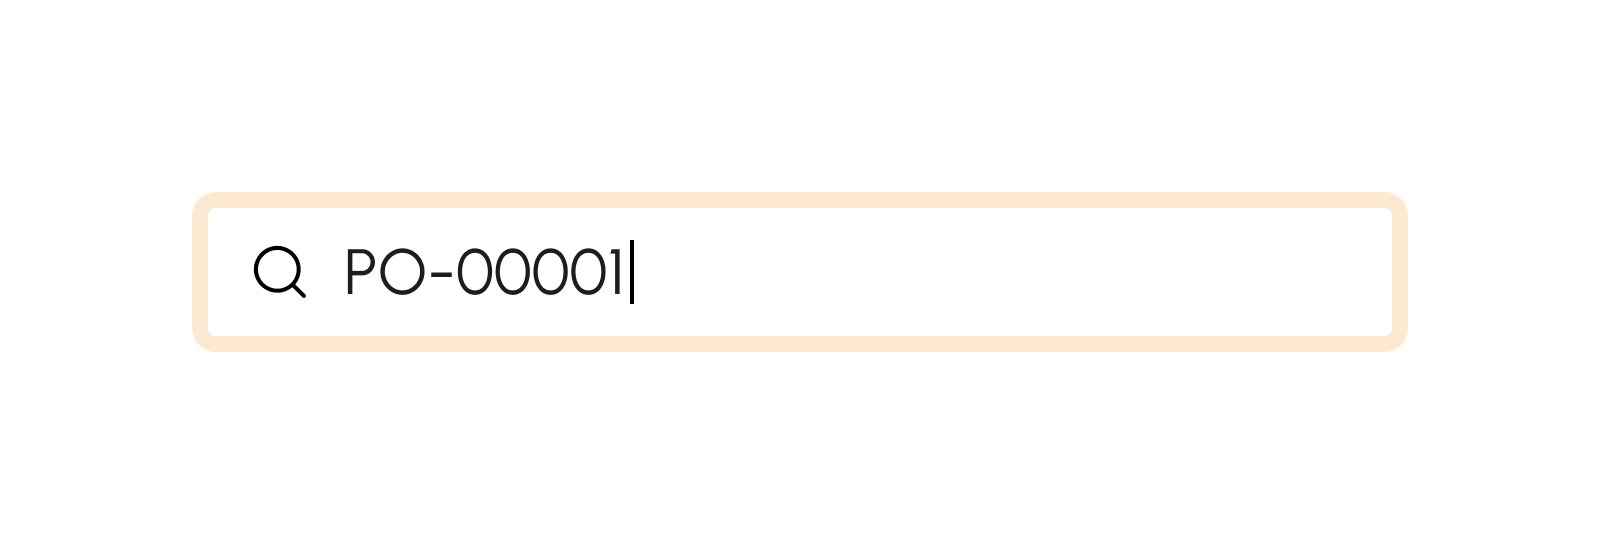
- Key in the purchase order number in the Search Bar to look for a particular PO.
- The Purchase Orders Summary Table will display the searched PO number.
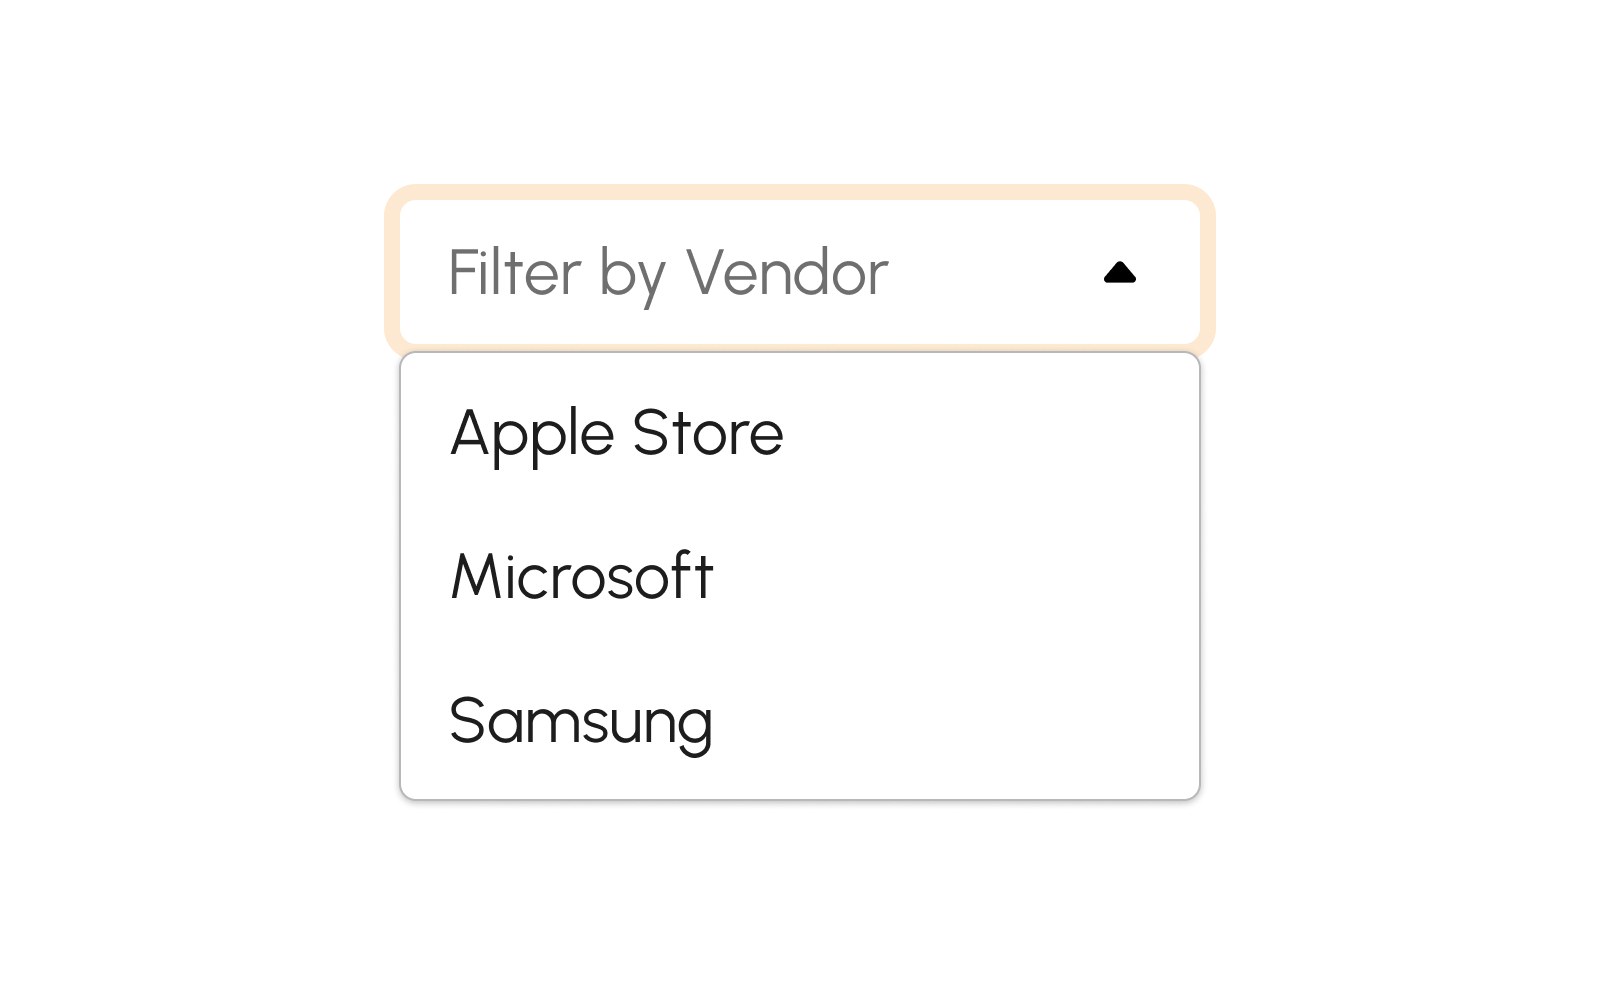
How to Filter Purchase Orders by Vendor
Click the filter by vendor dropdown to display and select the desired vendor.
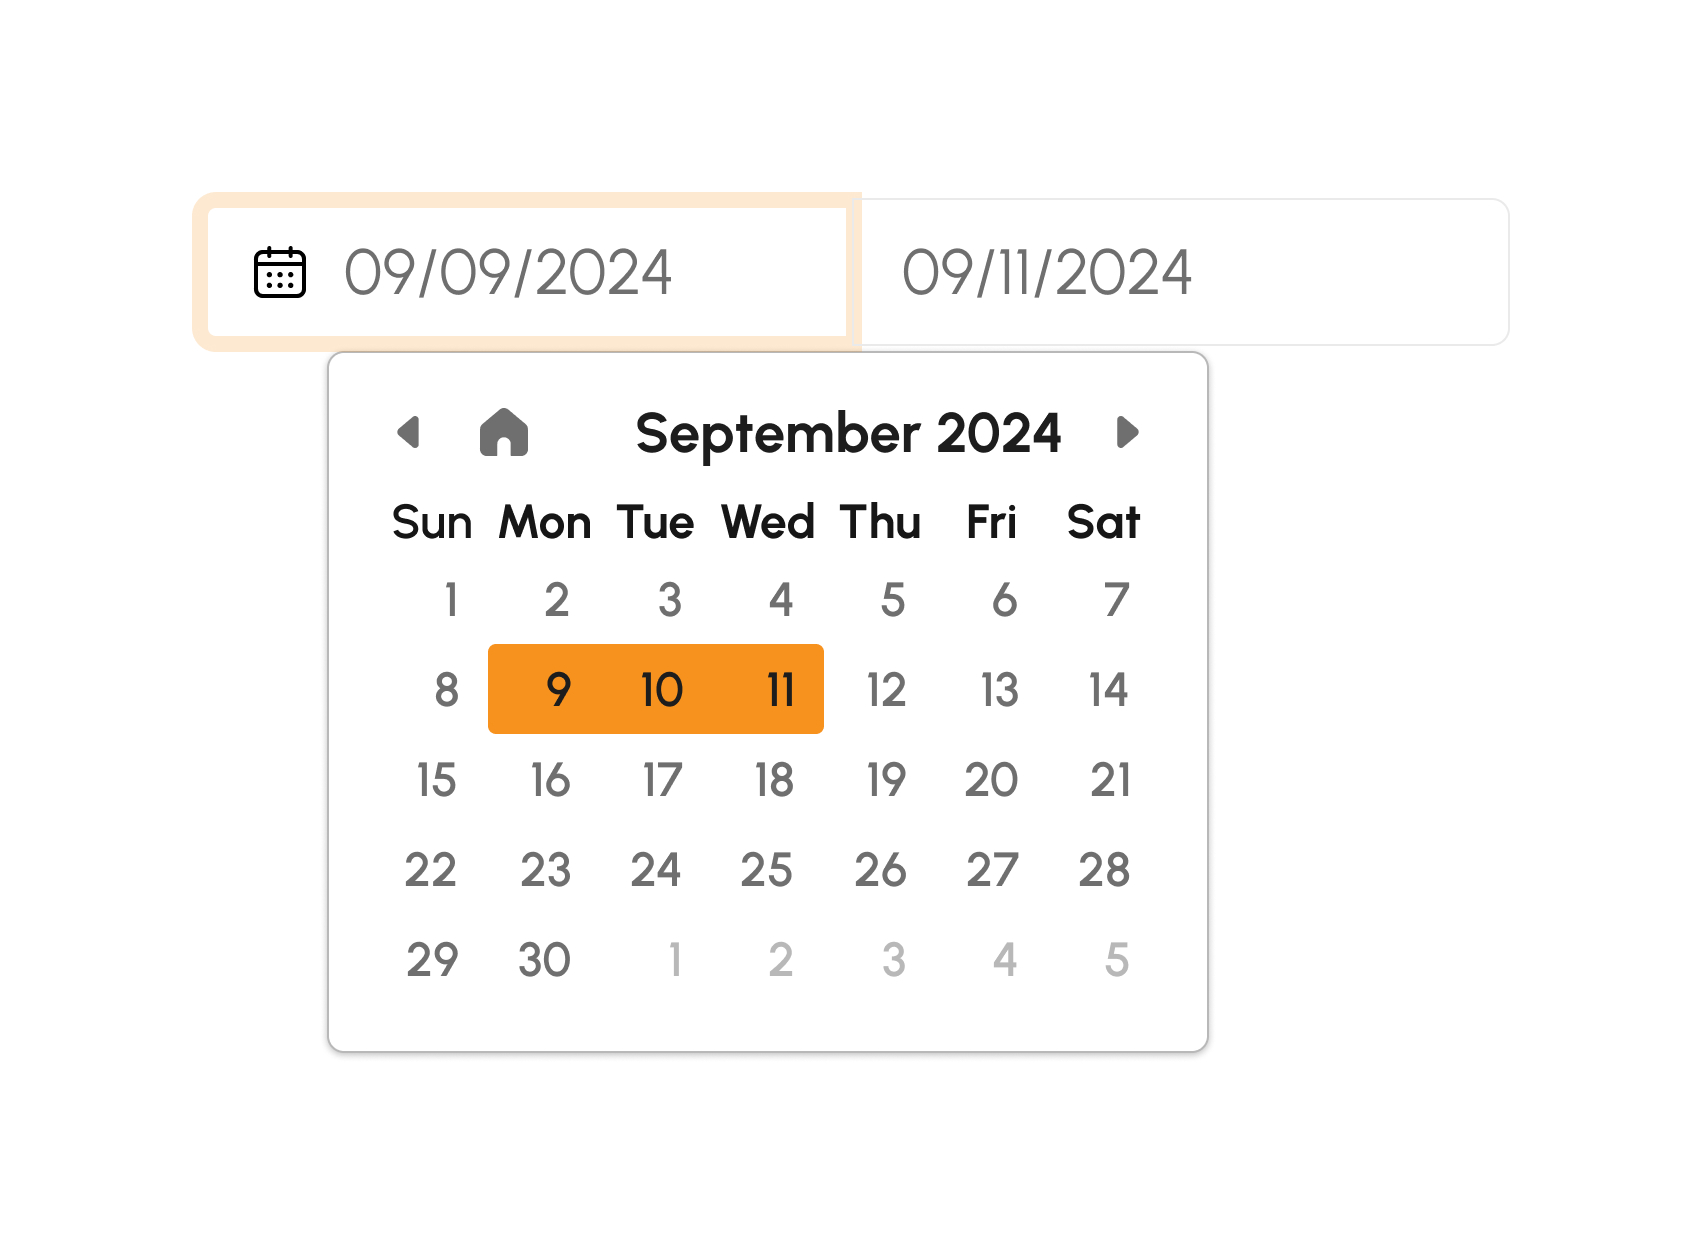
How to Filter Purchase Orders by Date Range
Users can also filter searches by specifying a start date and end date.
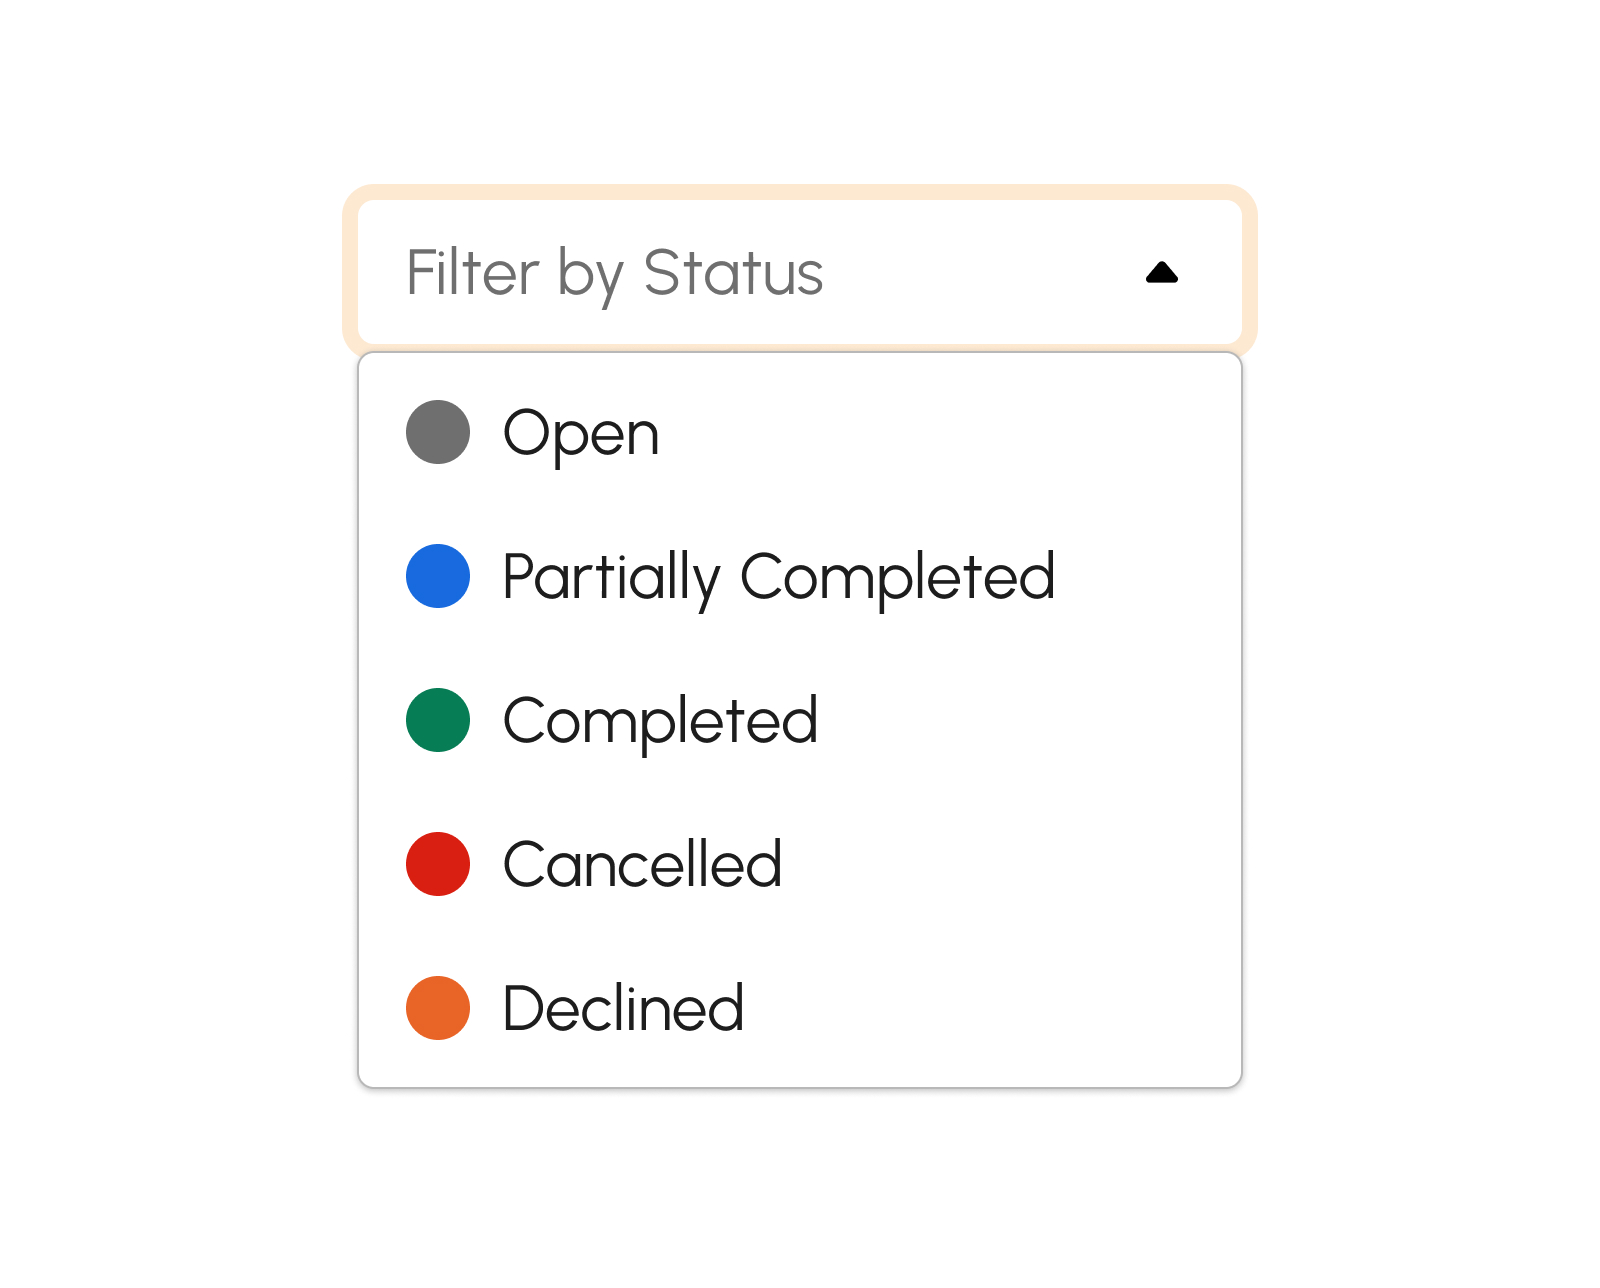
How to Filter Purchase Orders by Status
There are several statuses as follows:
- Open. This status shows the open Purchase Orders. Click the filter by status drop-down and select "Open".
- Partially Completed. This status shows the open Purchase Orders. Click the filter by status drop-down and select "Partially Completed".
- Completed. This status shows the open Purchase Orders. Click the filter by status drop-down and select "Completed".
- Cancelled. This status shows the open Purchase Orders. Click the filter by status drop-down and select "Cancelled".
- Declined. This status shows the open Purchase Orders. Click the filter by status drop-down and select "Declined".
Creating Purchase Orders
To begin creating Purchase Orders, follow the procedure below:
-
Click Create button to create Purchase Orders.

-
The screen displays a modal below to key in the required details in the following fields:
- Vendor
- Purchase Order Date
- Product
- Quantity
- Unit Cost
Note
Fields with (*) are required.
- To add a product item, click the Add button.
- The added product item will appear in the Purchase Order table.
- Click Create button to create the Purchase Order successfully.
-
A successful notification message will show:
Purchase Order successfully created
- Created purchase orders will be added to the list of Purchase Orders in the Summary Table.
- The purchase order can be viewed, closed, and download as a PDF by simply clicking the corresponding button.
Receiving Purchase Orders
To begin receiving Purchase Order follow the procedure below:
-
Click Receive PO button to receive Purchase Orders.

-
The screen displays a modal to key in the required details in the following fields:
- Location
- Receive Date
- Vendor Invoice
- Remarks
Note
Fields with (*) are required.
- Users have the ability to adjust the delivered quantity based on the actual amount received.
- Click Receive button to receive the Purchase Order successfully.
-
A successful notification message will show:
Purchase Order successfully received
- Received purchase orders will be added to the list of Purchase Orders in the Summary Table.
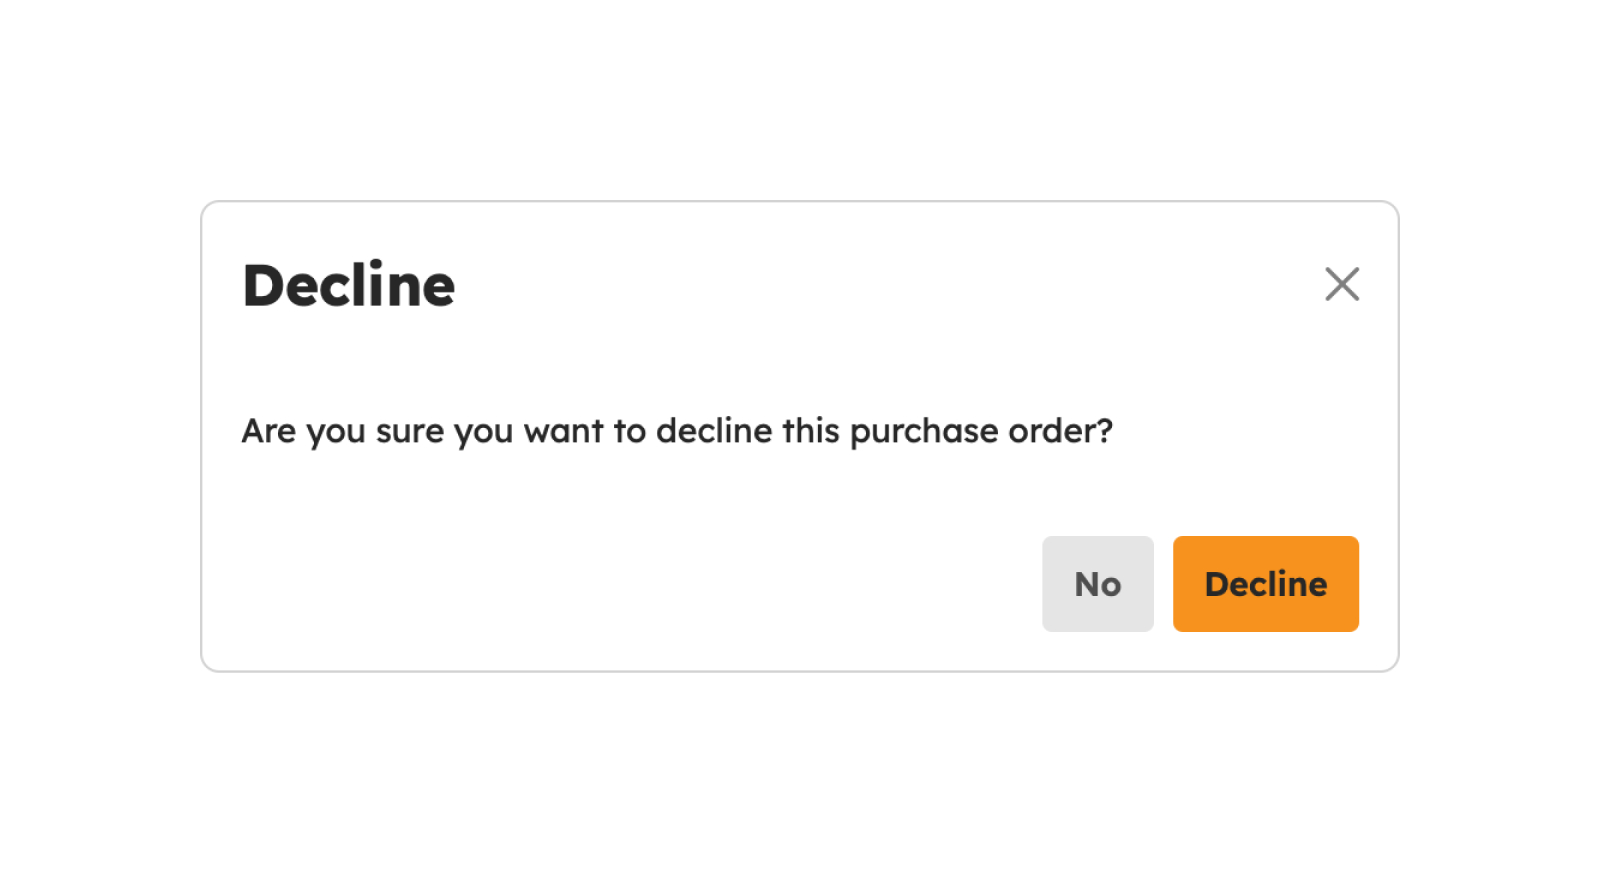
-
Click Decline button to decline the receive purchase order.
To Cancel the Receive Purchase Order, follow the procedures below:
- Click Cancel button to cancel the Receive Purchase Order.
- The screen closes the modal.
- The system will not proceed with receiving or declining a purchase order.
Receiving Receipts
Introduction to Receiving Receipts Page
This page facilitates the management of receiving receipts within the company. Its key functions include recording, viewing, and managing receipts to ensure accurate inventory records.
To access this page, navigate to the Inventory Module and click "Receiving Receipts" under the Purchasing Submodule, as shown in the image below:
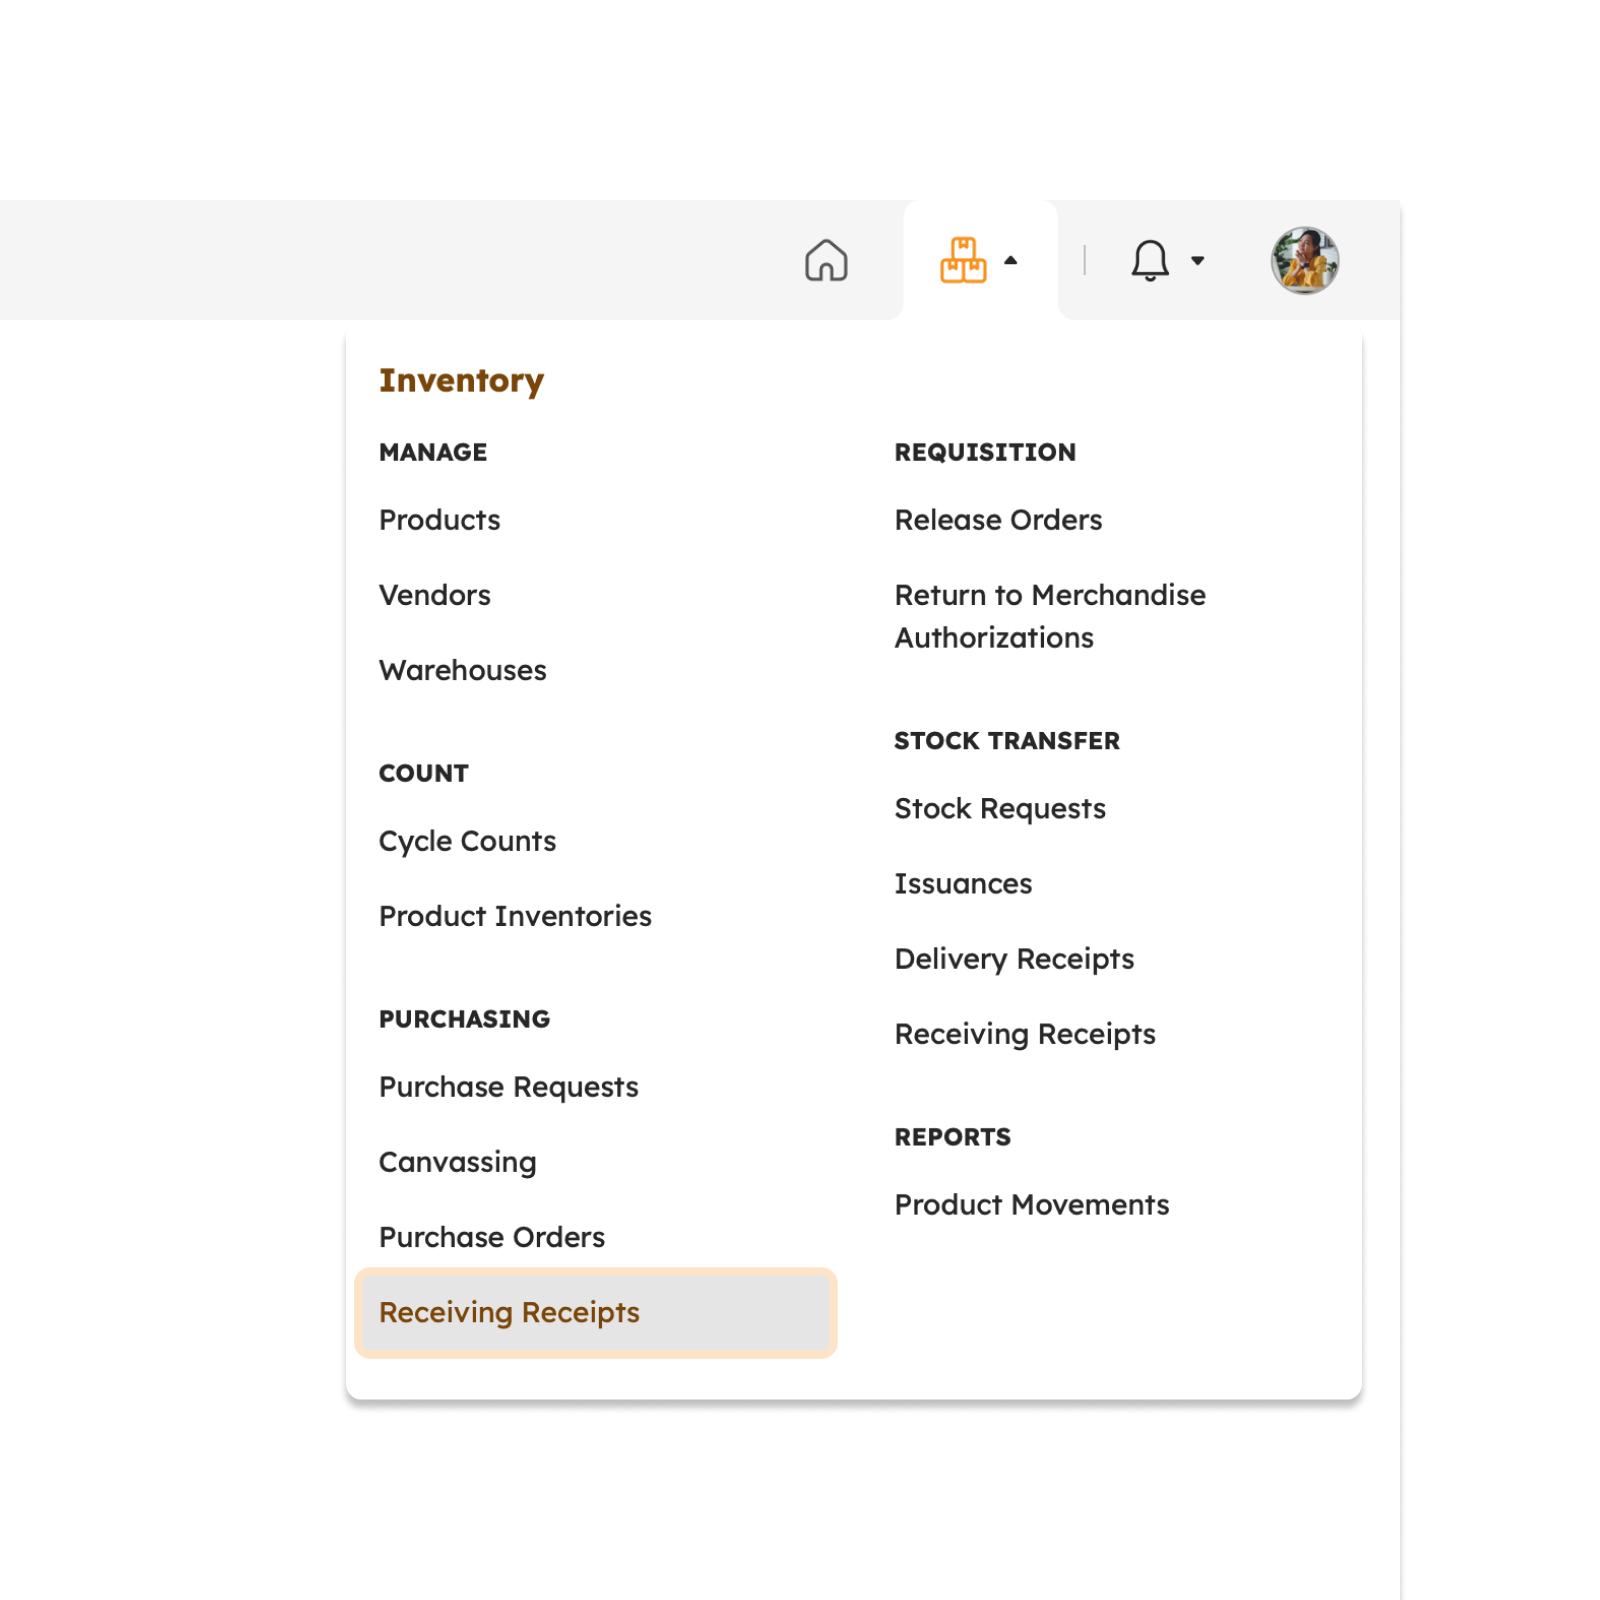
The screen will redirect to the Receiving Receipts page, showing several features to use that will be discussed in the next section.
Features in Receiving Receipts Page
The image below is the high-level view of the Receiving Receipts page along with its built-in features.
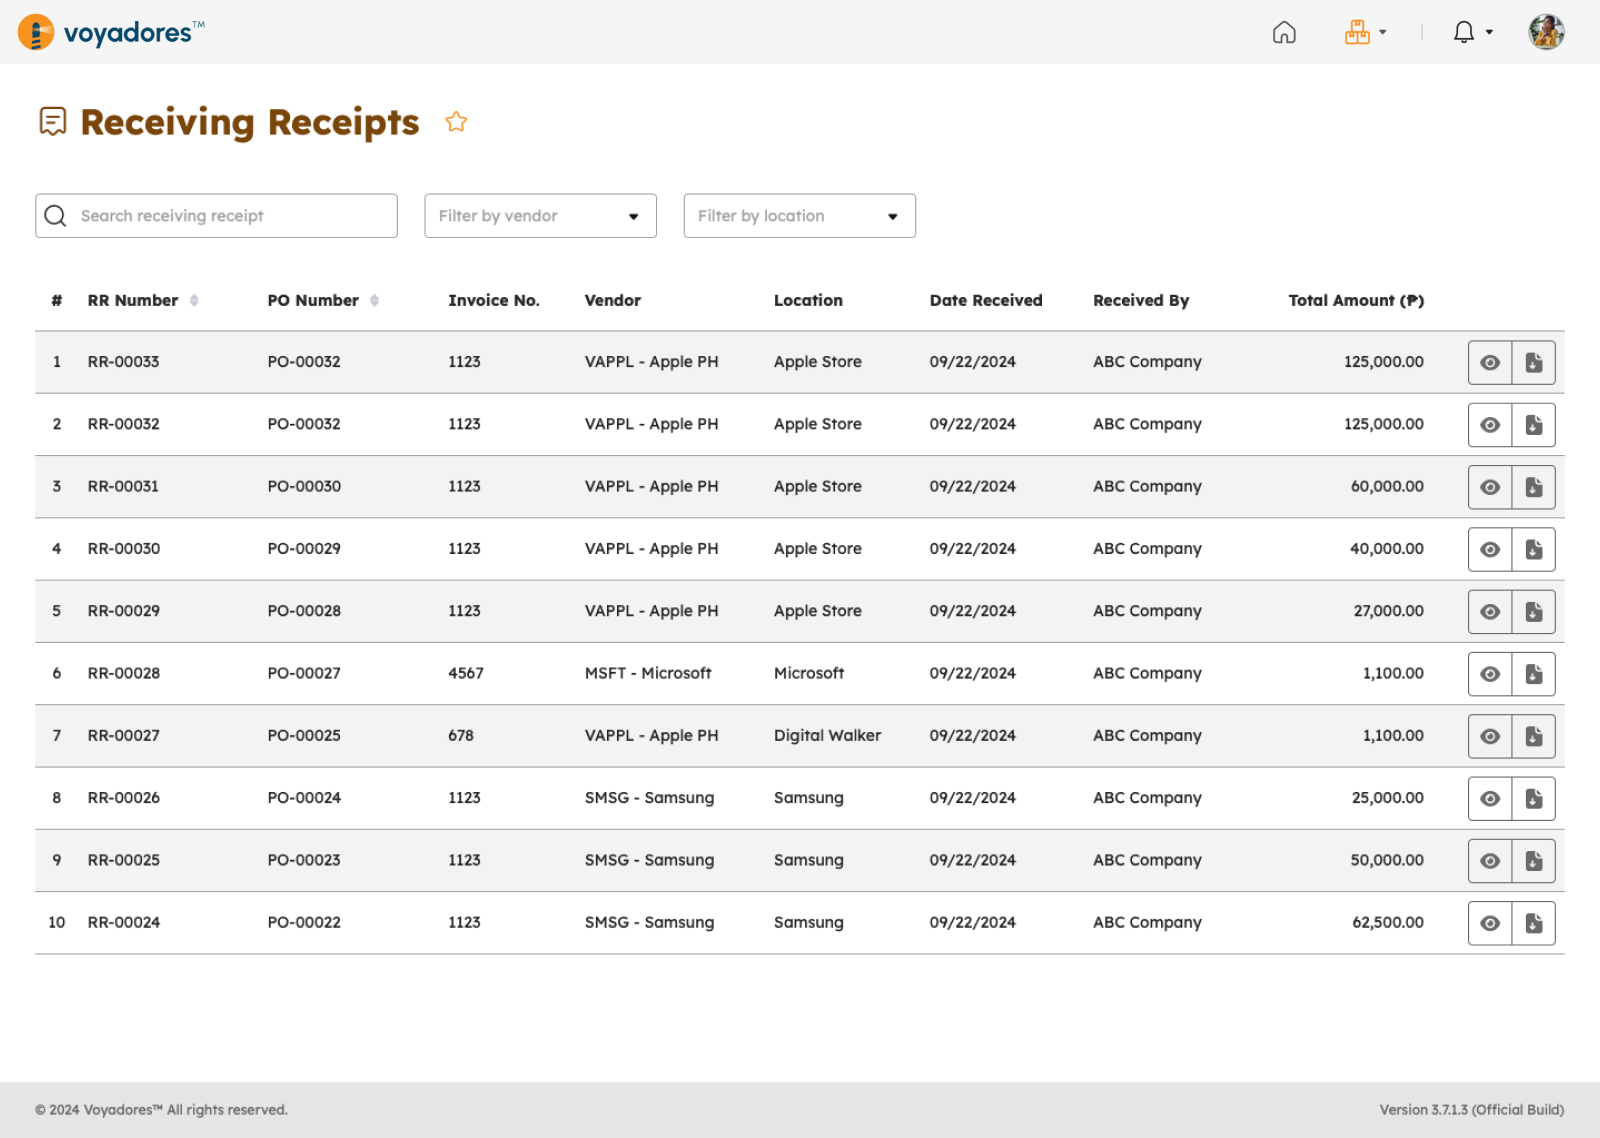
Receiving Receipts Summary Table
The Receiving Receipts Summary Table displays the following columns:
- Item number "#"
- RR Number
- PO Number
- Invoice No.
- Vendor
- Location
- Date Received
- Received By
- Total Amount
-
Actions
- View RR
- RR PDF
Searching Receiving Receipts
-
Key in the receiving receipts number in the Search Bar to look for a particular RR.
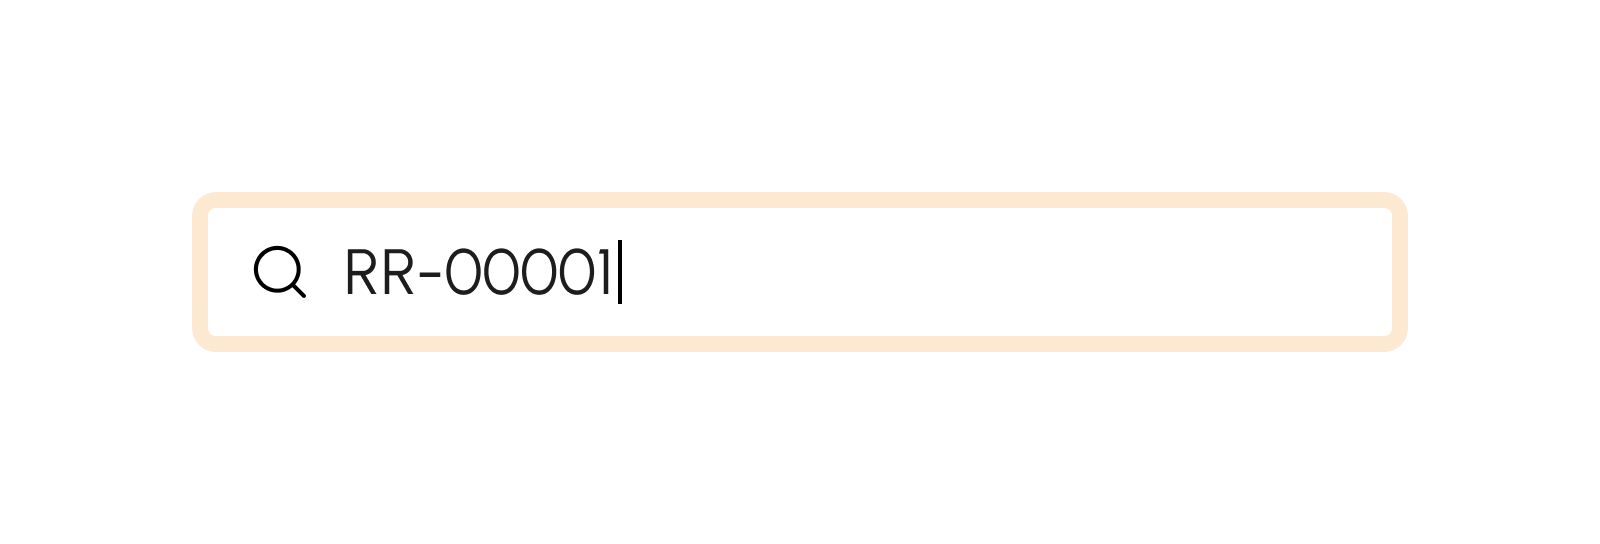
- The Receiving Receipts Summary Table will display the searched RR number.
How to Filter Receiving Receipts by Vendor
Click the filter by vendor dropdown to display and select the desired vendor.

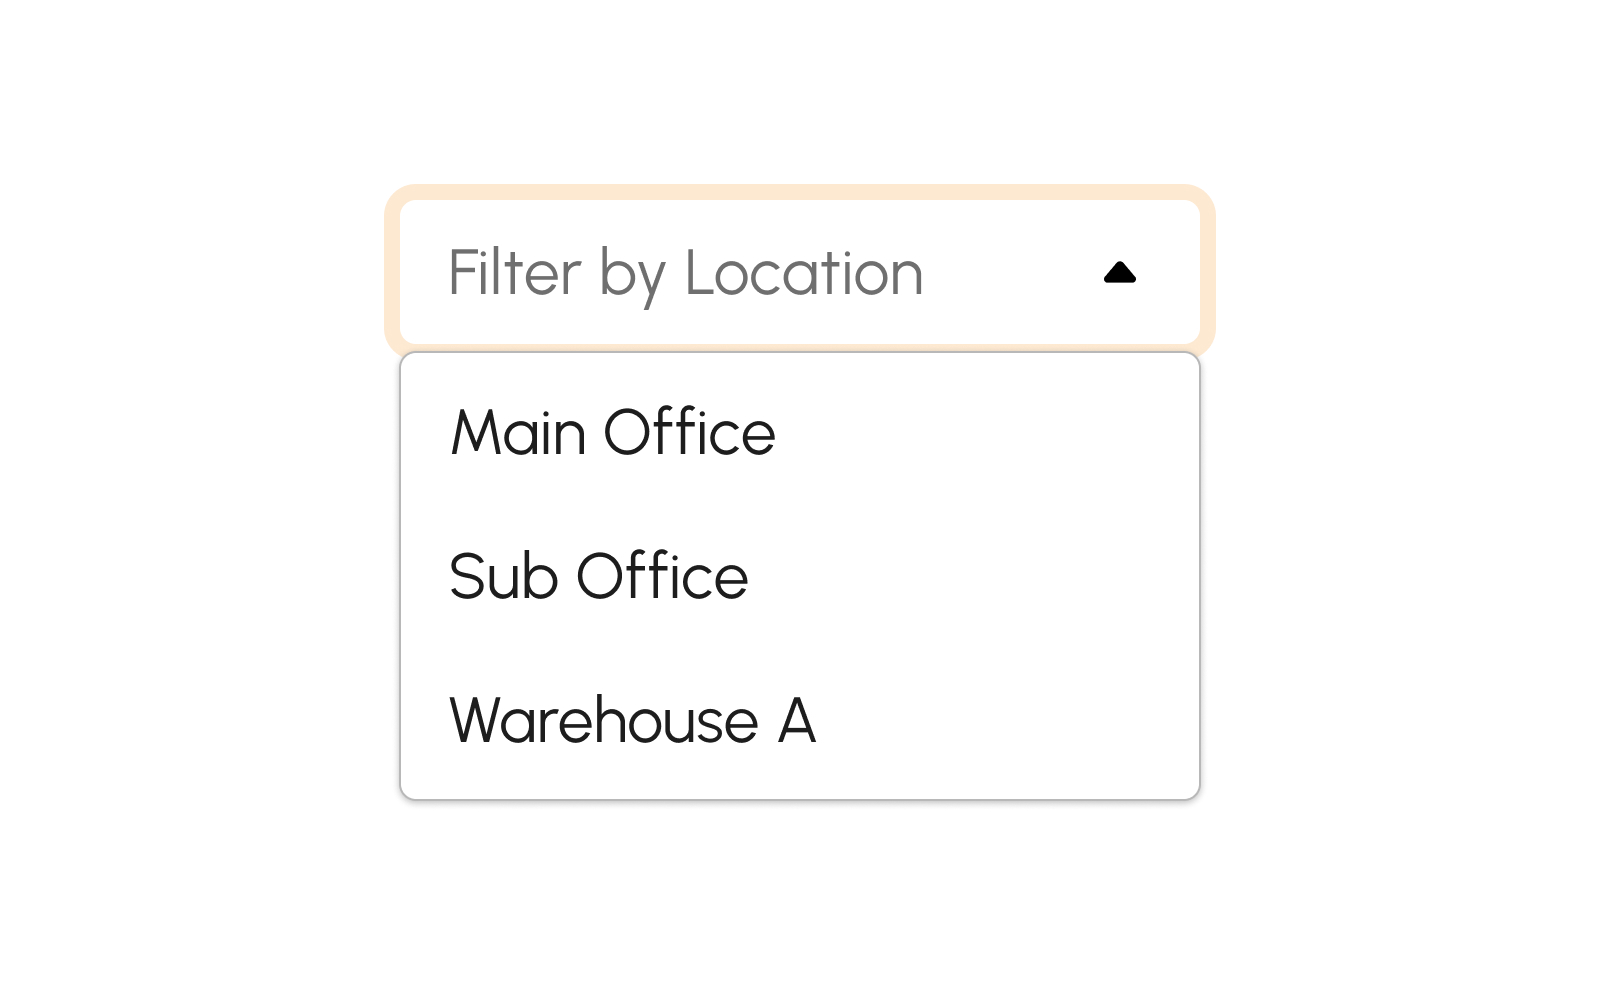
How to Filter Receiving Receipts by Location
Click the filter by location dropdown to display and select the desired location type.
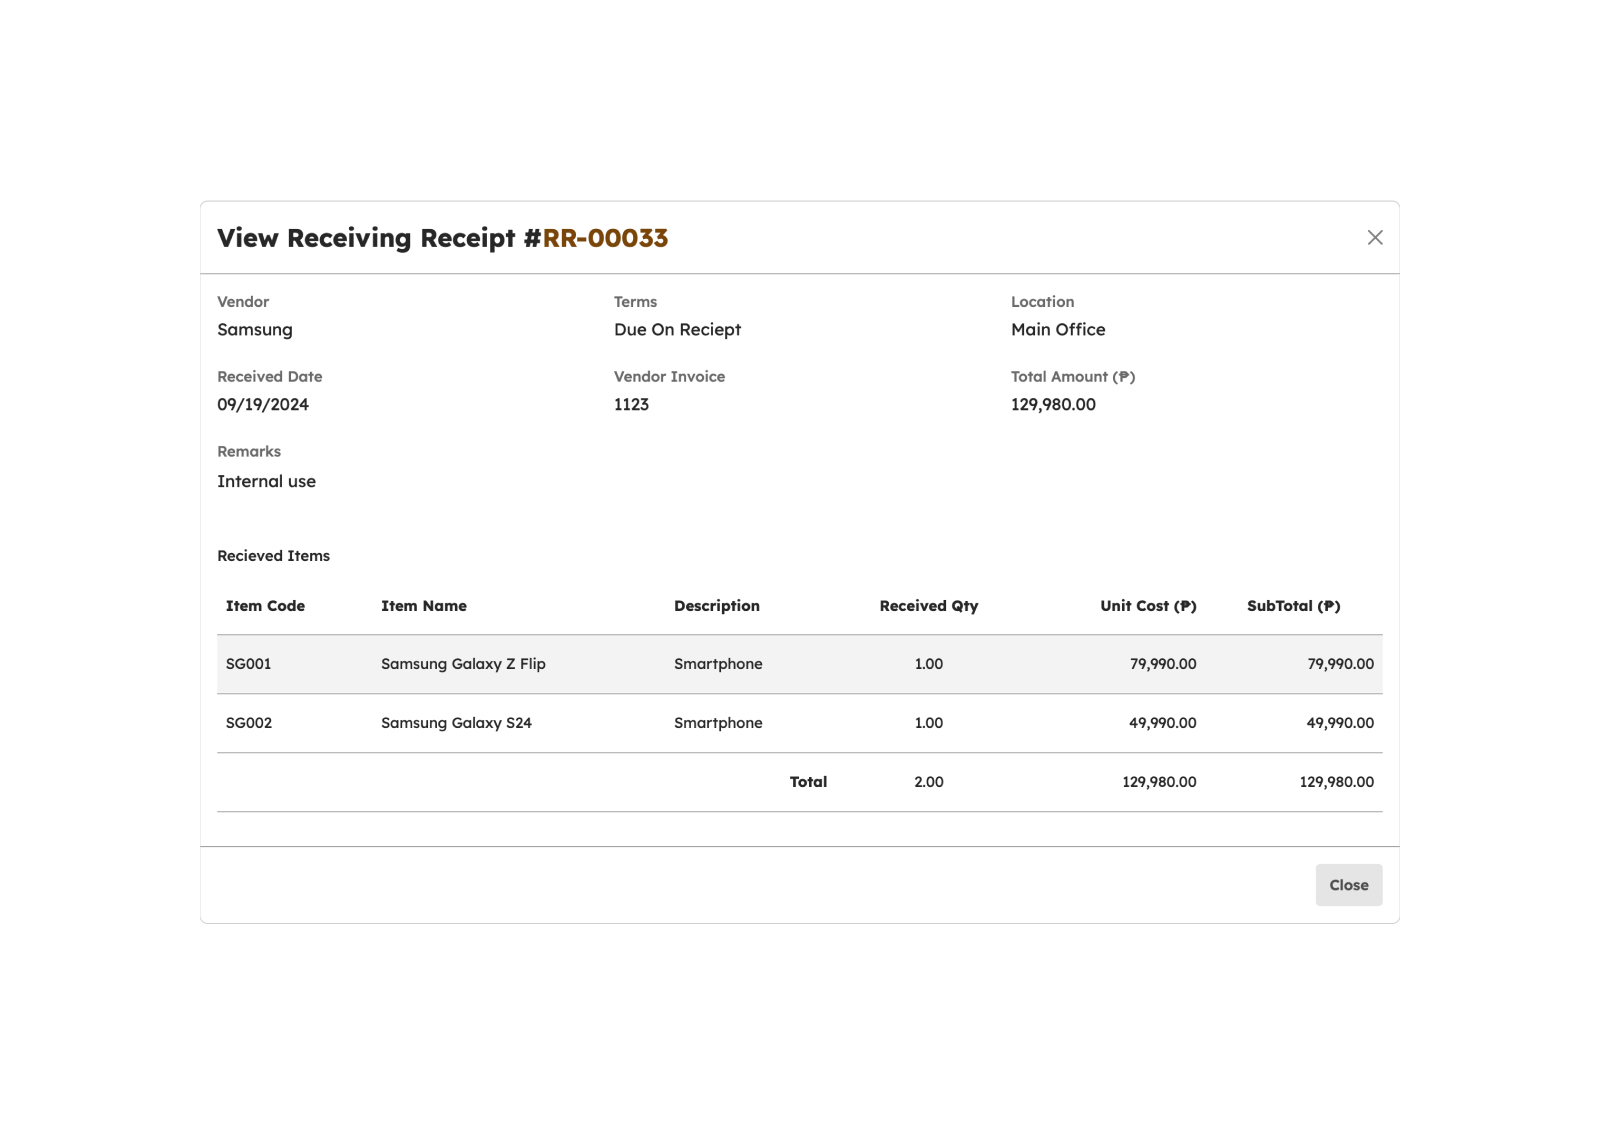
How to View Receiving Receipts
Click View button to view the Receiving Receipt.
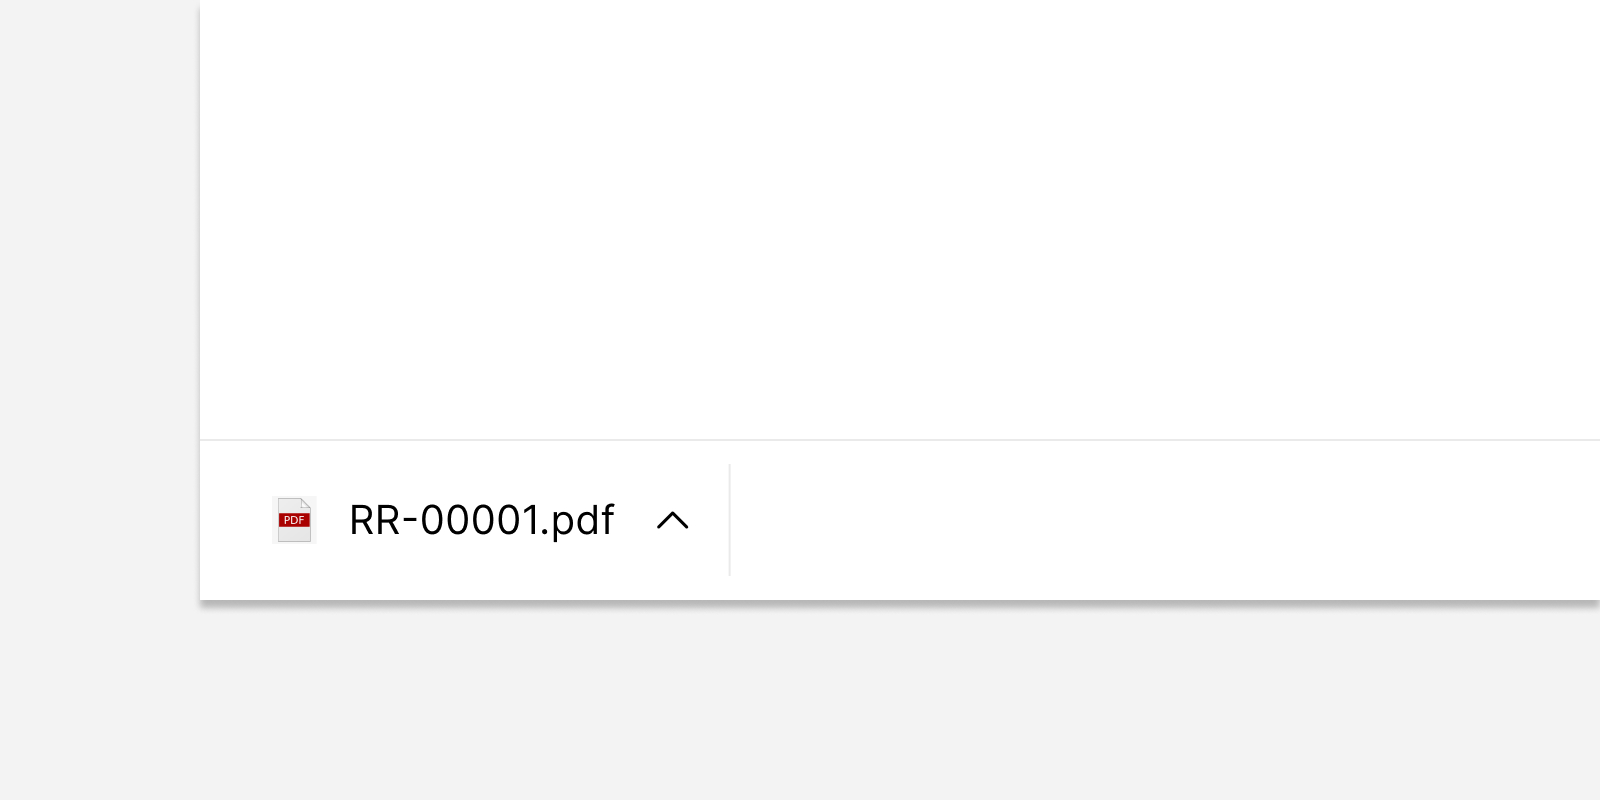
How to Download Receiving Receipts as a PDF
Click Download button to download the Receiving Receipt.