Employees
Who can use this feature
Anyone with Administrator and HR Manager role can access all the Employees pages
Introduction to Employees Submodule
The Employees submodule handles employee-related functions and information. This submodule typically provides functionalities related to managing employee data discussed further from this section.
Definition of Terms
Defined in this section are the available pages under the Employees submodule as follows:
- List of Employees. It allows for creating and storing employee profiles that include basic information like name, contact details, job title, department, files, and other relevant details.
- Employees Department. This page is all about creating company departments applicable in the organization.
- Employees Position. This page is all about creating lists of applicable Employees Position in the company.
- Employees Schedule. This page is all about the creating and assigning work schedules to the employees.
Roles and Permissions
The table below shows the defined roles and permissions when accessing pages and features under Employees Submodule.
| Functions | Administrator | HR Manager | Payroll Manager | Employee |
|---|---|---|---|---|
| List of Employees | ||||
| Add | ||||
| Edit | ||||
| View | ||||
| Import | ||||
| Export | ||||
| Employees Department | ||||
| Create | ||||
| Edit | ||||
| Activate/Deactivate | ||||
| Employees Position | ||||
| Create | ||||
| Edit | ||||
| Employees Schedule | ||||
| Create | ||||
| Edit | ||||
| Assign | ||||
| Delete Assigned Schedule | ||||
Roles and Permissions
Flexibly enhance access control and refine user privileges by effortlessly adding and configuring additional roles and permissions. This aligns system functionality with the organizational structure and security requirements, ensuring that users have appropriate levels of access and responsibilities.
To do so, contact [email protected]
List of Employees
Introduction to List of Employees Page
This page manages list of employees within the company. It serves as a centralized repository of employee information and provides an overview of the workforce.
The overall function of this page is to manage employees information such as Personal details, Employment status, Job title, Department, Salary History and Reporting structure.
To access this page, navigate to the Human Resources Module and click “List of Employees” under Employees Submodule as shown in the image below:
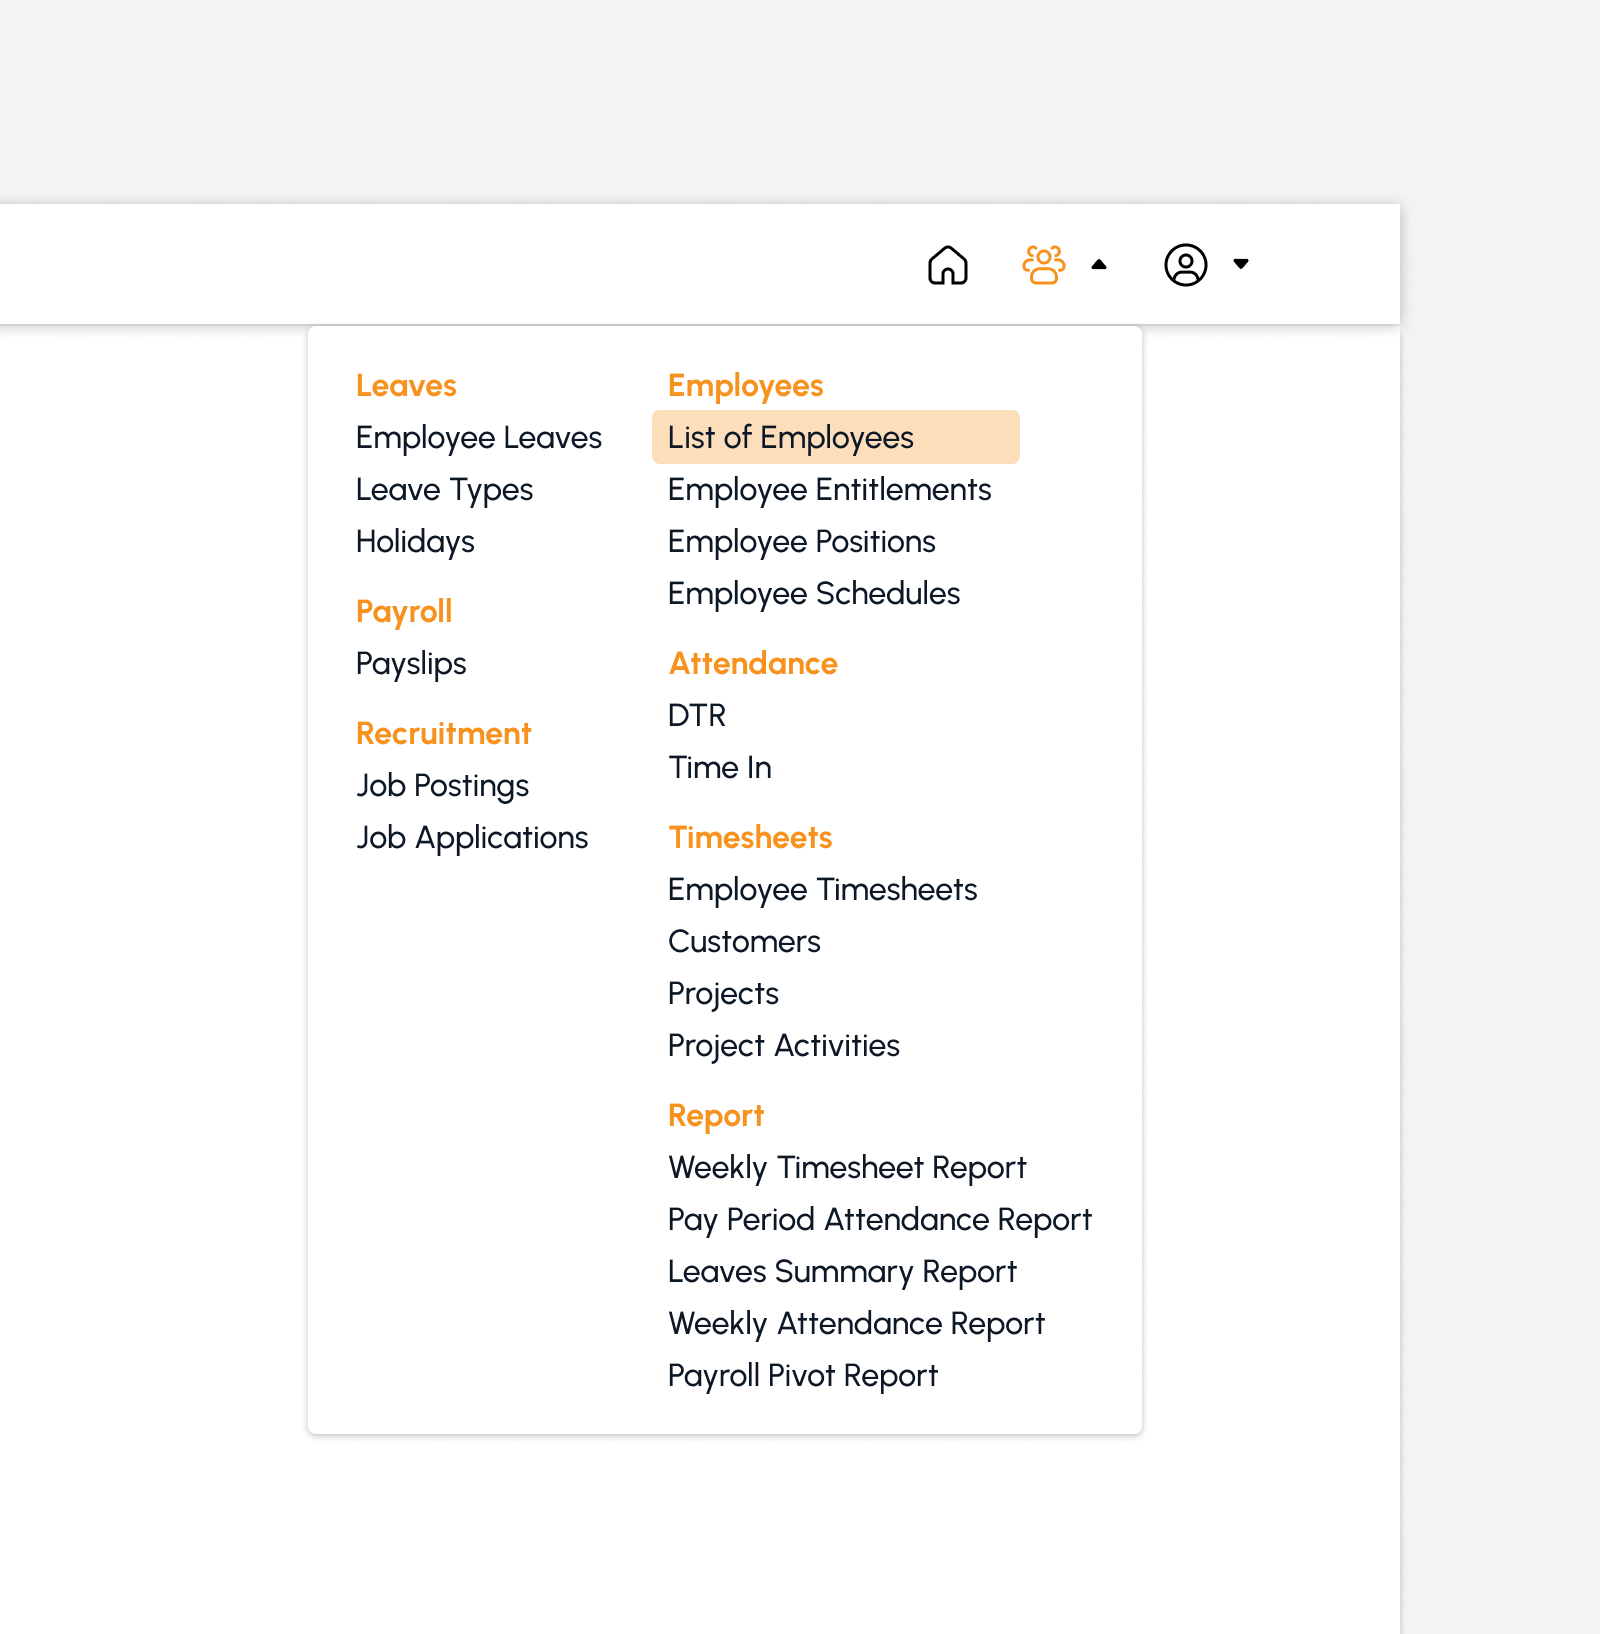
The screen will redirect to the List of Employees page, showing several features to use.
Features in List of Employees Page
The snip below is the high-level view of List of Employees page along with its built-in features.
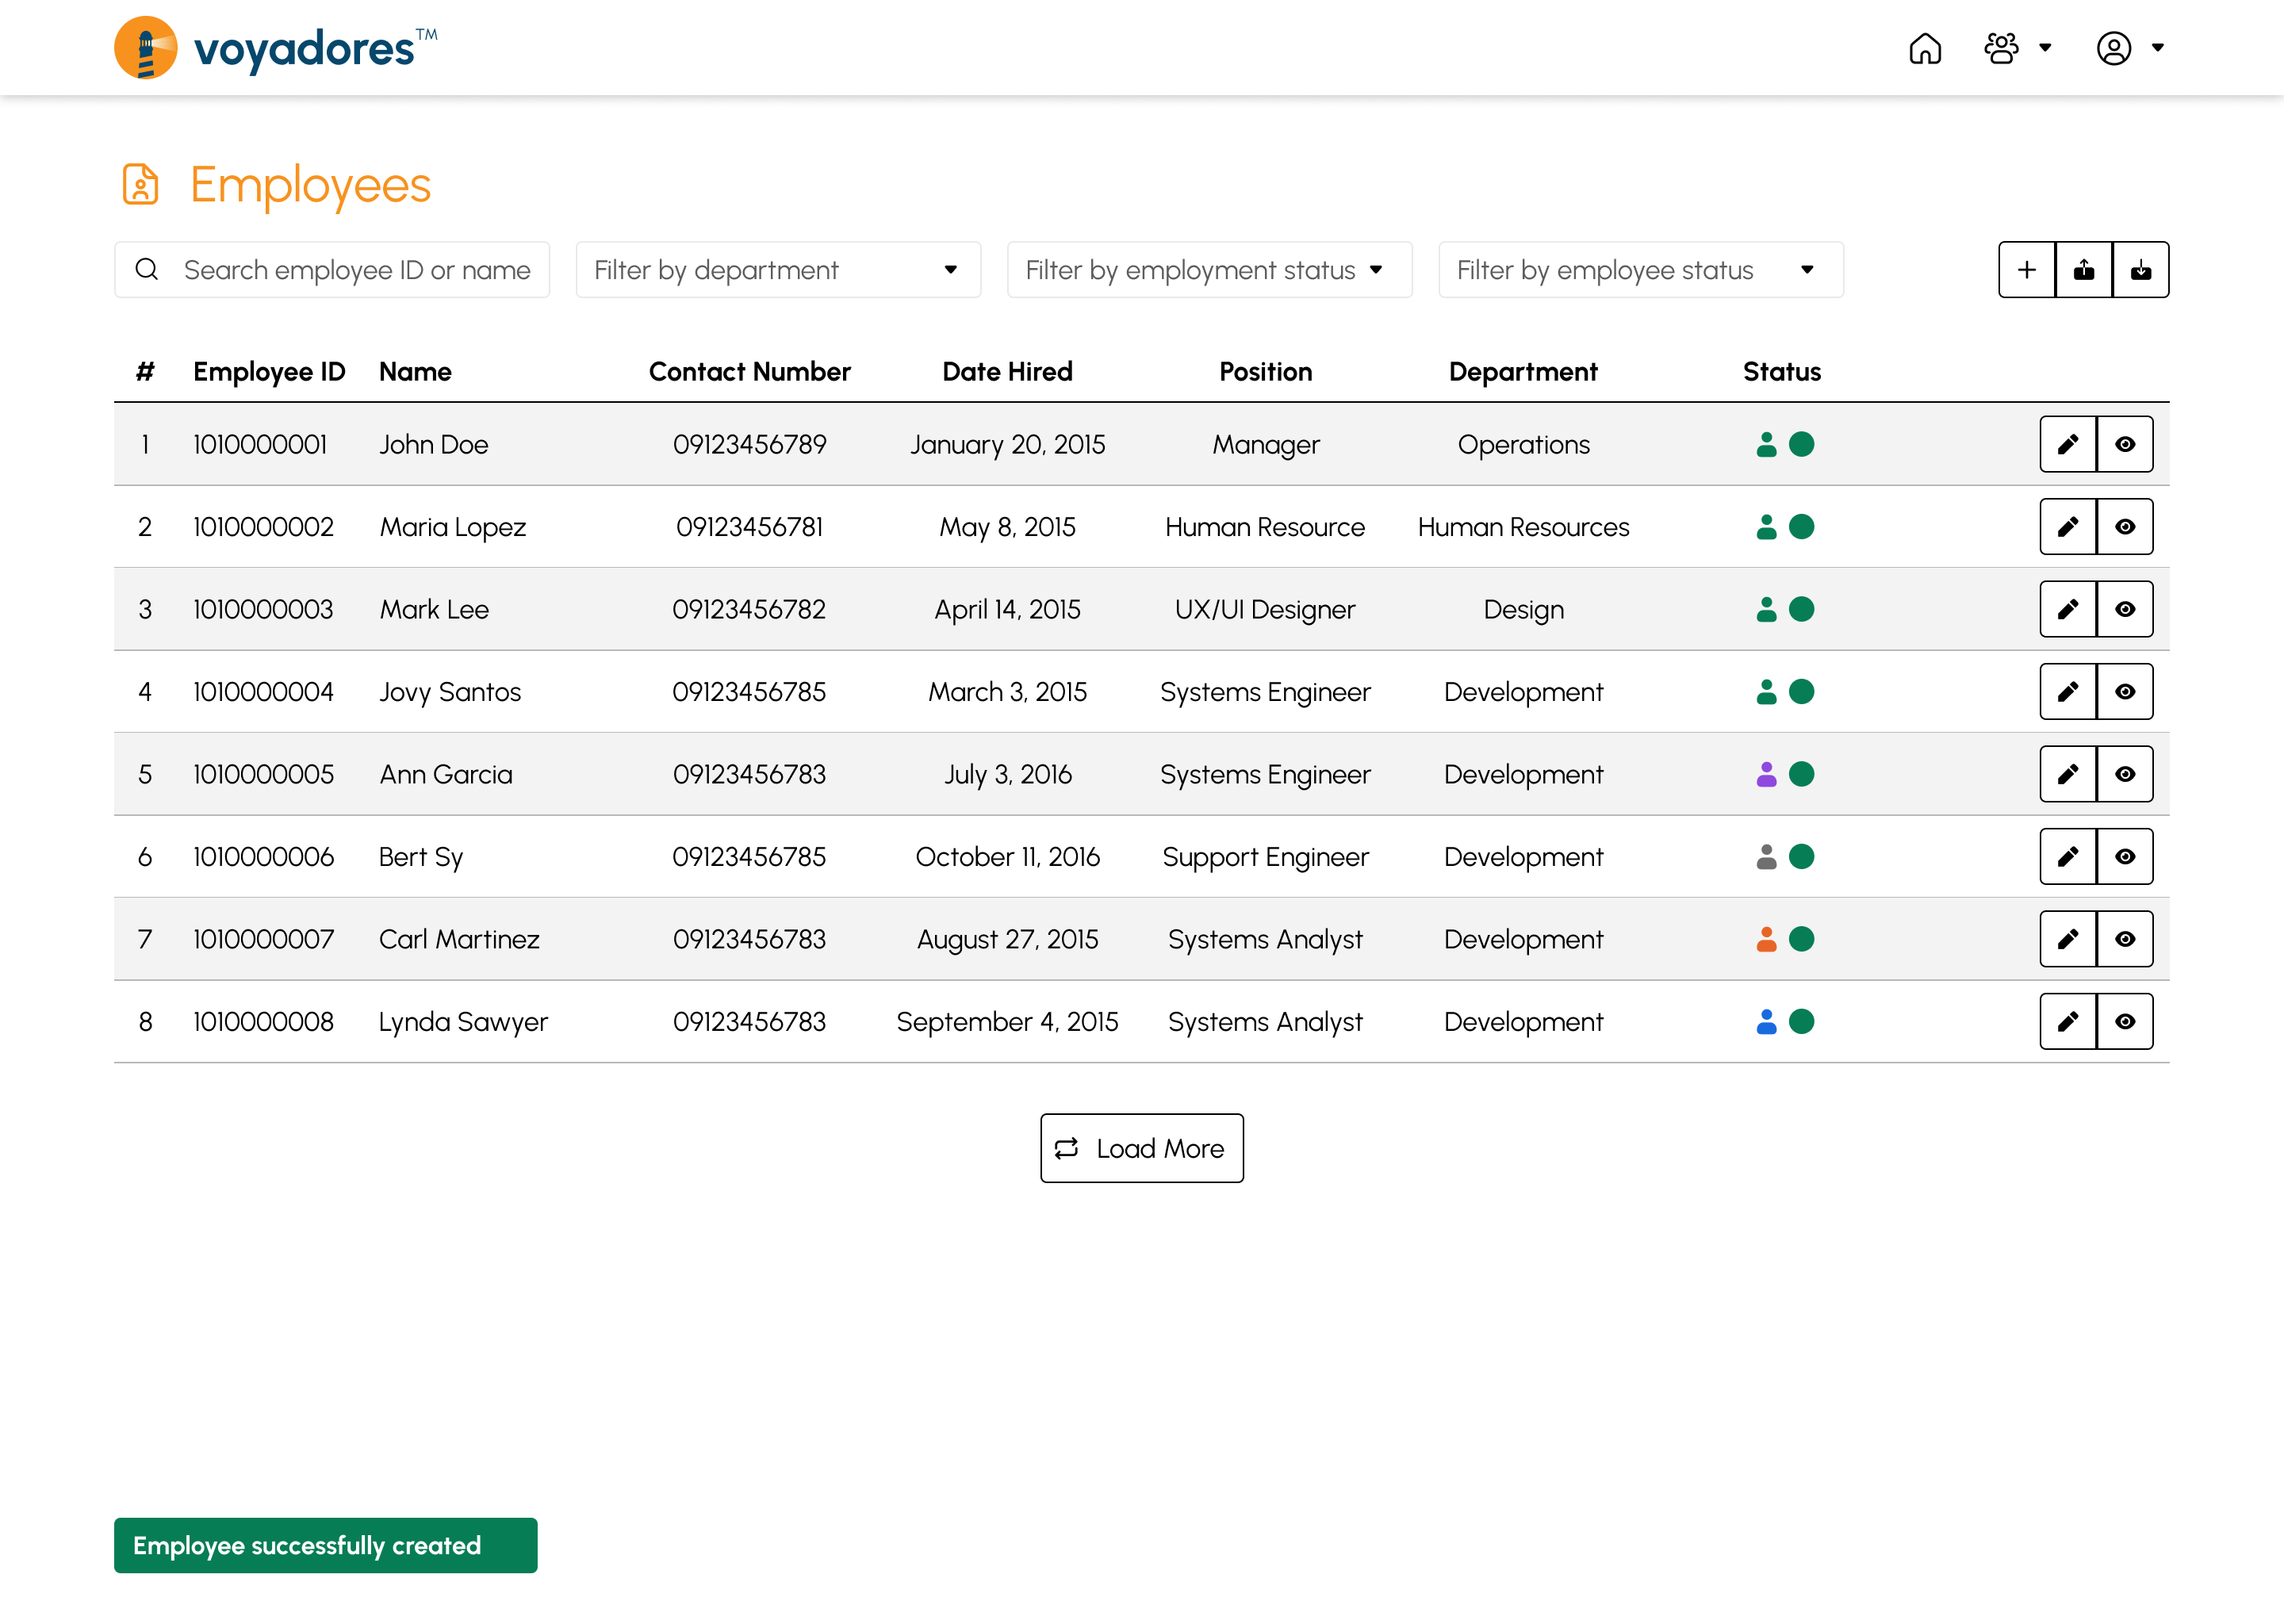
Summary Table
The summary table displays the list of employees with the following columns:
- Item number “#”
- Employee ID
- Name
- Contact Number
- Date Hired
- Position
- Department
- Employee Type
- Status
-
Actions
- Edit Employee
- View Employee
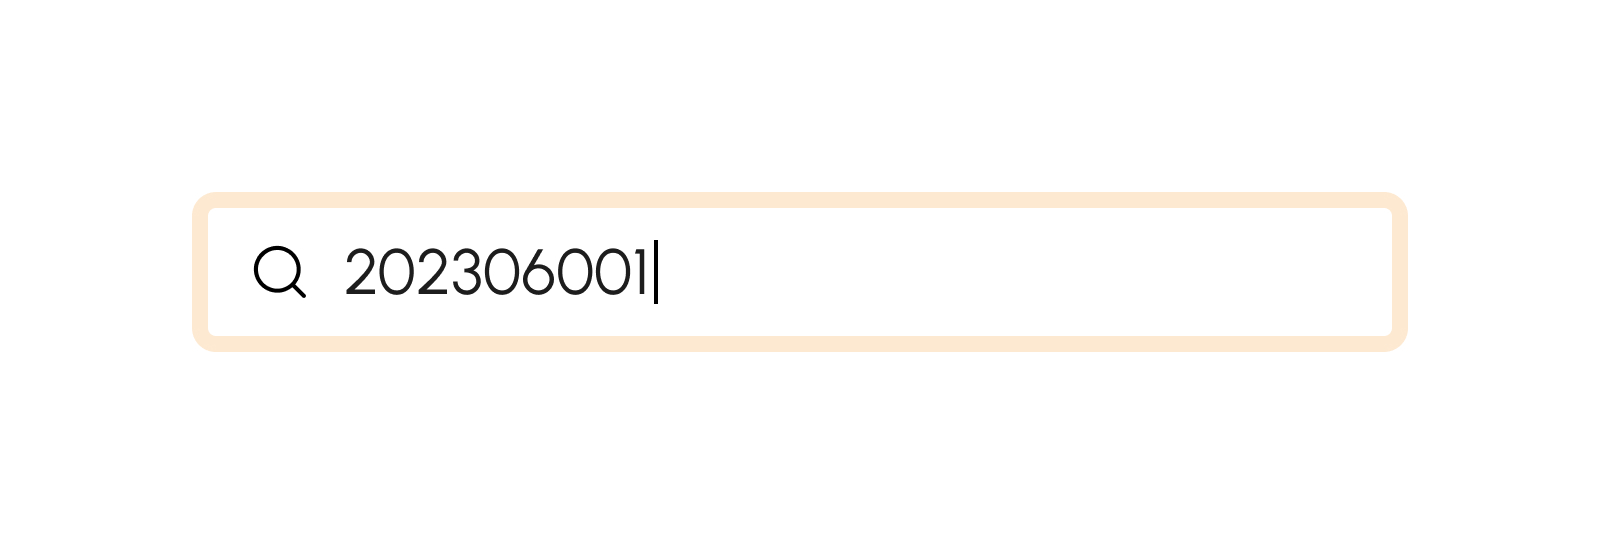
Search by Employee ID
To search for a particular Employee by Employee ID, key in the Employee ID in the Search Bar as shown in the snip below:
Search by Employee Name
To search for a particular Employee by Name, key in the Employee first name or last name in the Search Bar as shown in the snip below:

How to Filter Employees by Employment Status
This feature gives the option to filter Employees by Employments Status.
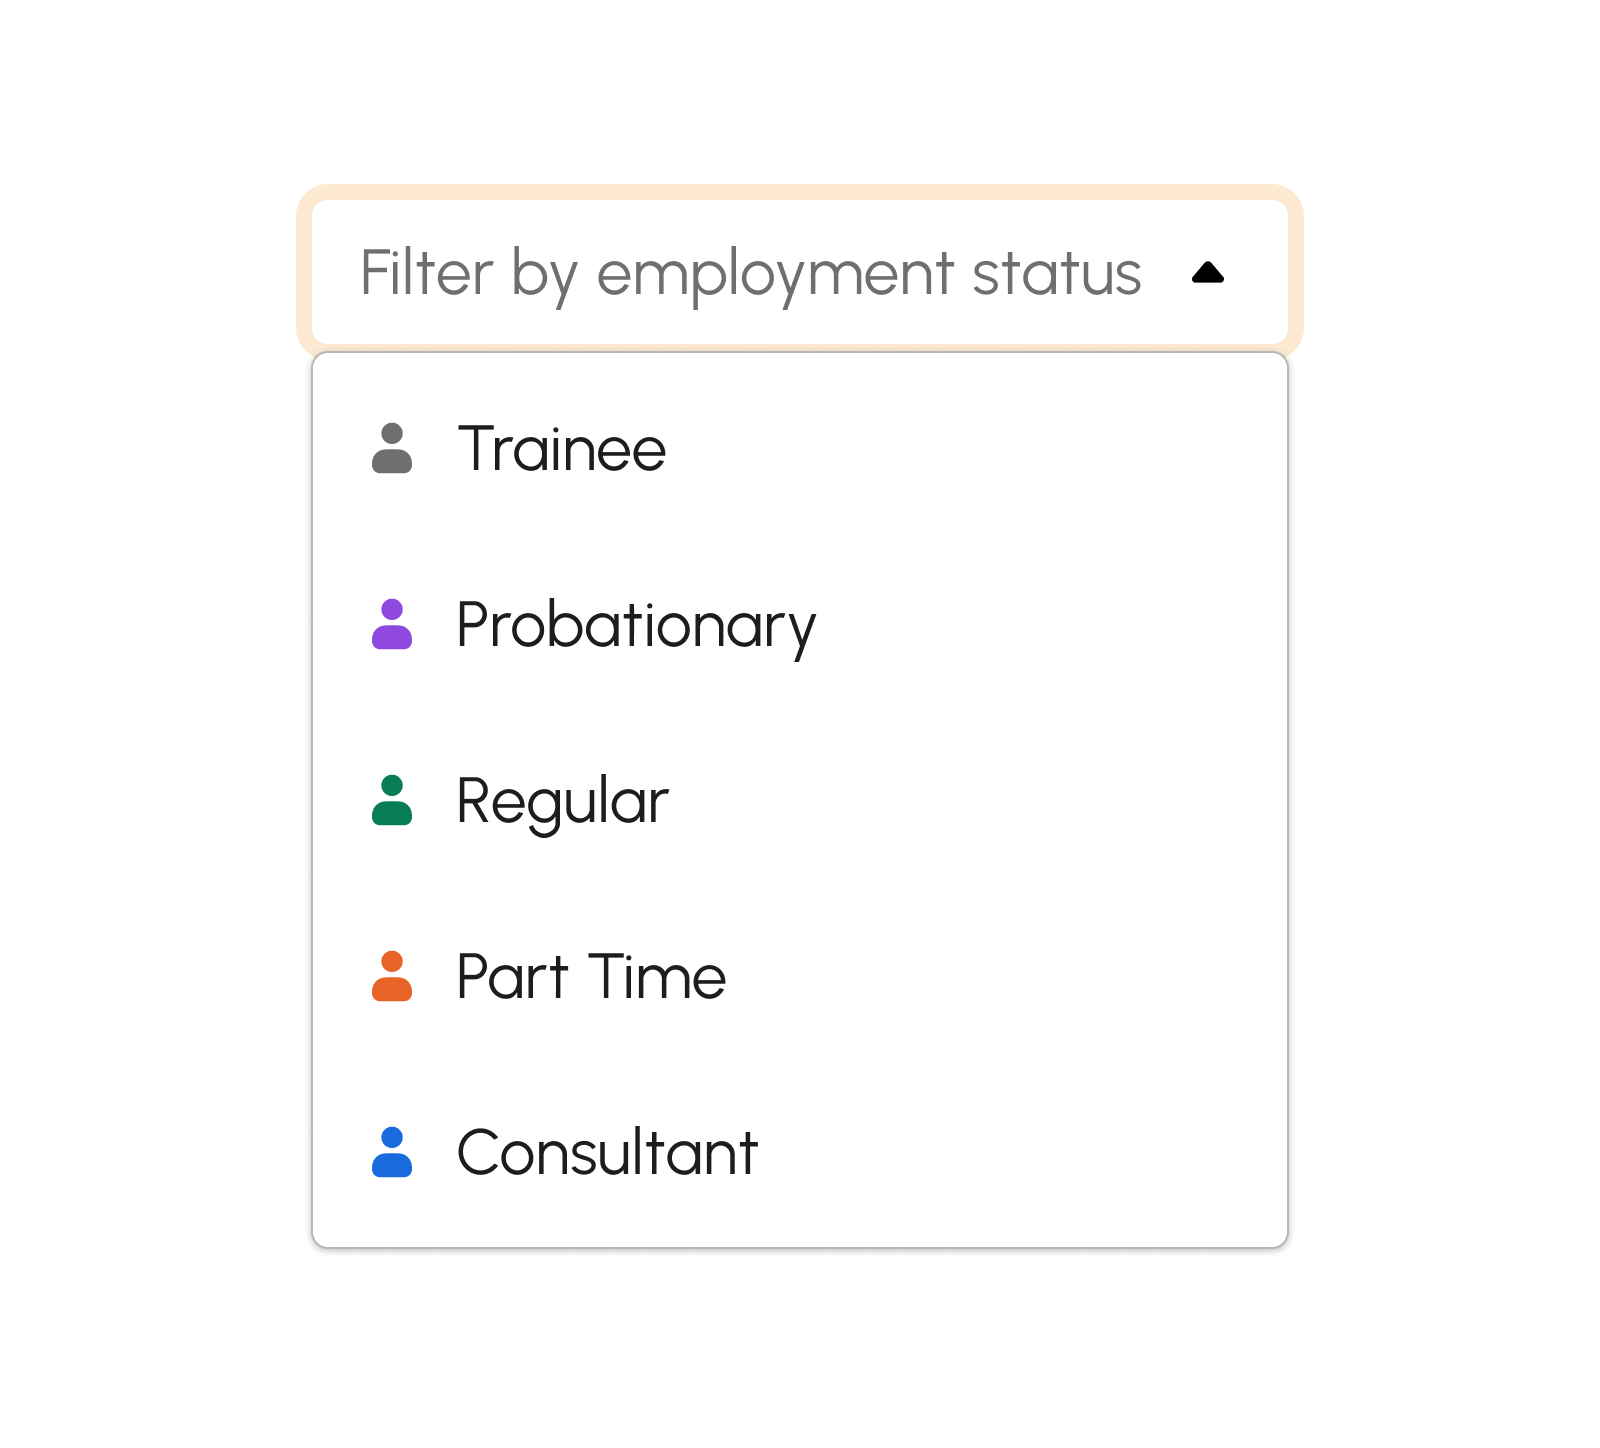
- Trainee. This temporary position indicates that the employee is currently undergoing a training period.
- Probationary. This is a temporary employment arrangement in which an employee is hired on a trial basis to assess their suitability for the job. During this period, the employee's performance is measured and evaluated.
- Regular. This is a permanent employment status, and an employee who has this status is entitled to the rights and benefits associated with regular employment.
- Part Time. This status can be either permanent or temporary, depending on the agreement between the employer and the employee. It refers to an individual who is hired by an employer to work fewer hours than a full-time employee. Part-time employees typically work a set number of hours per week or a specific schedule that is less than the standard full-time hours.
- Consultant. This status is considered temporary or project-based rather than permanent. It refers to an individual who is hired by a company or organization to provide expert advice, specialized skills, or professional services on a temporary or project-based basis.
How to Filter Employees by Status
This feature gives the option to filter employees by status.

- Active. This green-colored status shows the active Employees. Click the filter by status drop-down and select “Active”.
- Inactive. This red-colored status shows the inactive Employees. Click the filter by status drop-down and select “Inactive”.
- Resigned Employees. This gray-colored status displays the list of all employees who have voluntarily resigned from their jobs. To view this list, click on the "Filter by Status" drop-down and select "Resigned Employees".
- Resigned Employees (Company Initiated). This black-colored status display list of all employees. This indicates that the company has requested or required the employee to resign from their position, leading to the termination of their employment.
- Dismissed (Employment Terminated). This violet-colored status display list of all employees who was terminated by the company, these employees failed to meet the expectations or requirements of their job or engage in misconduct.
- Dismissed (Others). This blue-colored status display list of all employees who was terminated for a various reason. The dismissal is not directly related to performance issues, misconduct, or redundancy.
How to Create List of Employee
- Click the Create button.
-
Fill in Employee details.
- First Name
- Middle Name
- Last Name
- Gender
- Marital Status
- Nationality
- Date of Birth
- Contact Number
- Address
- Date Hired
- Exit Date
- SSS
- TIN
- Philhealth
- PAGIBIG
- Driver’s License Number
- Driver’s License Expiry Date
- Bank Name
- Bank Account Number
- Account Email
- Biometric ID
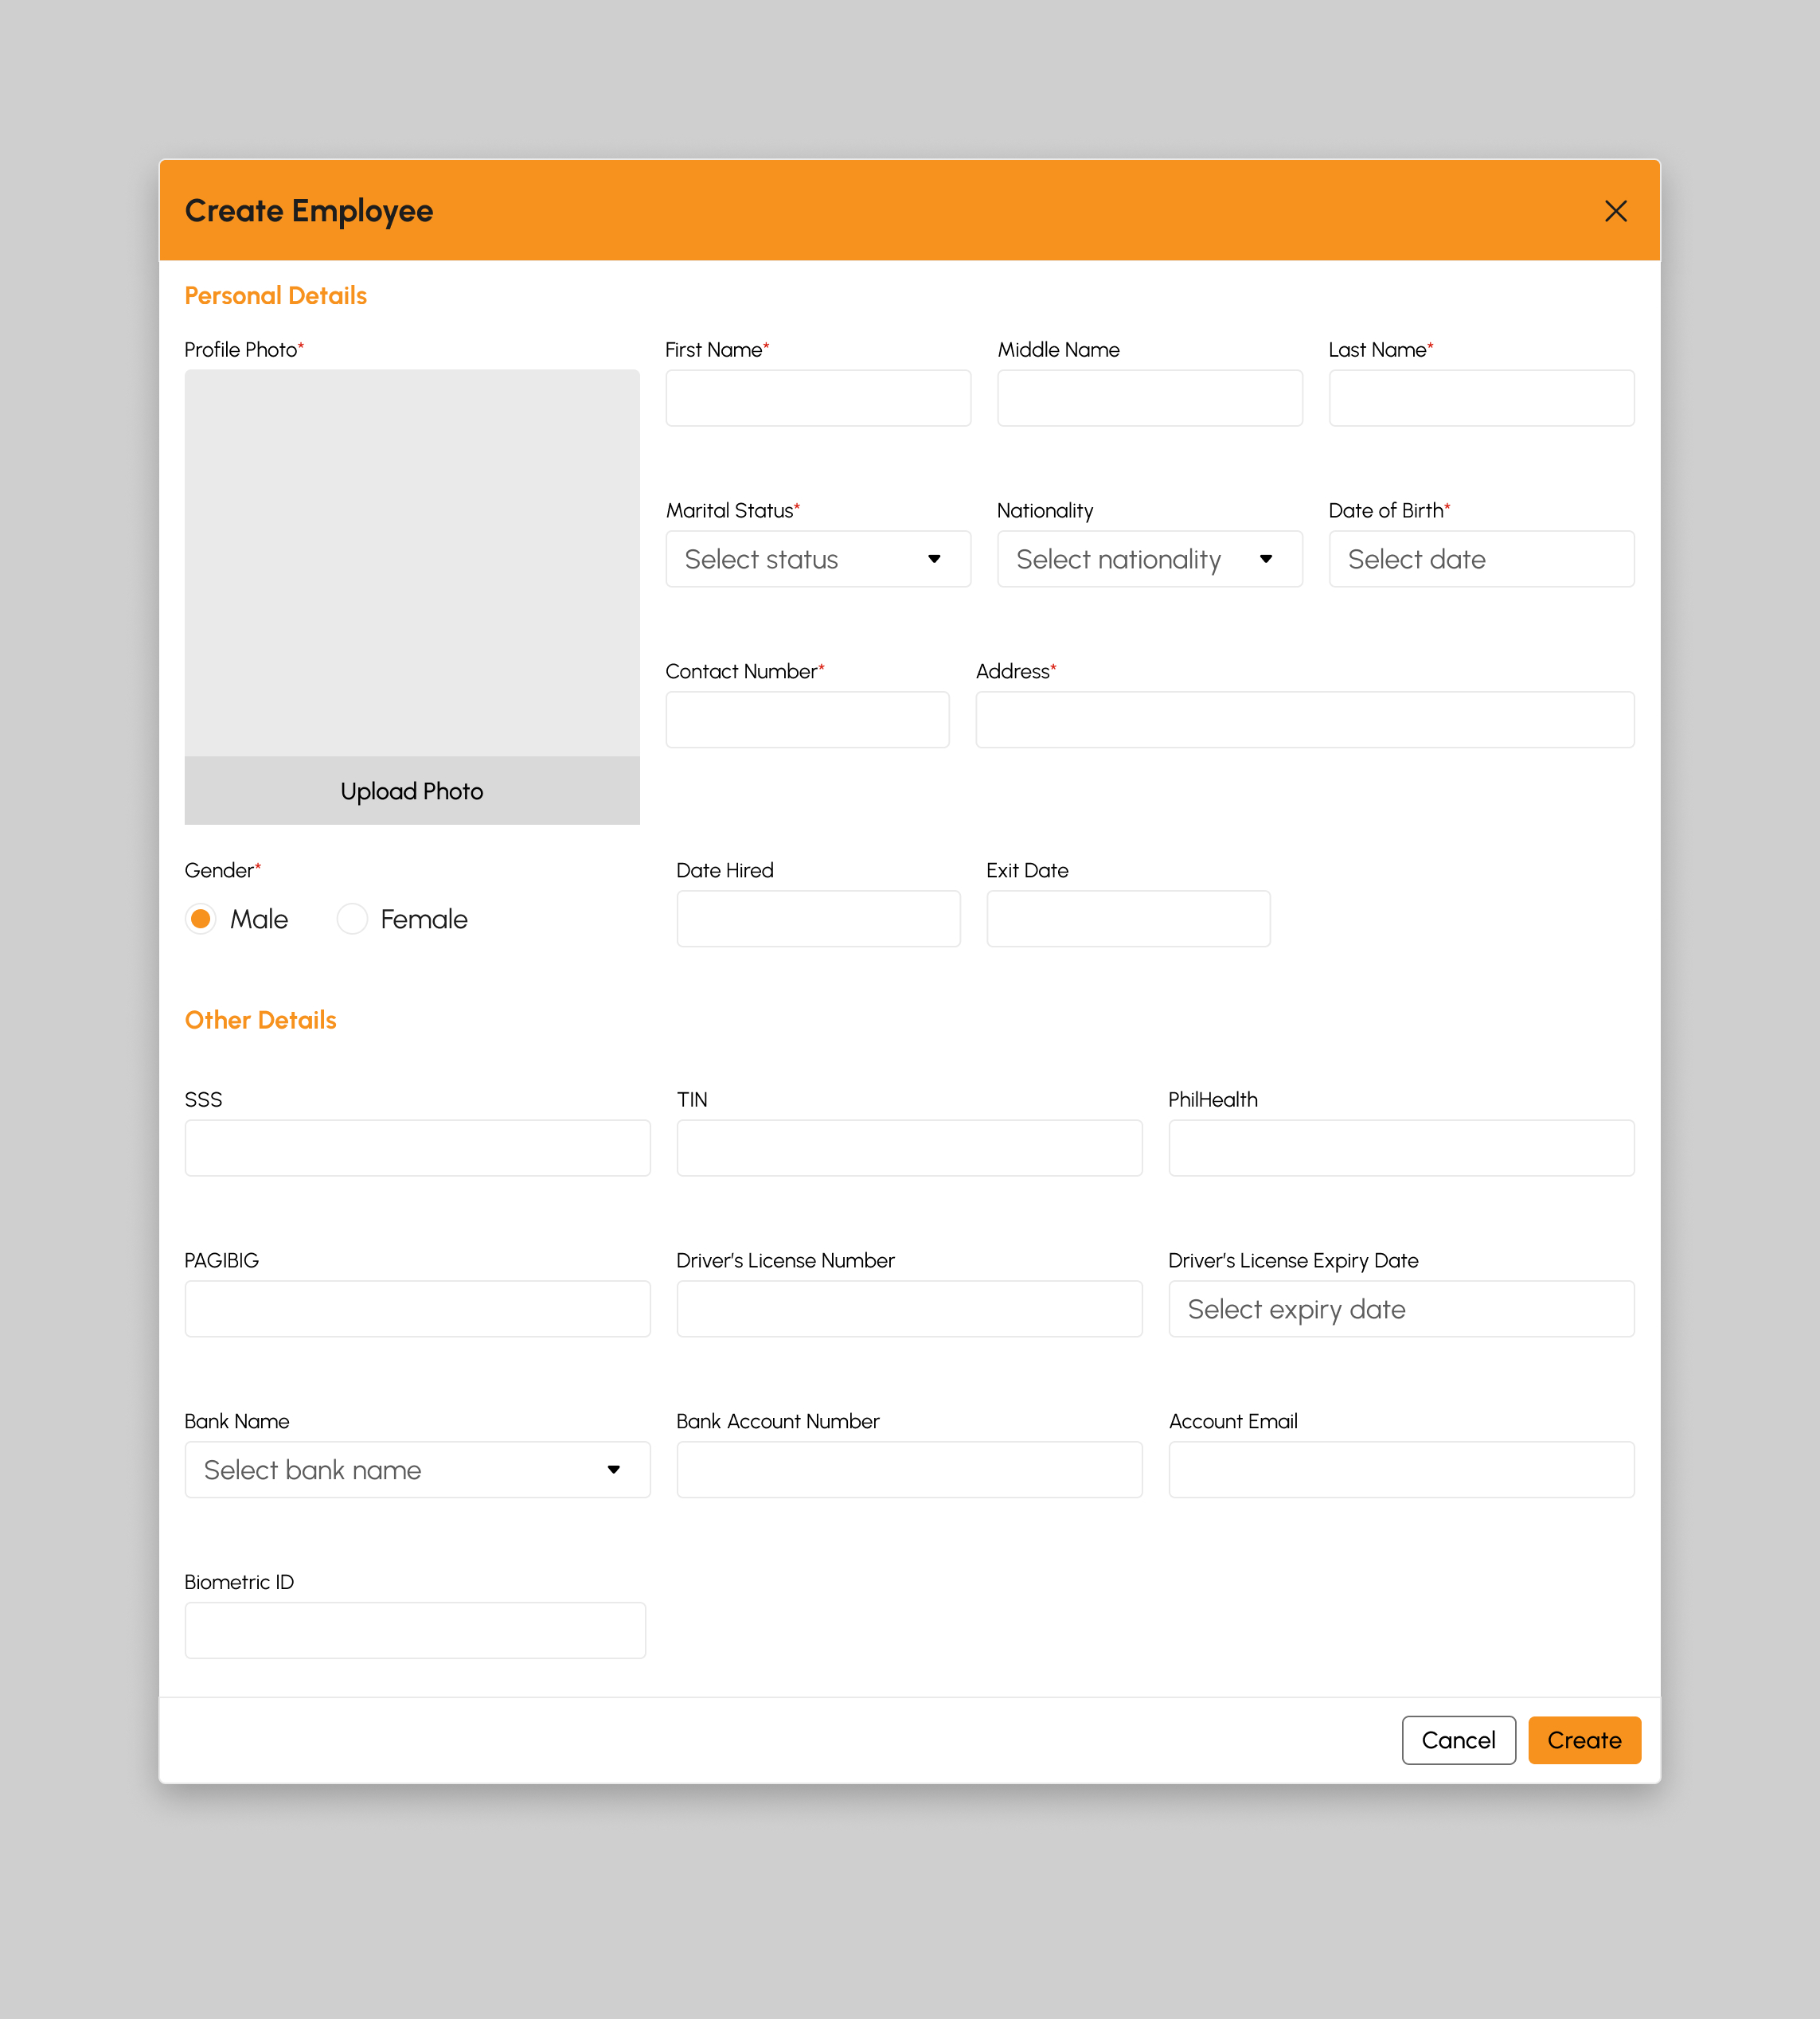
Note
Fields with (*) are required.
- Click the Create button.
-
A successful notification will show.
Employee successfully created
- Step 3 will successfully create new employee otherwise, proceed to Step 6.
- Click the Cancel button to cancel the creation of Employee.
- The screen closes the modal.
- The system will not create nor save the employee information.
How to Edit Employee Information
- Click the Edit button.
-
Fill in Employee details.
- First Name
- Middle Name
- Last Name
- Gender
- Marital Status
- Nationality
- Date of Birth
- Contact Number
- Address
- Date Hired
- Exit Date
- SSS
- TIN
- Philhealth
- PAGIBIG
- Driver’s License Number
- Driver’s License Expiry Date
- Bank Name
- Bank Account Number
- Account Email
- Biometric ID
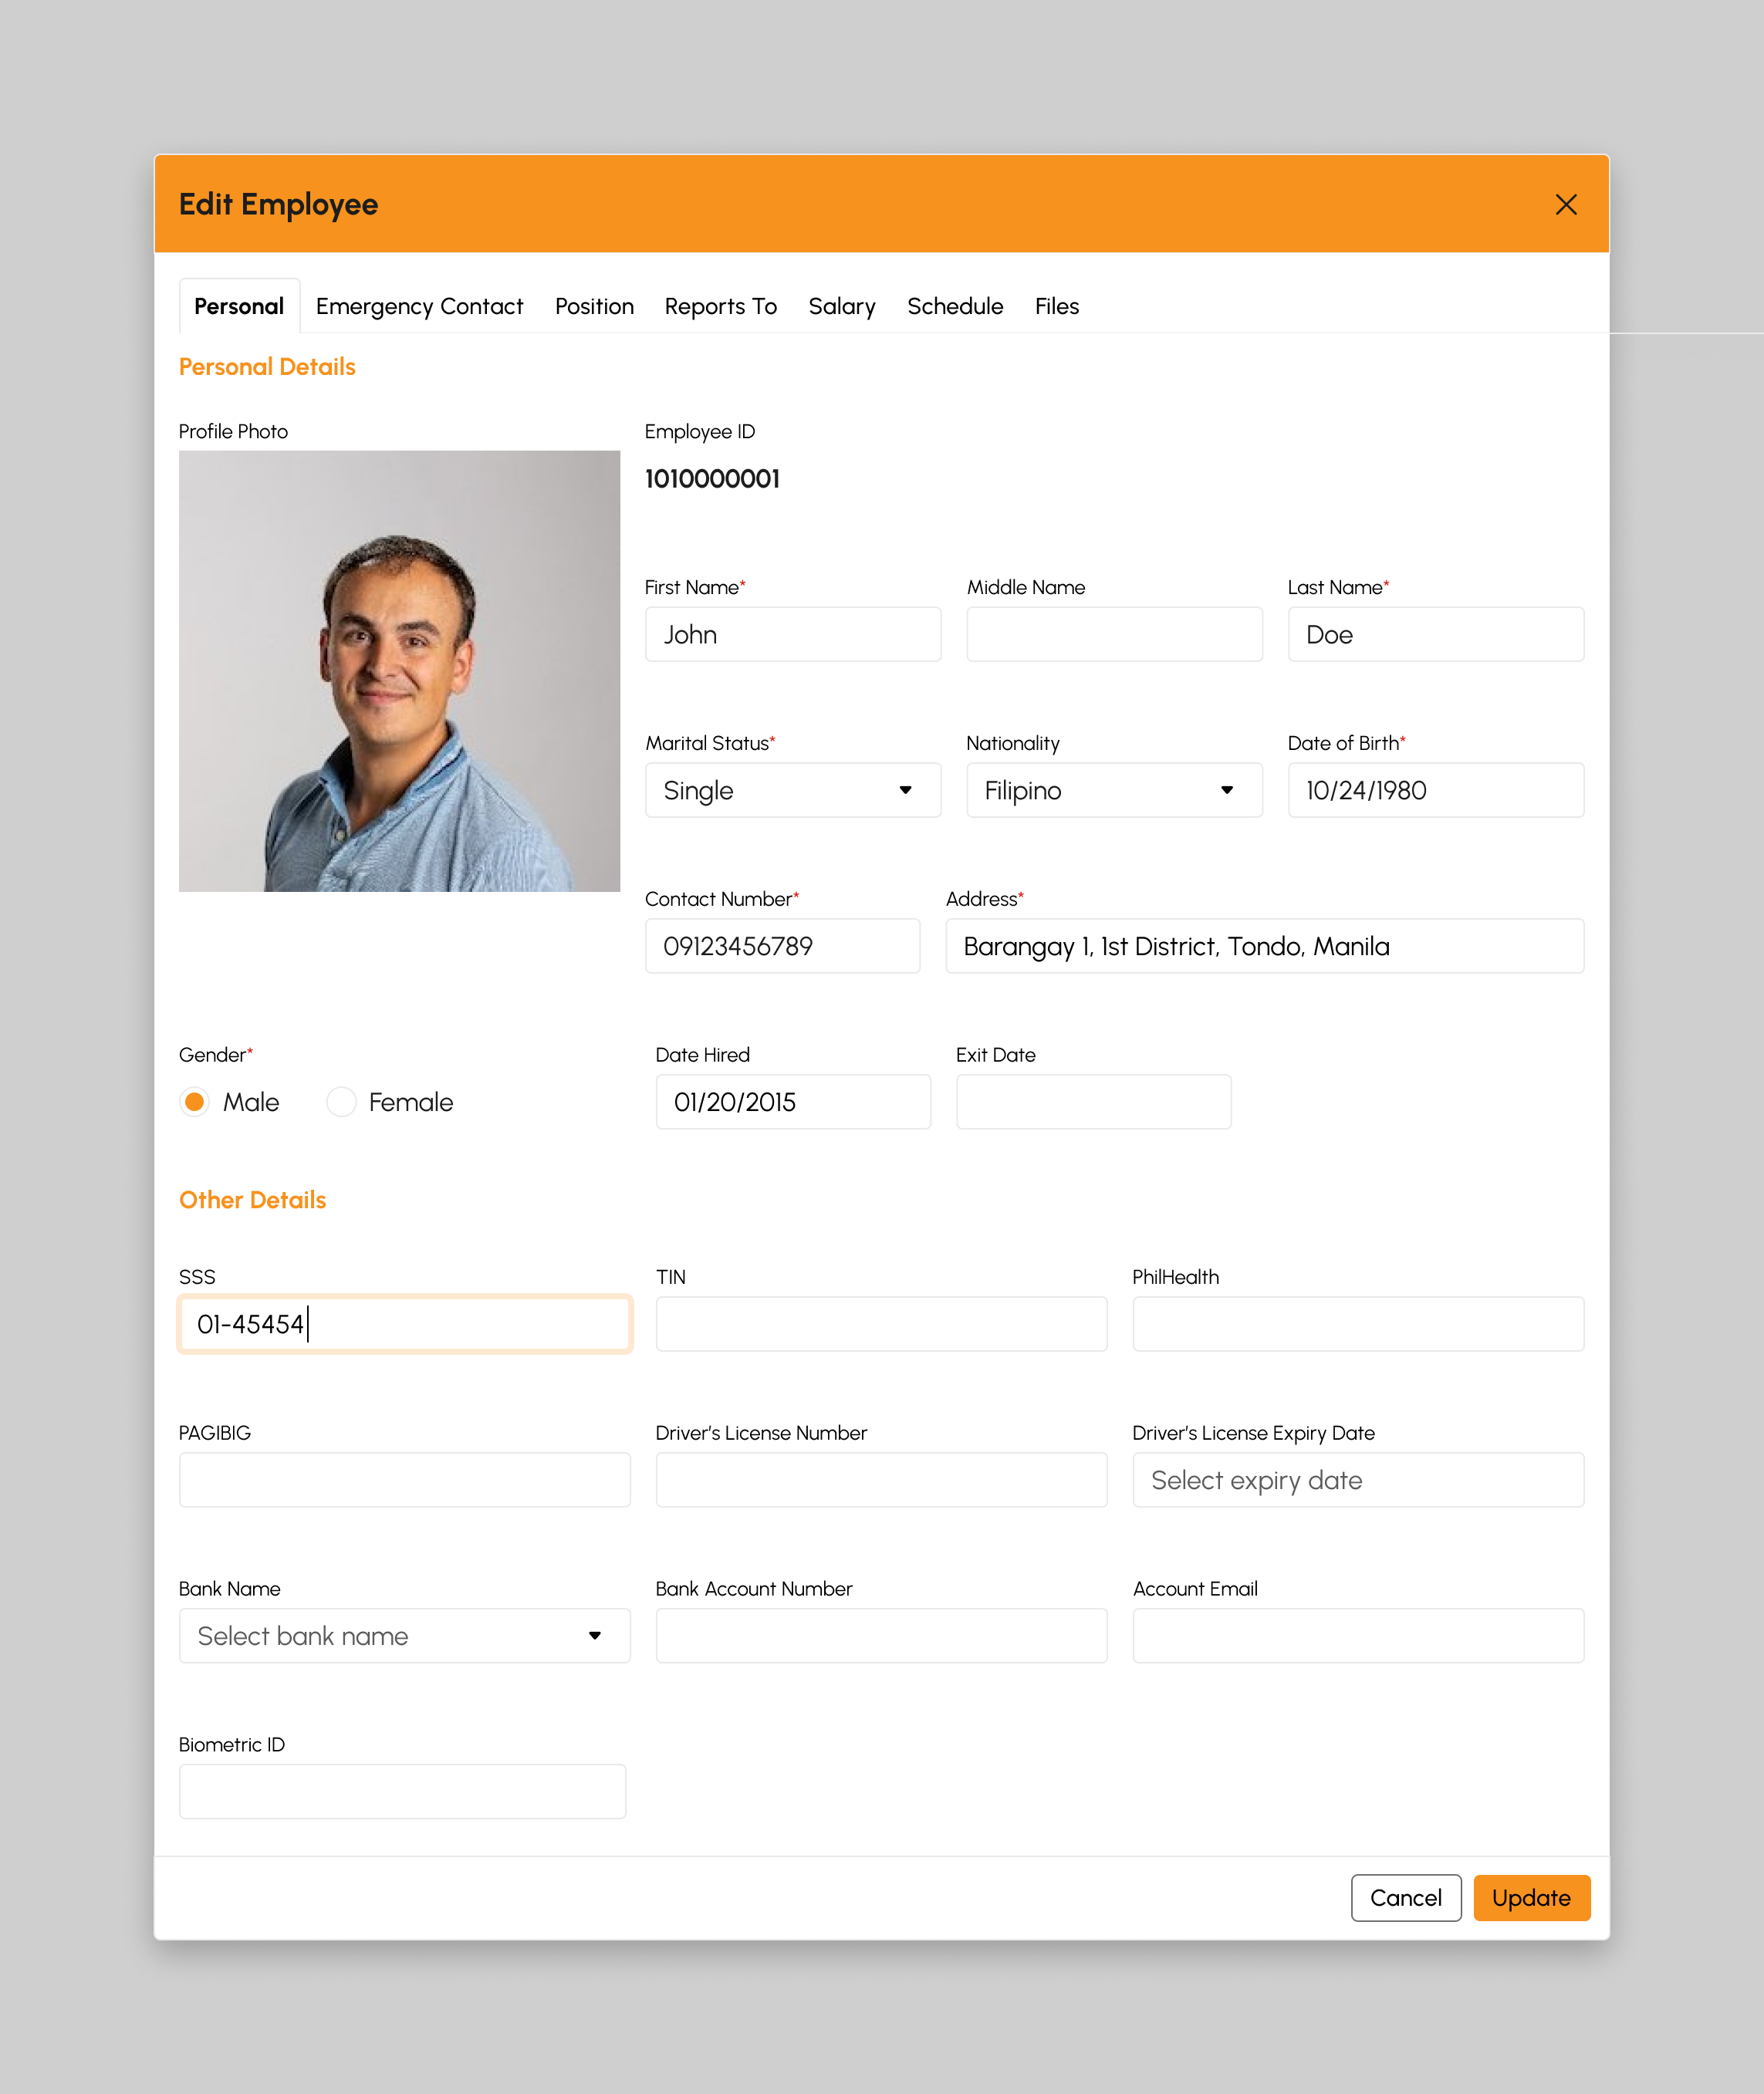
Note
Fields with (*) are required.
- Click the Update button.
-
A successful notification will show:
Employee successfully updated
- Step 3 will successfully update Employee information otherwise, proceed to Step 6.
- Click the Cancel button to cancel updating Employee information.
- The screen closes the modal.
- The system will not proceed updating the employee information.
How to Import Multiple Employee Information
- Click the Import button.
-
The screen displays a modal below to begin importing multiple employee information.
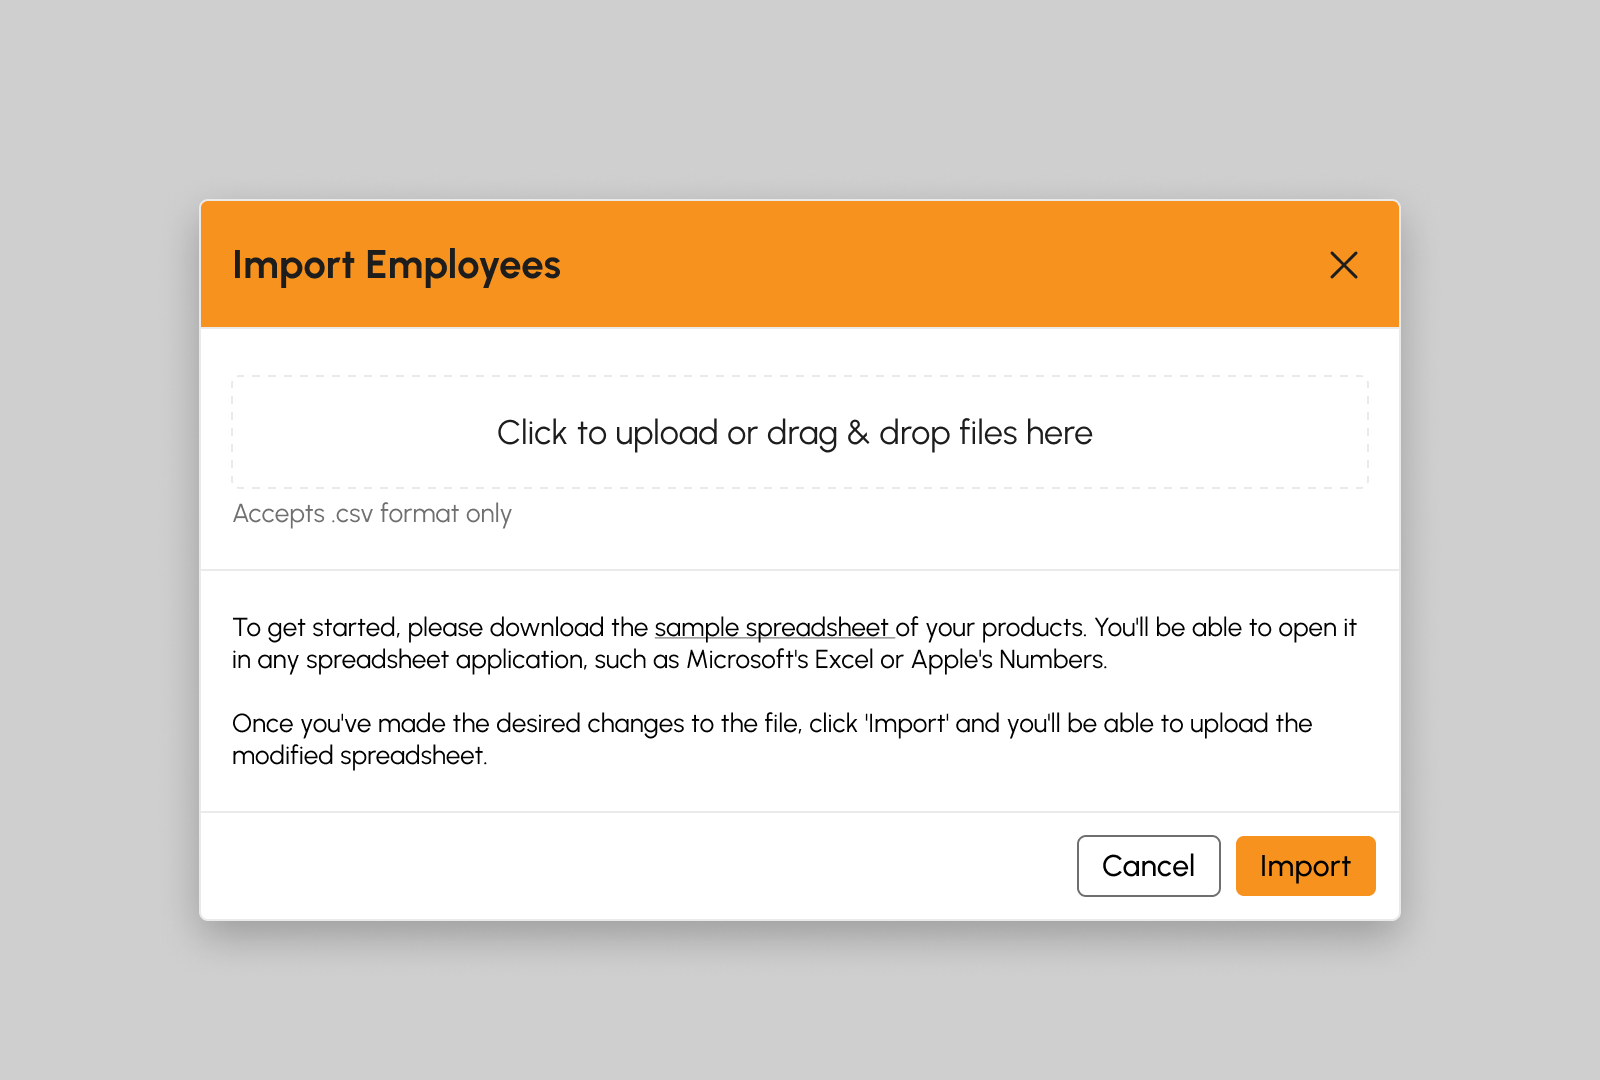
- In the import modal, click the Add button and select the file to be imported.
- Click the Import button to successfully import the file.
-
A successful notification message will show:
Employees successfully imported
- Step 4 will successfully import the file otherwise, proceed to Step 7.
- Click the Cancel button to cancel the import of Employees.
- The screen closes the modal.
- The system will not proceed on uploading the import file.
How to Download List of Employees
- Click the Export button.
- Downloading of the csv file will begin shortly.
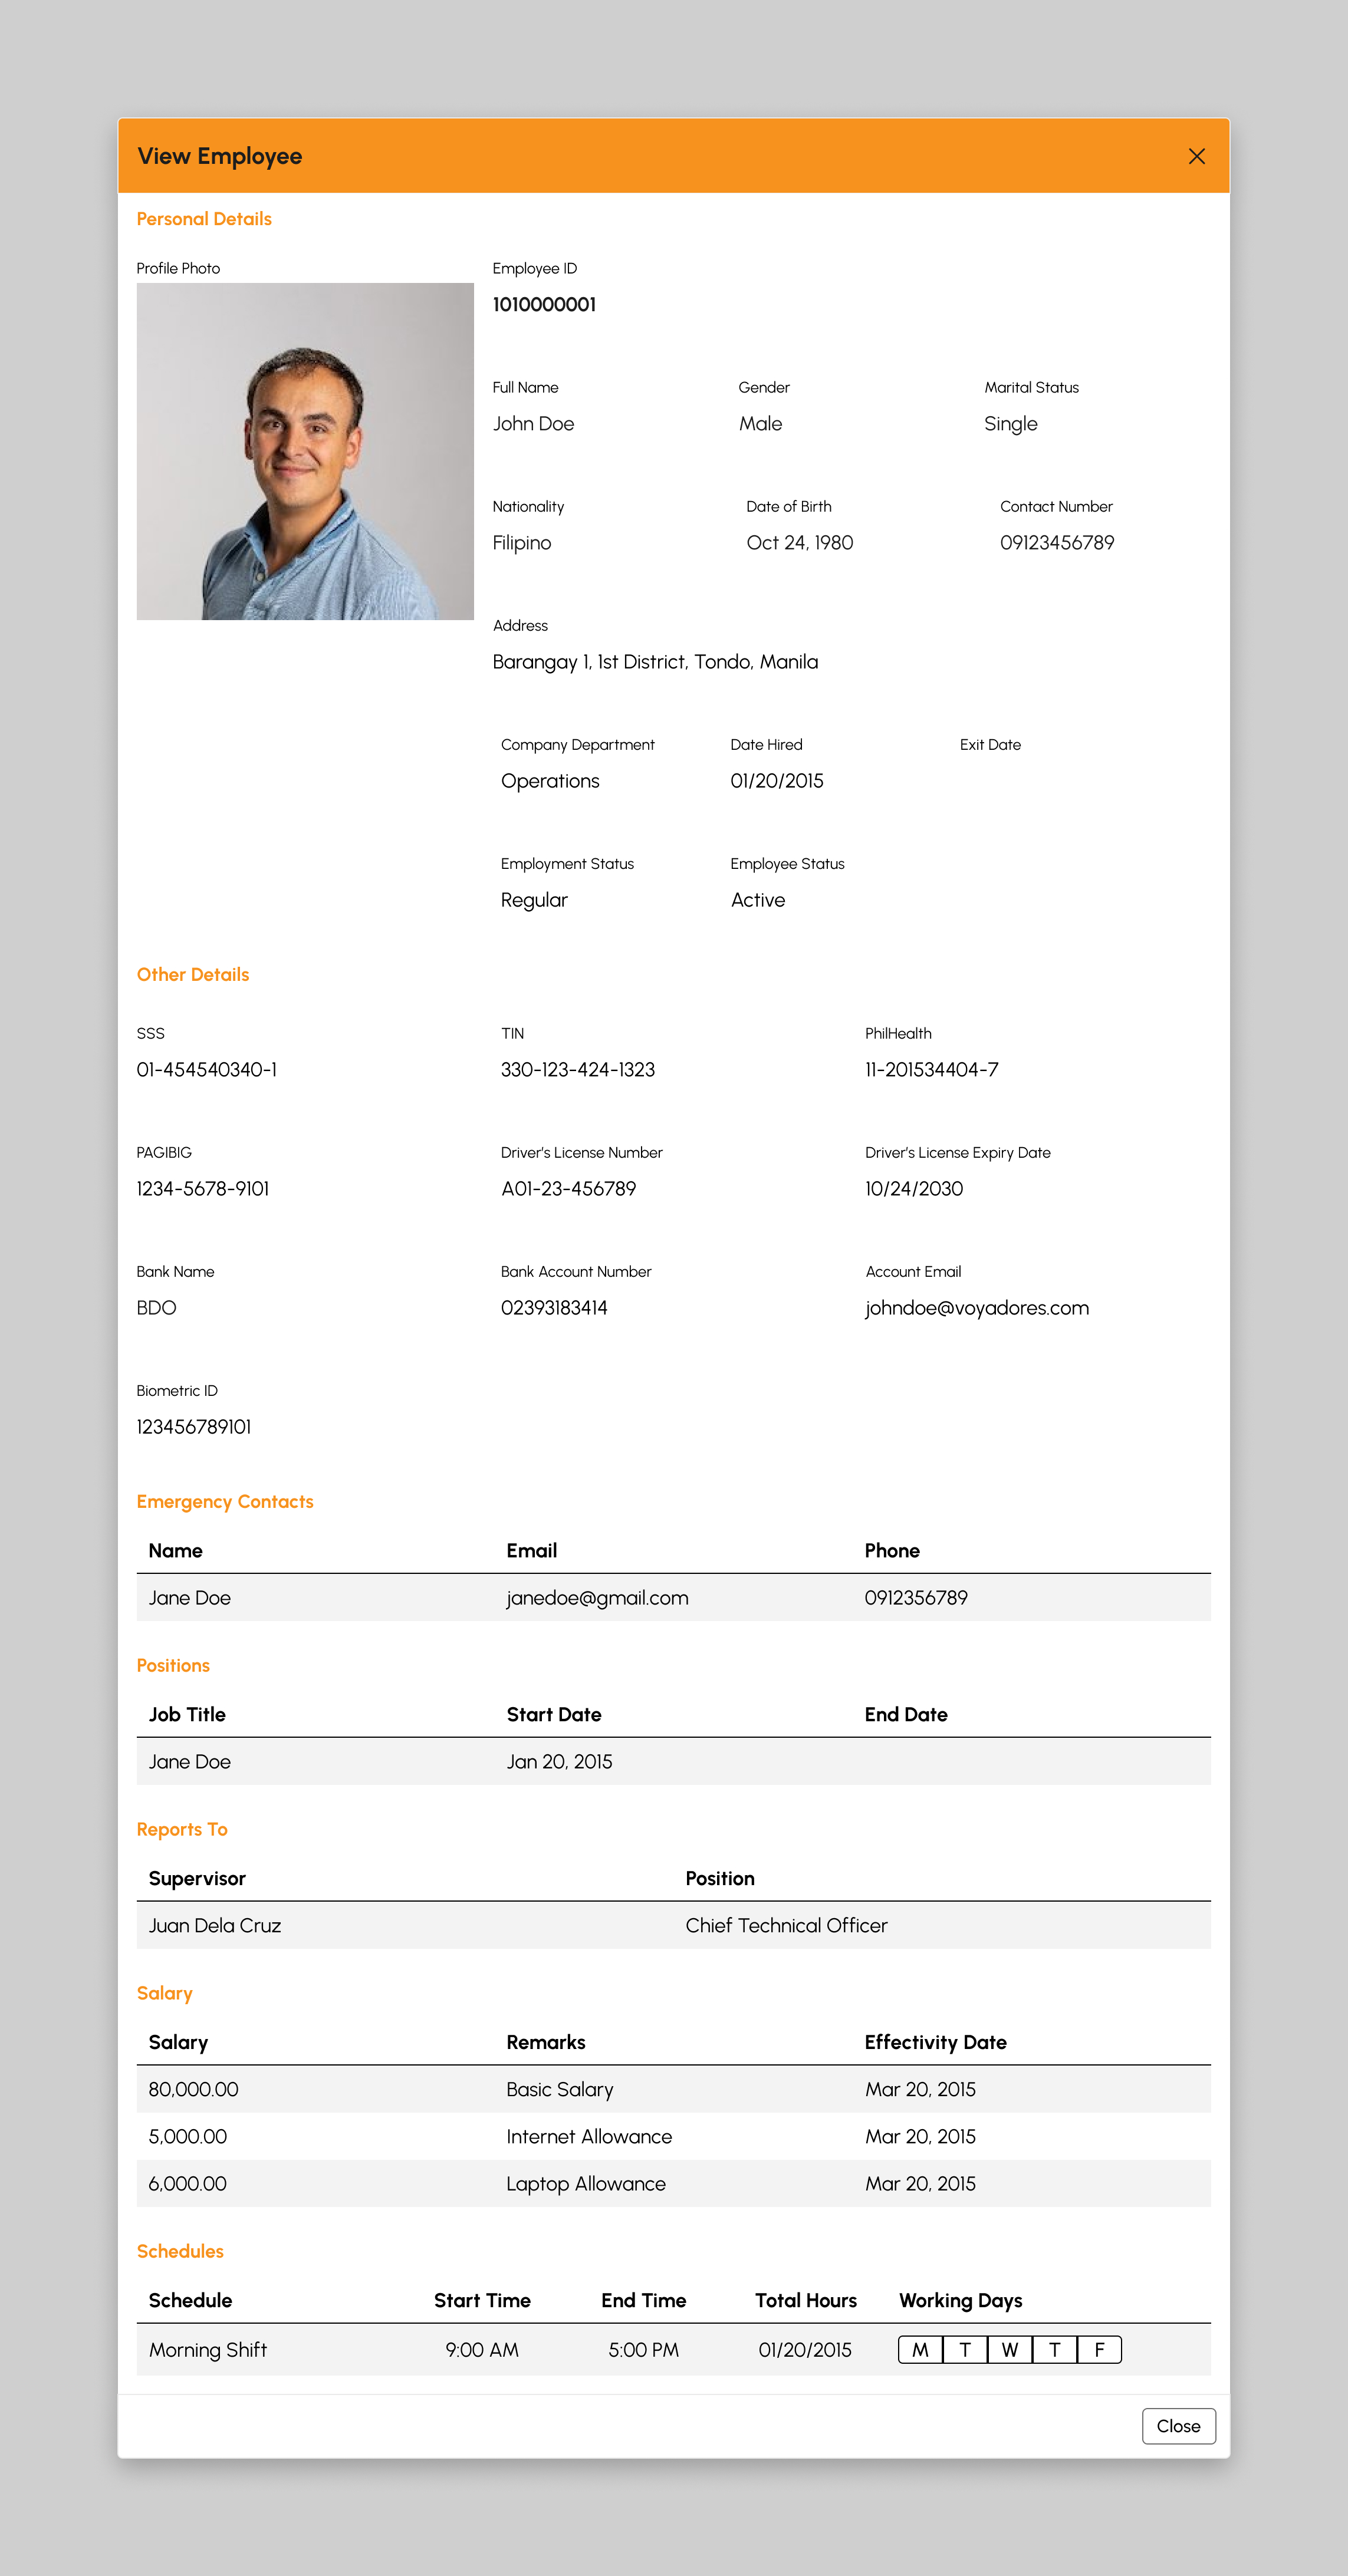
How to View Employee Information
- Click the View button.
-
The screen displays a modal below that shows the Employee Information:
- Personal Details
- Other Details
- Contacts
- Position
- Reports To
- Salary
- Work Schedule
How to Load More Employees
To verify if there are more than 20 Employees per status or per employment type, click the Load More button to display other Employees since the default item number displayed in the screen is from count 1-20.
Employee Entitlements
Introduction to Employee Entitlements Page
This page assigns leave benefits and other entitlements applicable in the company. This software version currently offers two (2) types of entitlements assignment:
- Assigning Attendance Entitlements
- Assigning Leave Entitlements
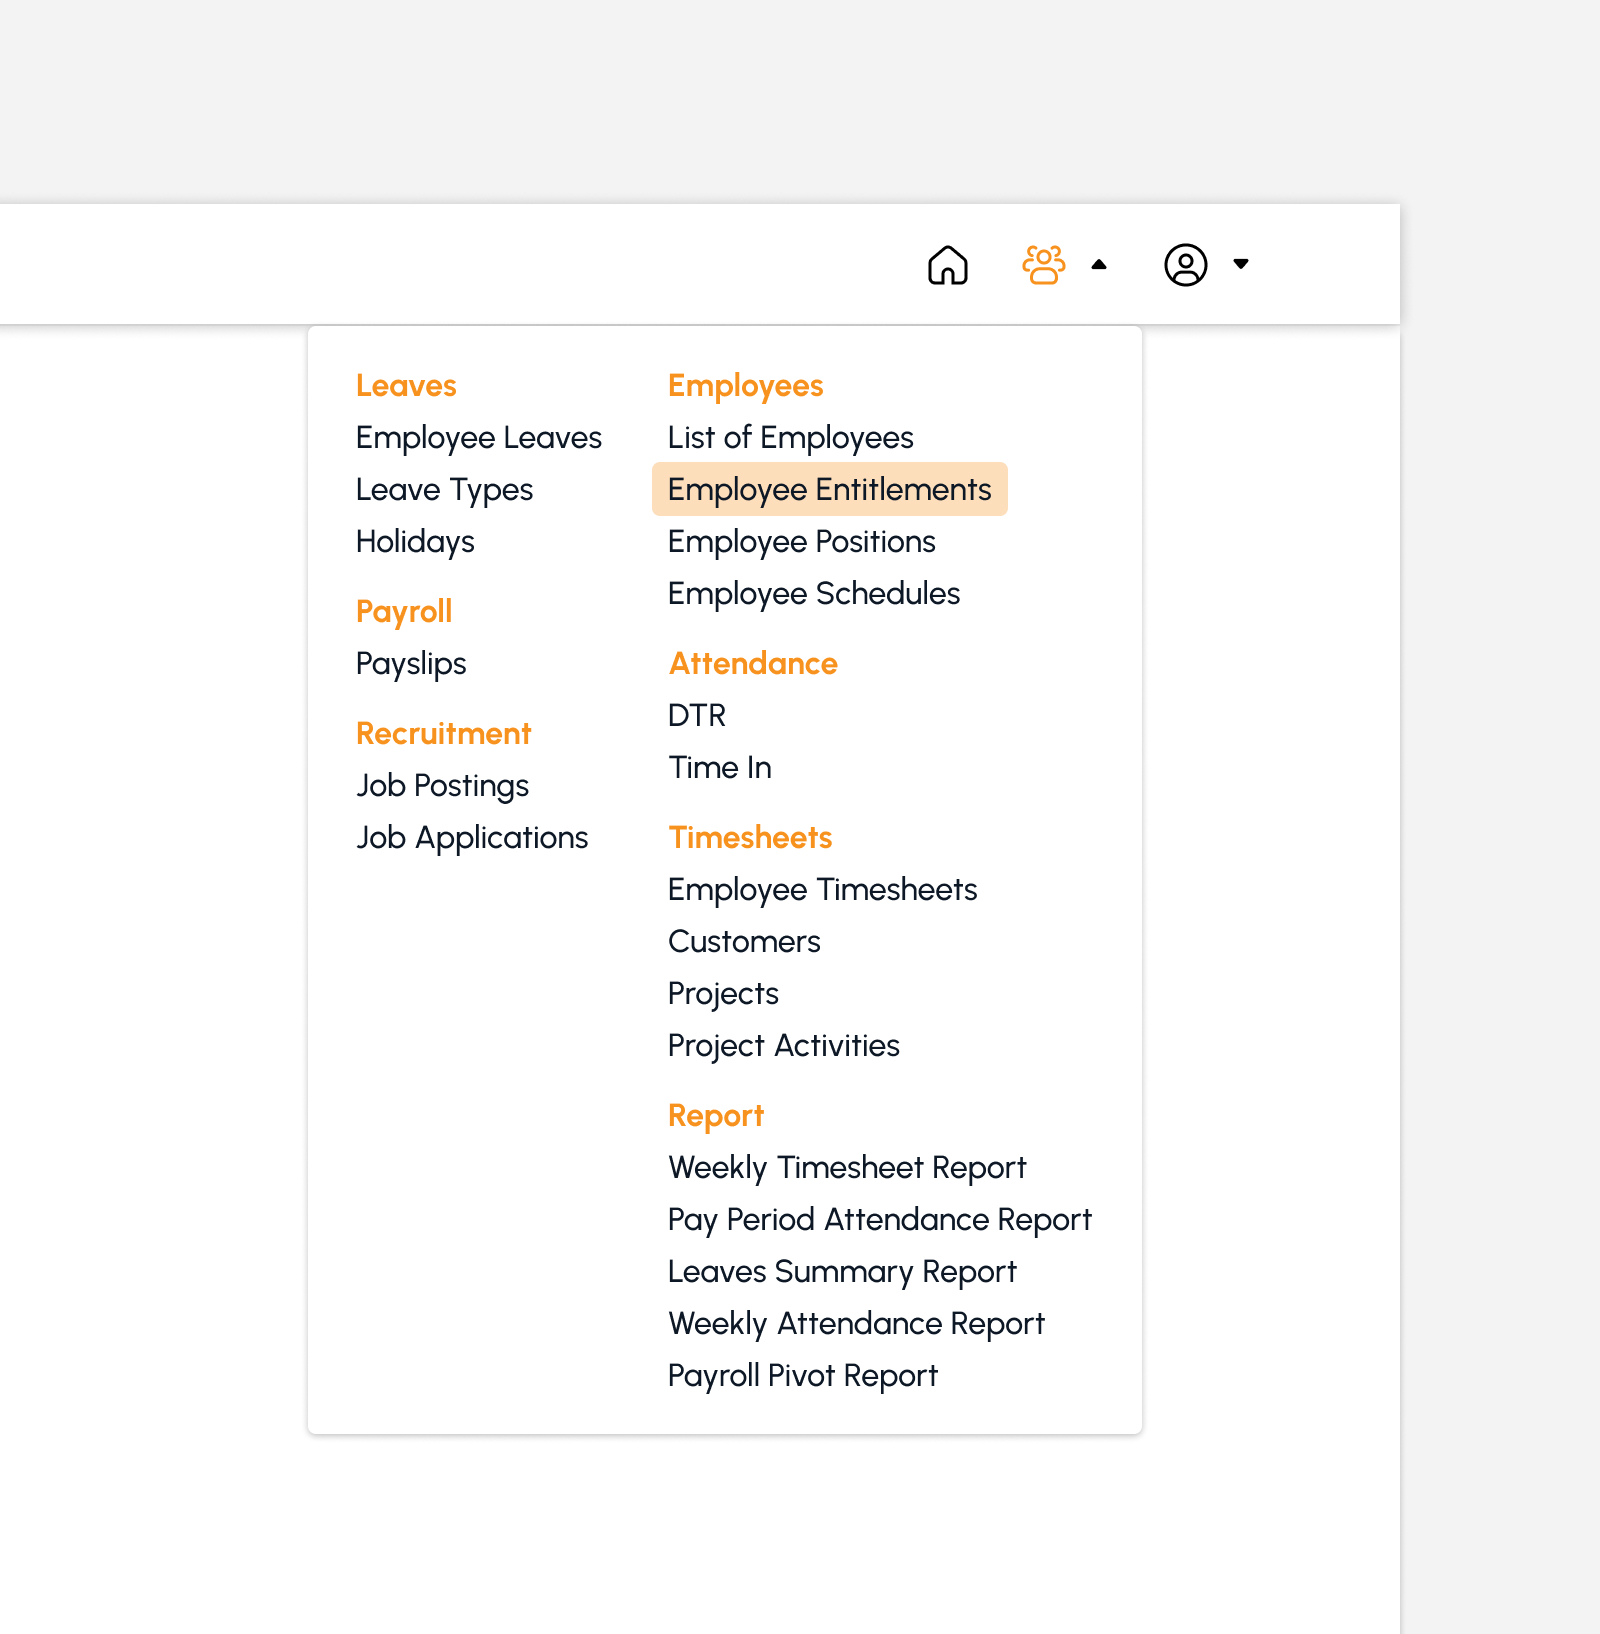
Assign Entitlements to employees to help manage leaves and attendance entries. To access this page, navigate to the Human Resources Module and click "Entitlements” under Employees Submodule as shown in the image below:
The screen redirects to the Entitlements page, showing several features to use that will be discussed in the next section.
Features in Employee Entitlements Page
The snip below is the high-level view of Entitlements page along with its built-in features.
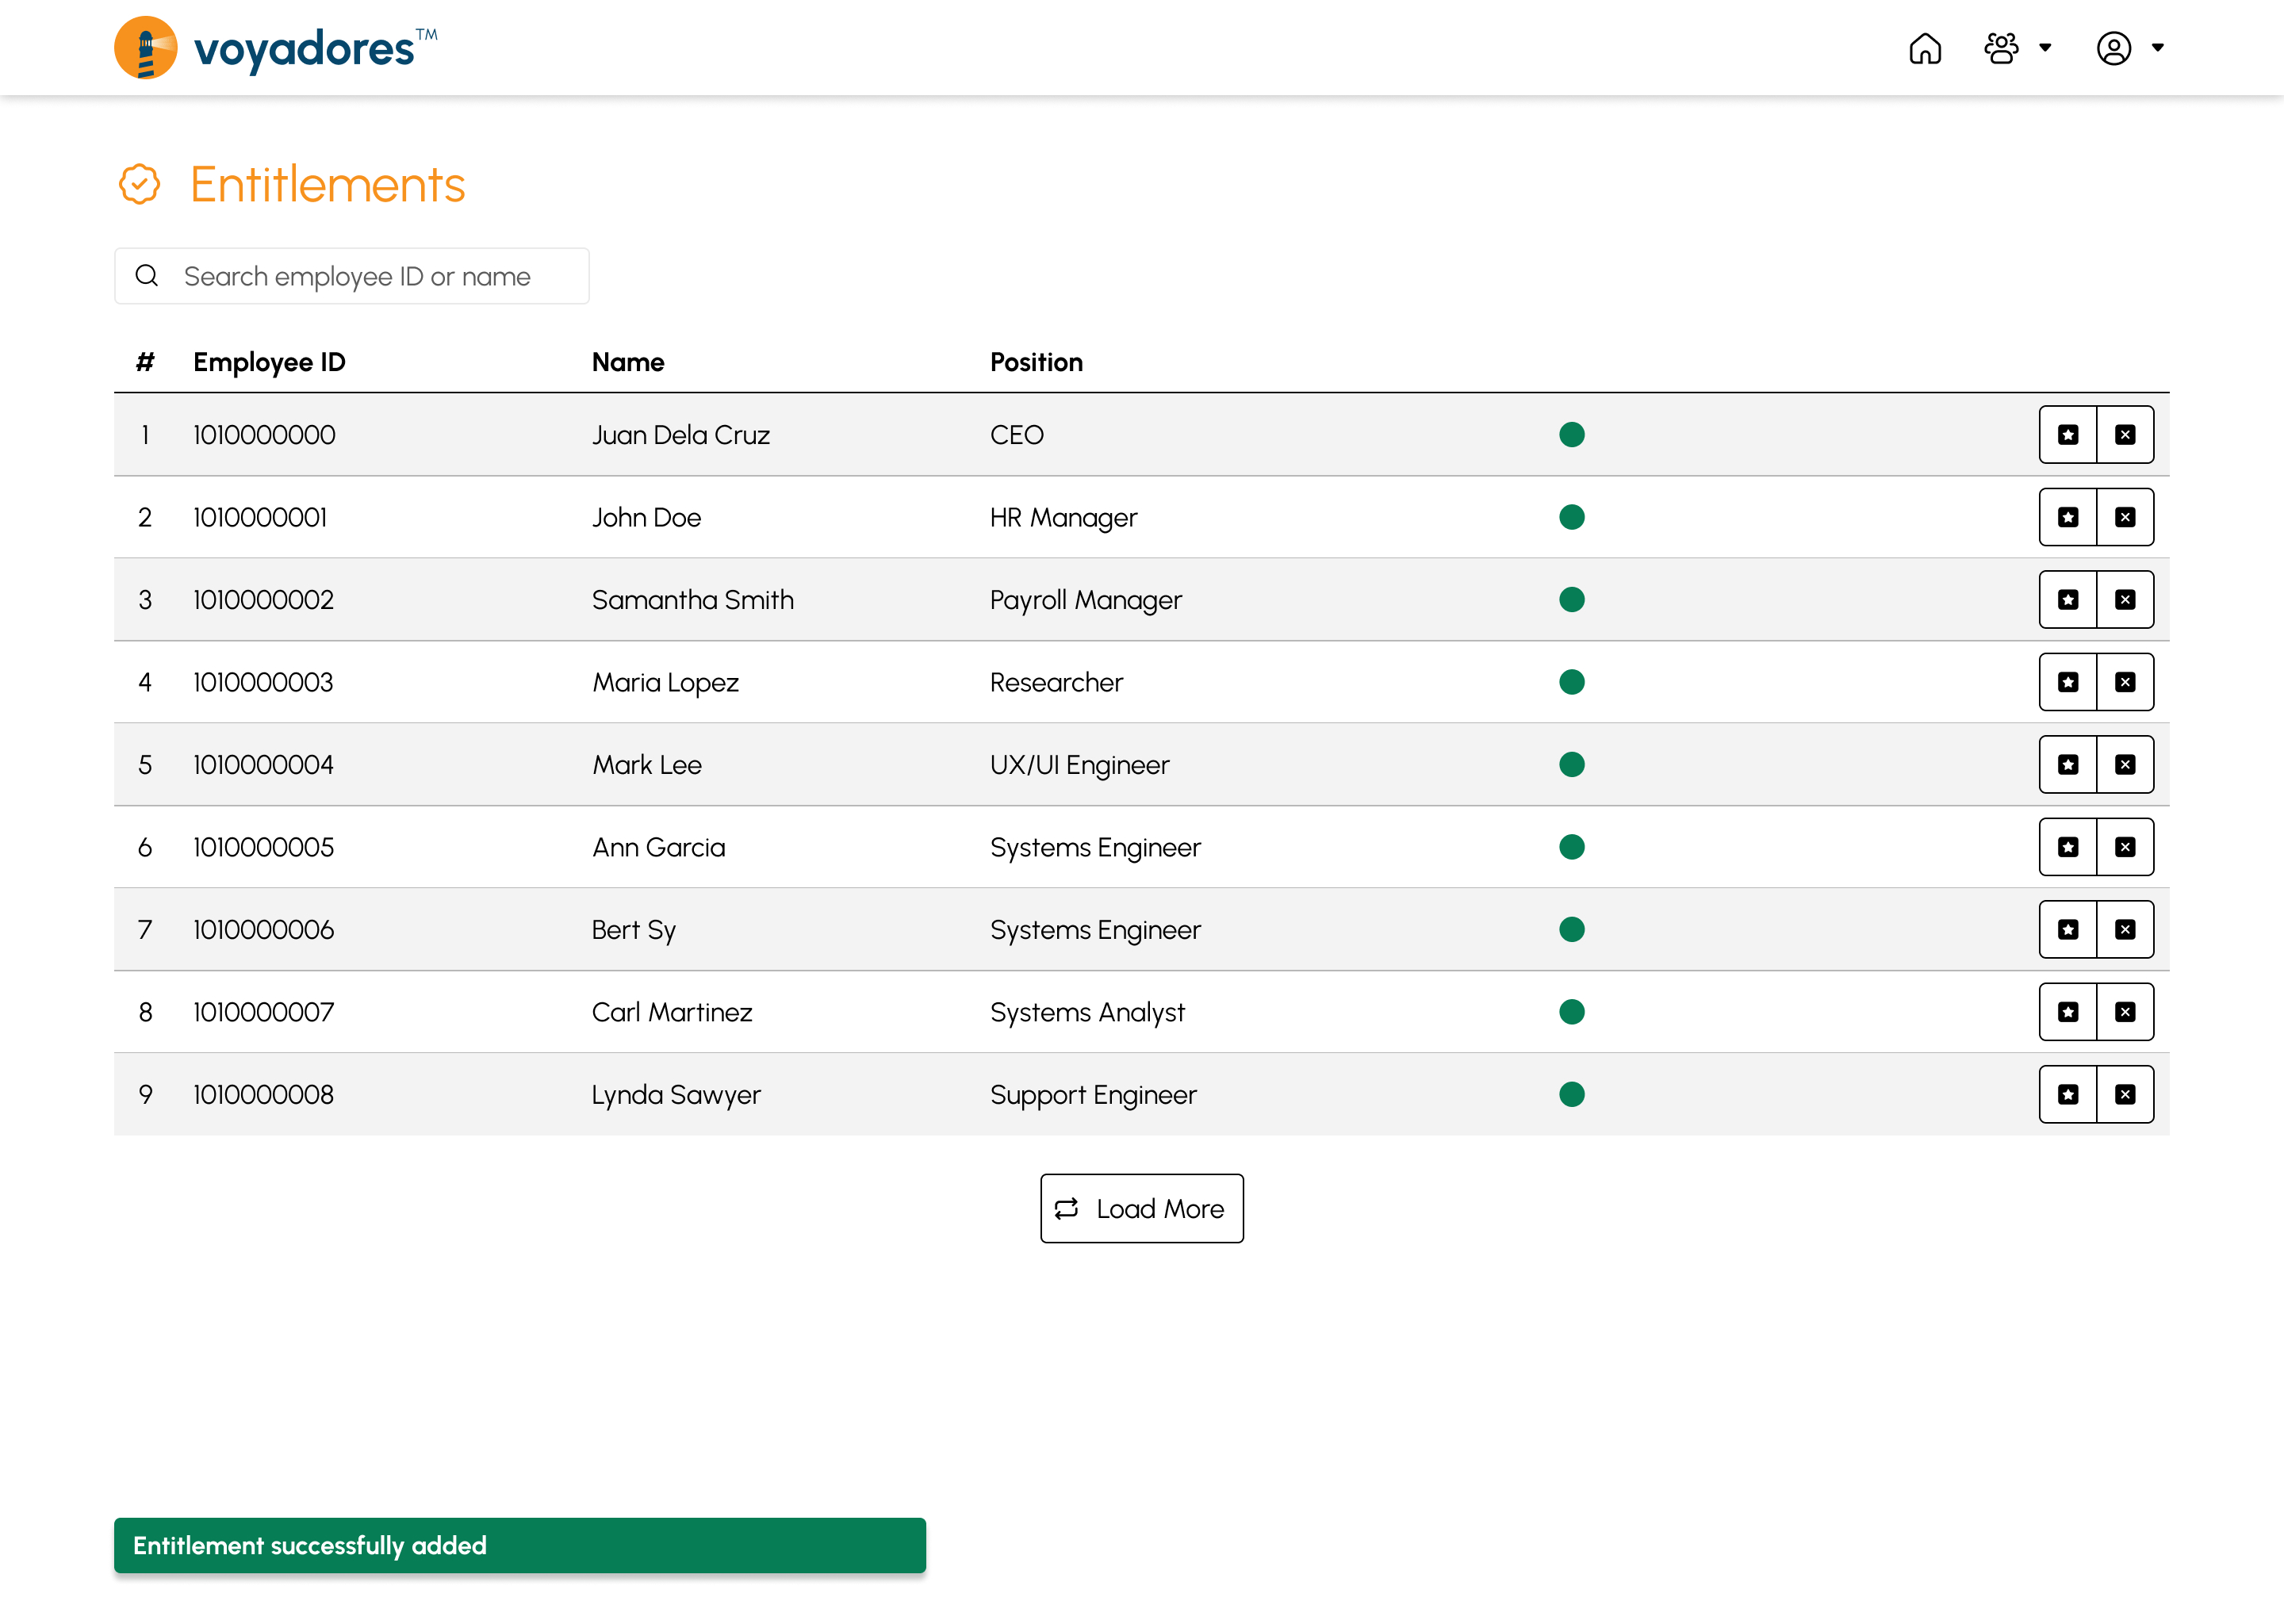
Entitlements Summary Table
The summary table displays the list of active employees with the following columns:
- Item number “#”
- Employee ID
- Employee Name
- Employee Position
- Status
-
Actions
- Assign Attendance Entitlements
- Assign Leave Entitlements
Searching Employee Name or ID
To search for an employee, follow the steps below:
-
Key in the name or ID of the employee in the Search Bar as shown in the snip below:

- The Entitlements Summary Table will display the searched employee name or ID.
Assigning Attendance Entitlements
Assign Attendance Entitlements to employee by following the procedures as follows:
-
Begin the procedure by clicking the Assign Attendance Entitlement button to display the Assign Attendance Entitlement modal as shown below:
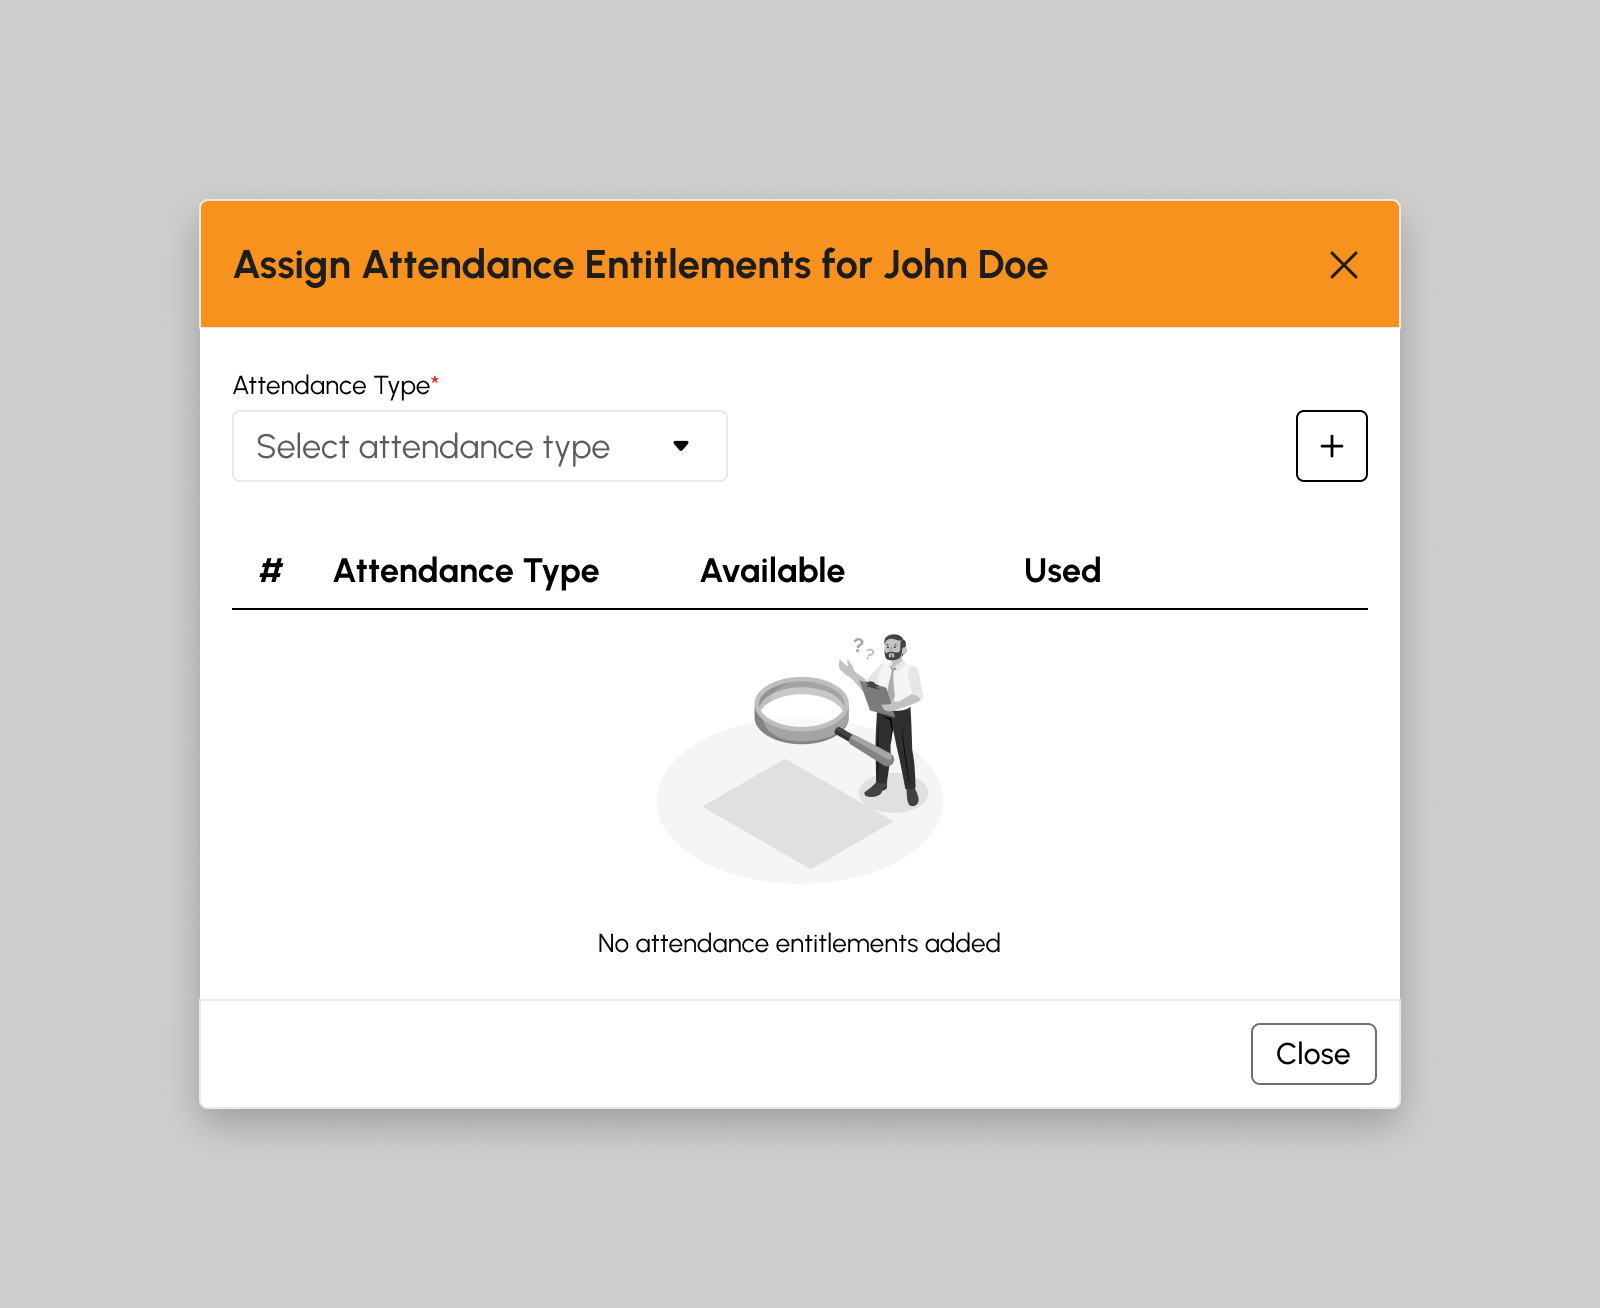
-
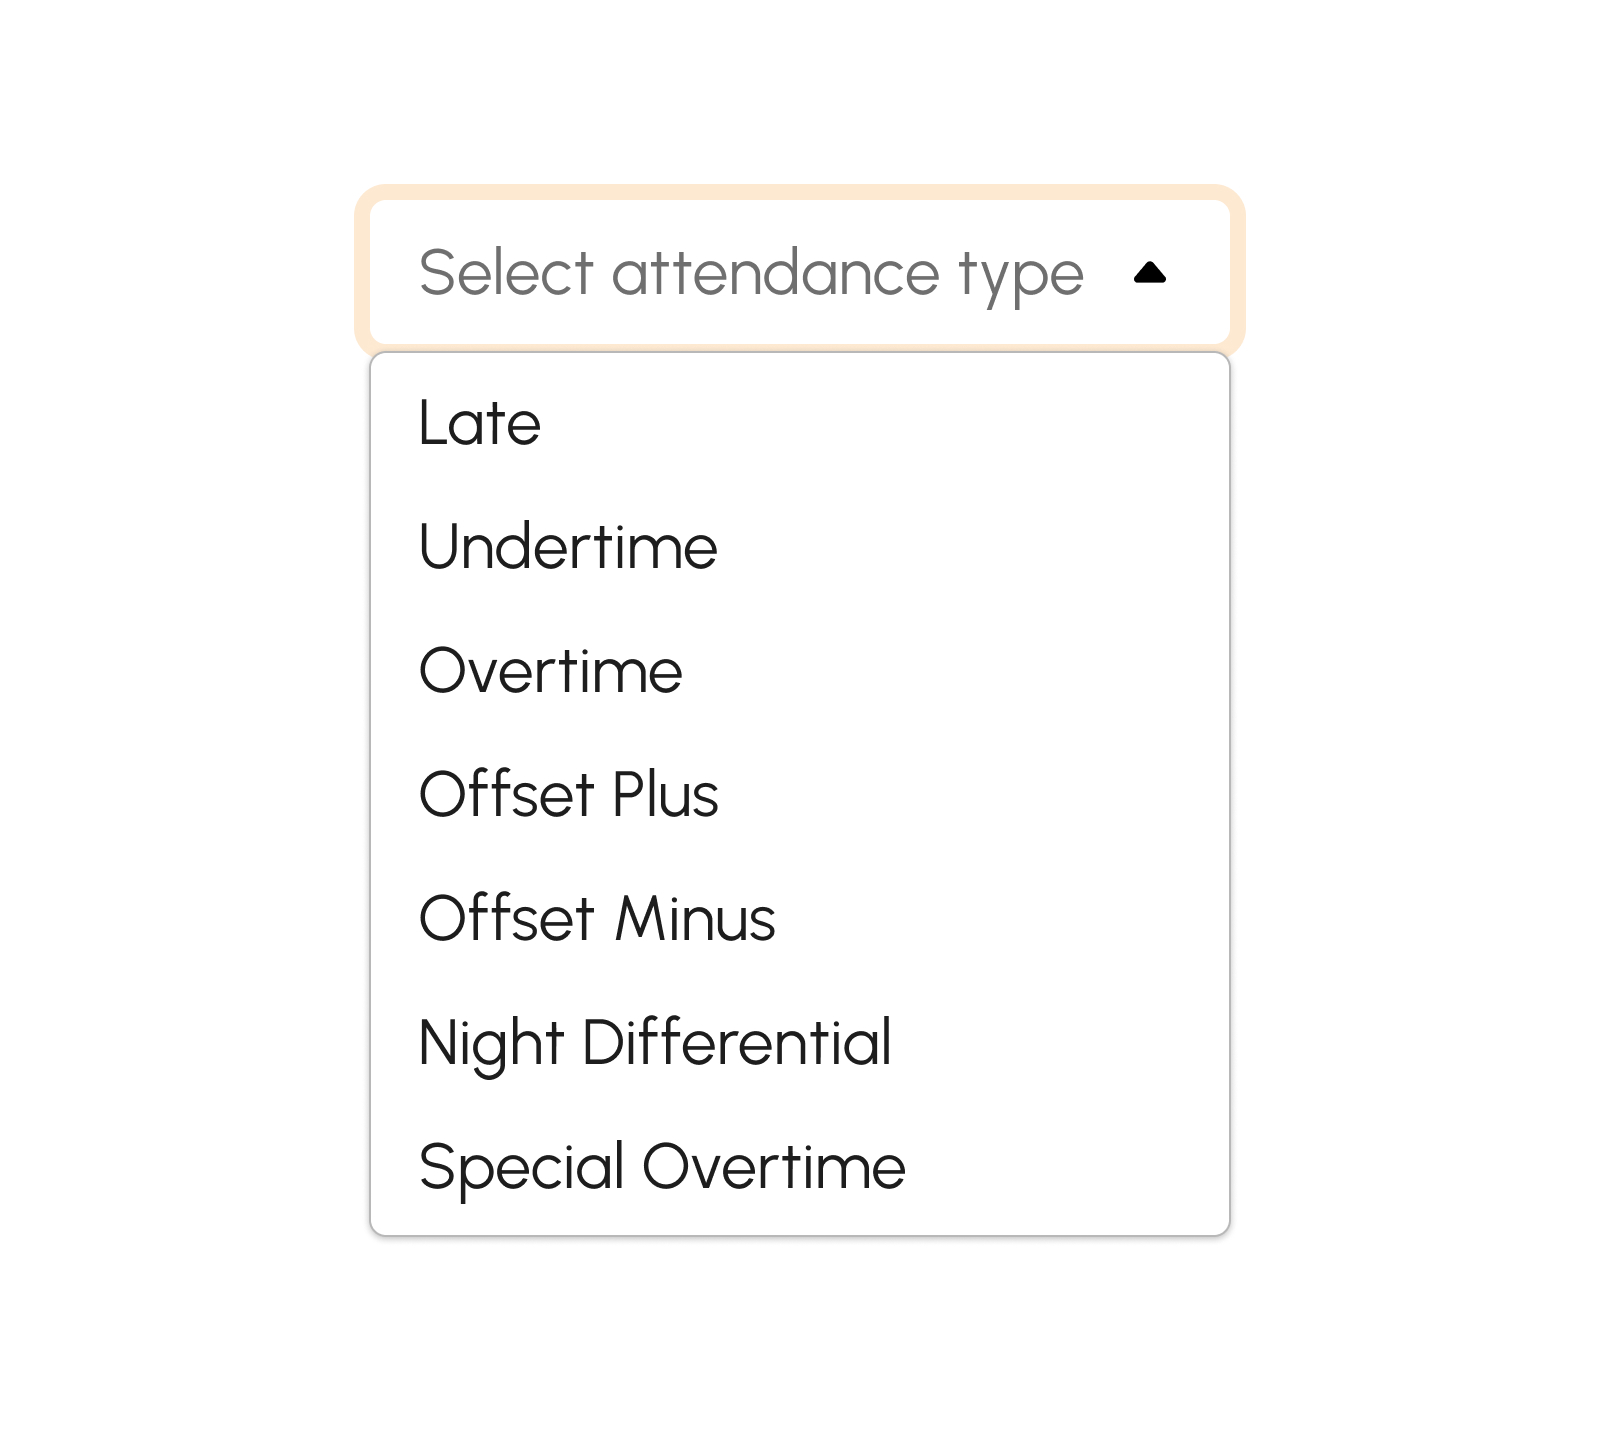
Select an attendance type by clicking this field.
- Click the Add button to add the attendance entitlement.
-
Review the details as shown in the table below:
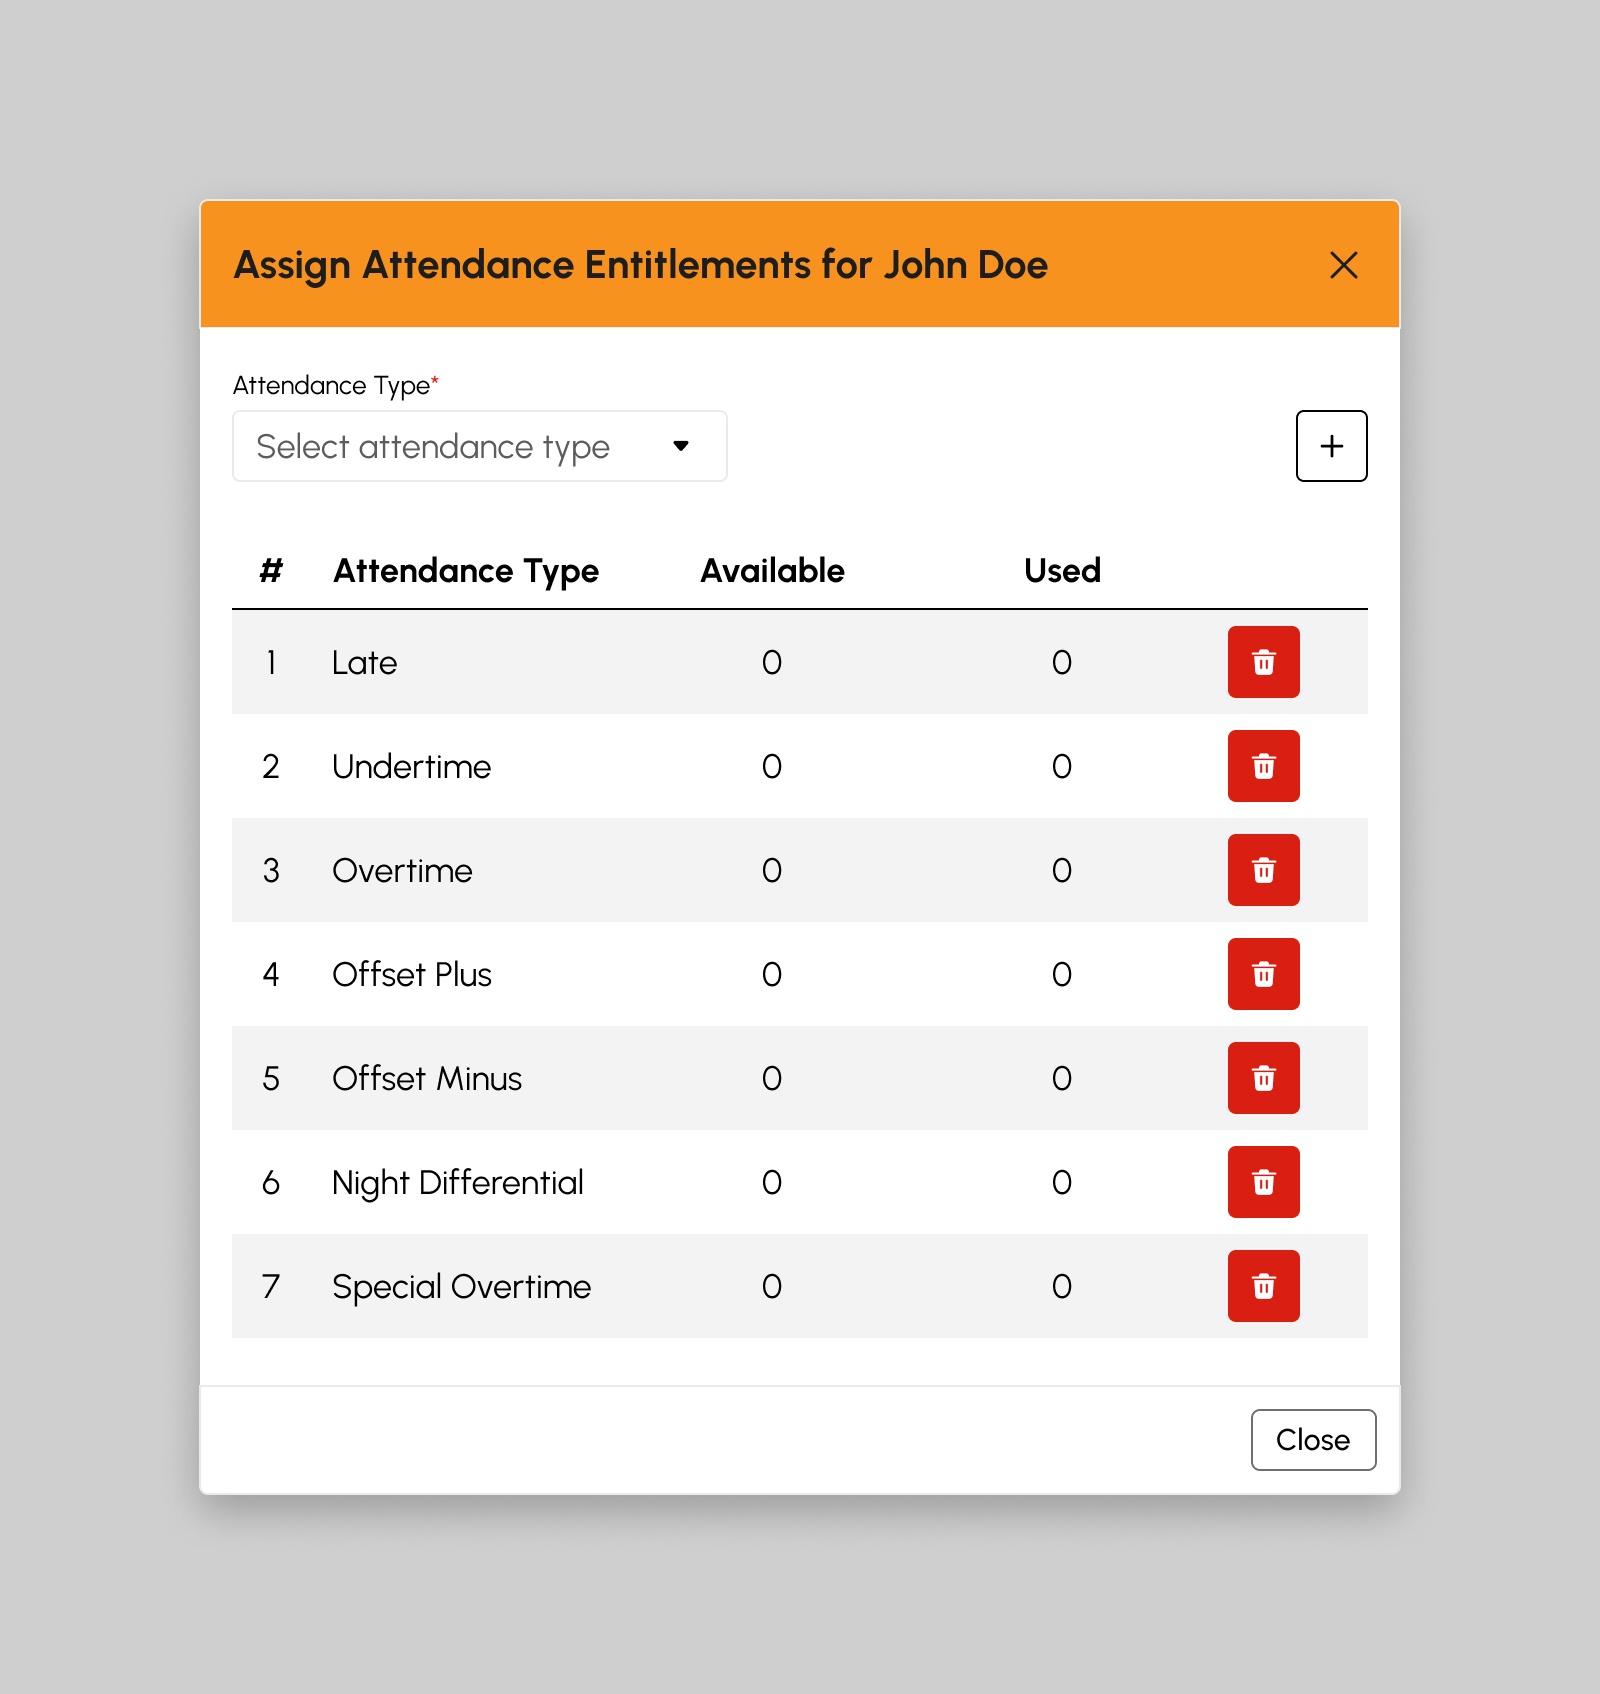
- Column 1 represents the item list number.
- Column 2 displays the selected attendance type.
- Column 3 shows the total number of attendance entitlement filed by an employee based on the employee's DTR.
- To remove the entitlement type, simply click the Delete button to remove the assigned entitlement type.
- Repeat steps 1-4 to assign more Attendance Entitlements to employee, otherwise proceed to Step 7.
- Click the Close button on the bottom right or Close button on the top right of the modal to close the Assign Attendance Entitlement modal.
Assigning Leave Entitlements
Follow the procedures below to assign Leave Entitlements to employees.
-
Begin this procedure by clicking the Assign Leave Entitlement button to display the Assign Leave Entitlement modal as shown below:
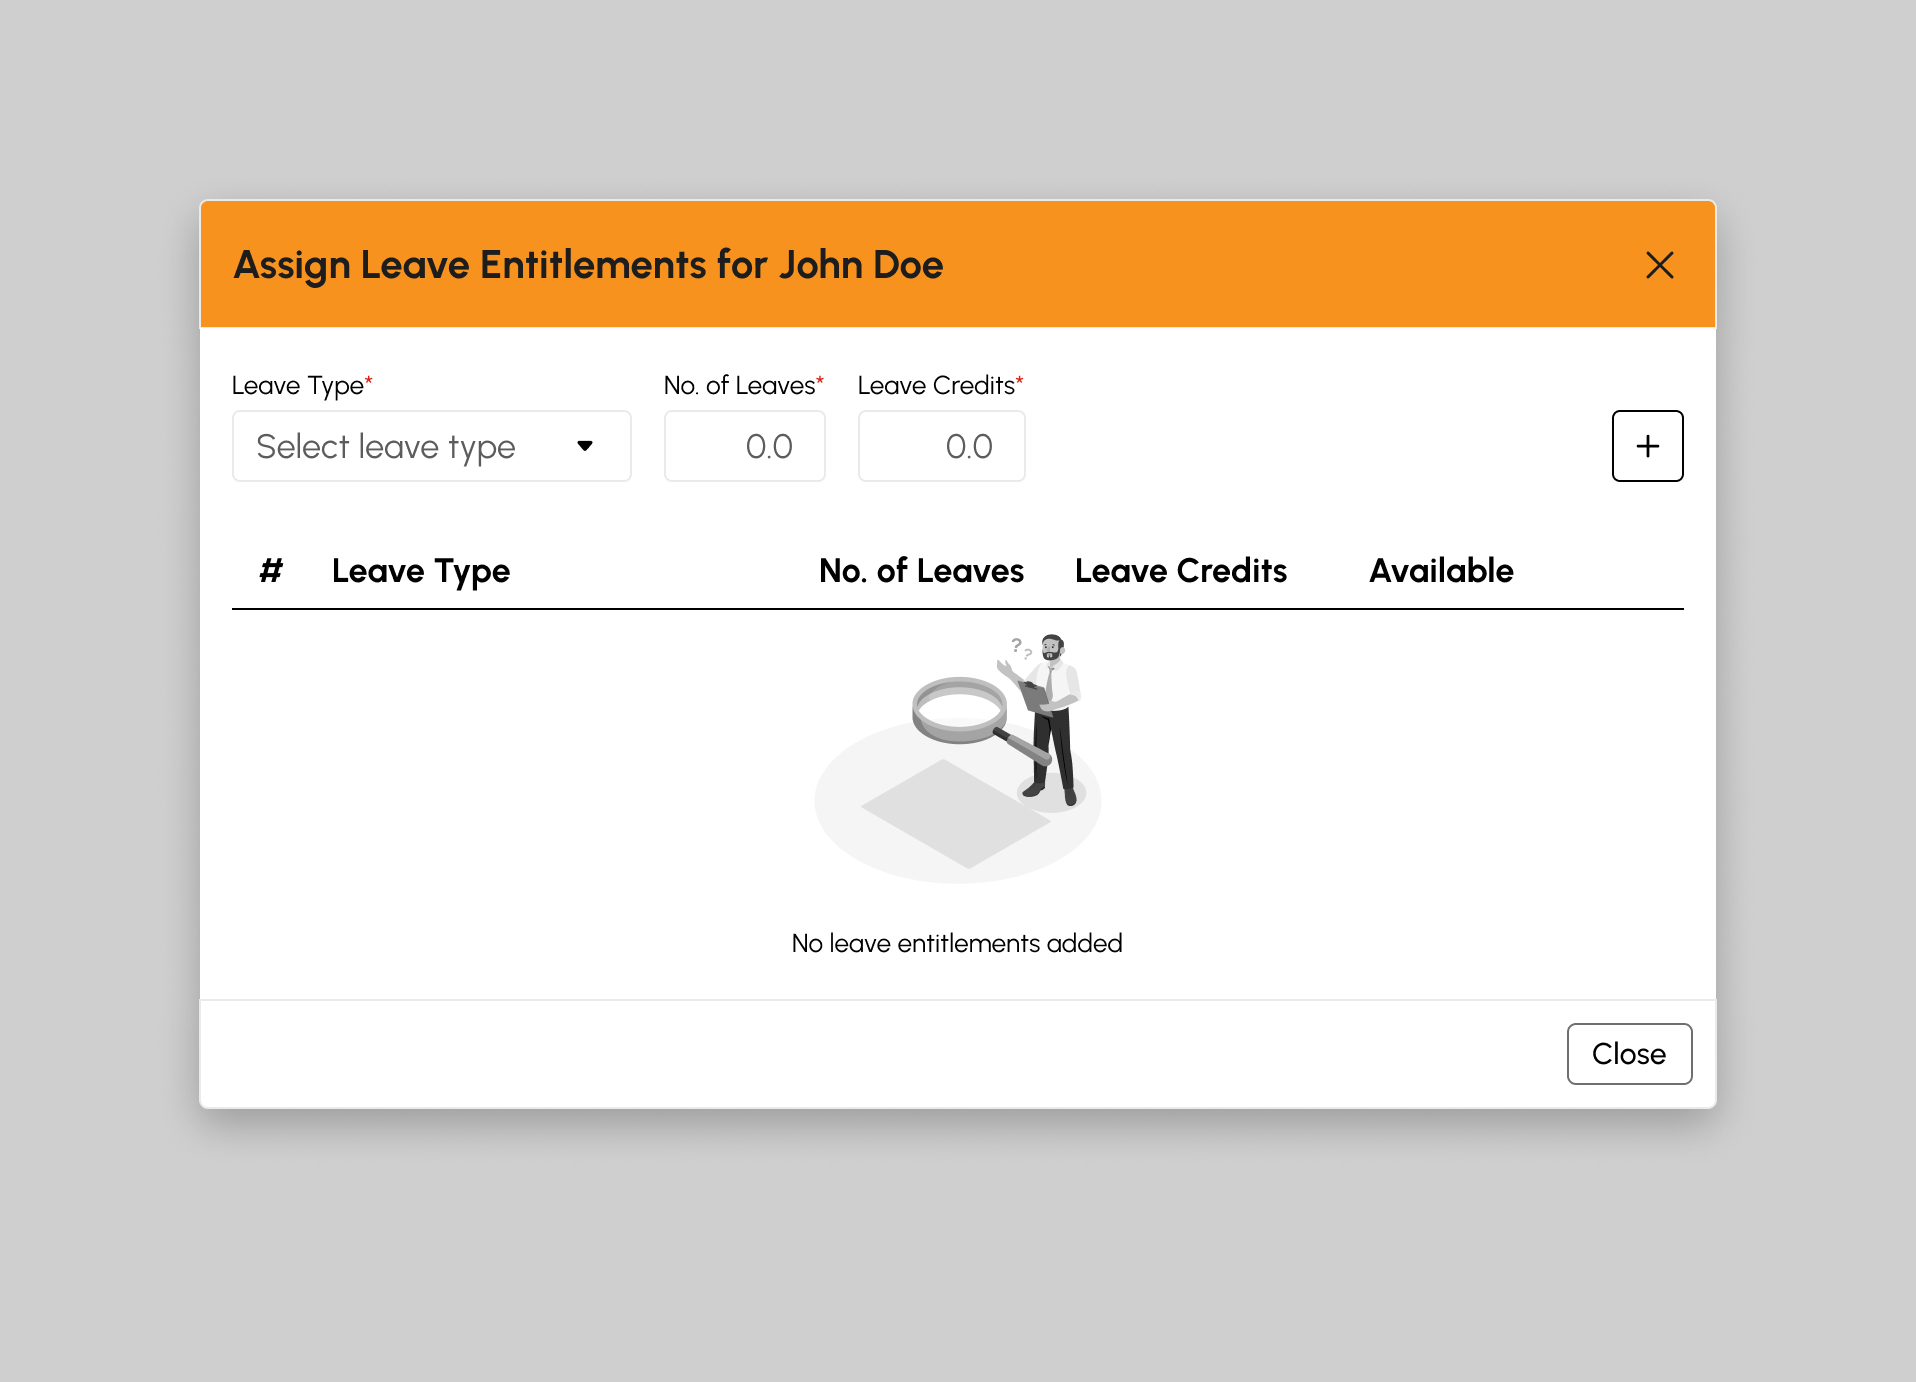
-
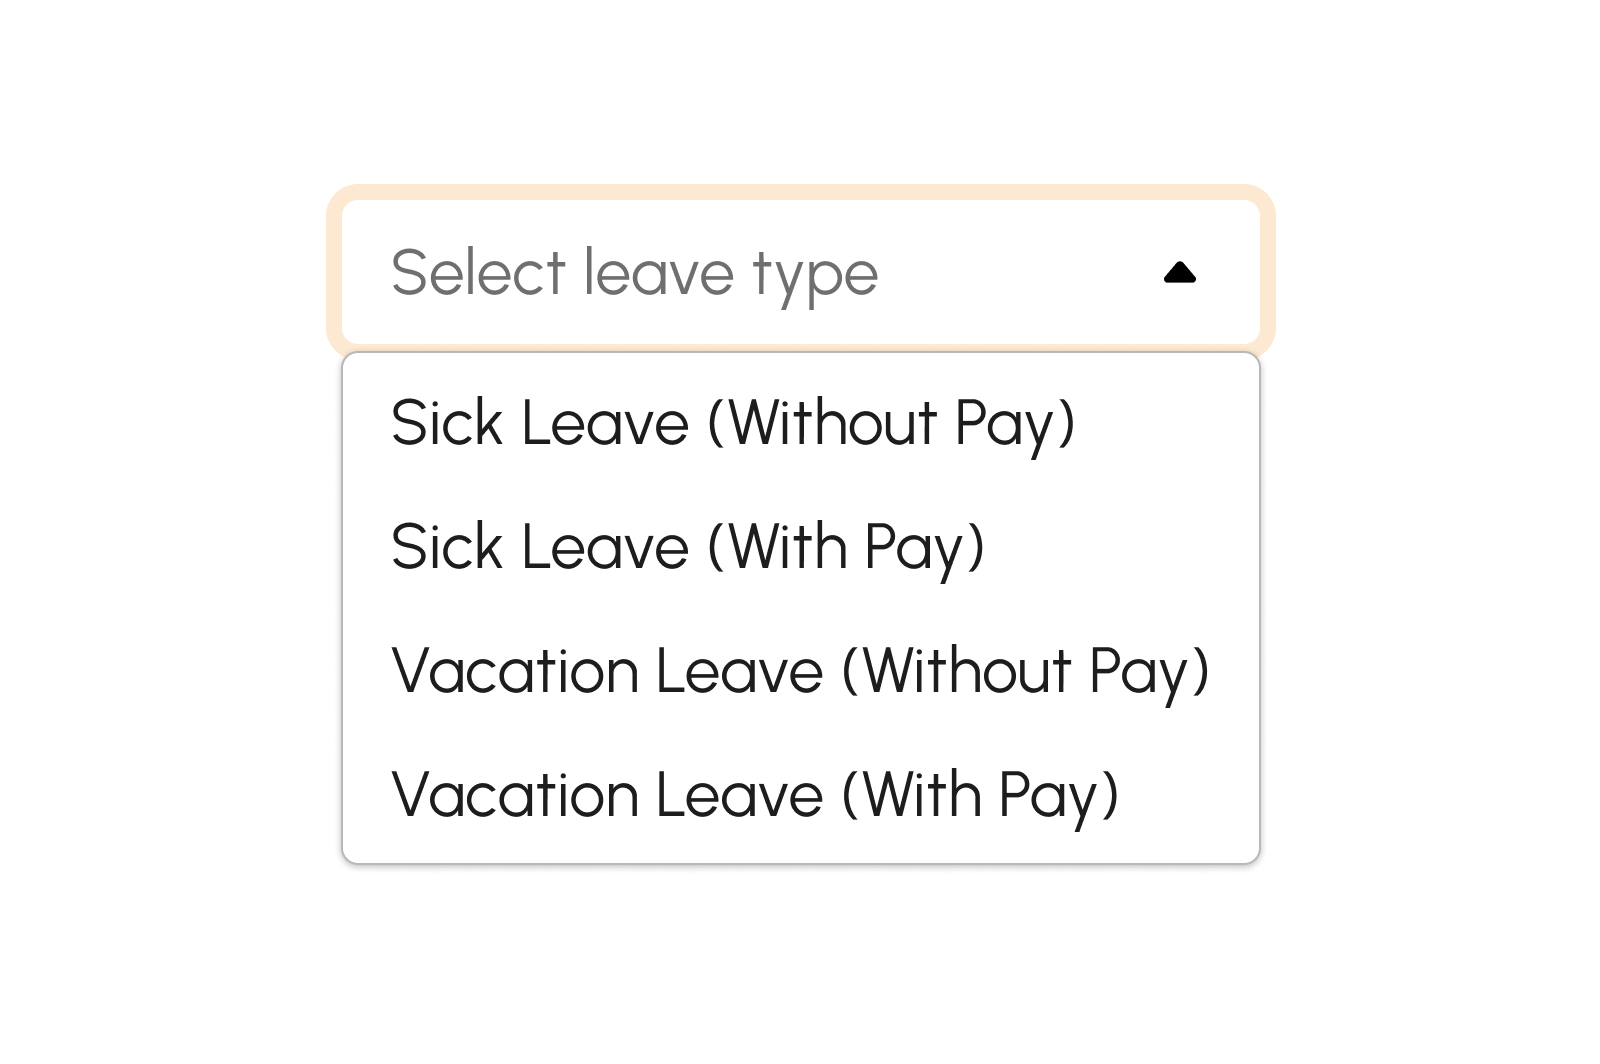
Select a Leave type on this field.
- Input the number of Leaves available for an employee.
-
Leave Credits automatically computes accrued leave.
Sample computation for accrued VL with pay per month. Leave Type No. of Leaves to Earn Annually No. of Months per Annum Monthly Leave Credits Vacation Leave 10 12 0.83 -
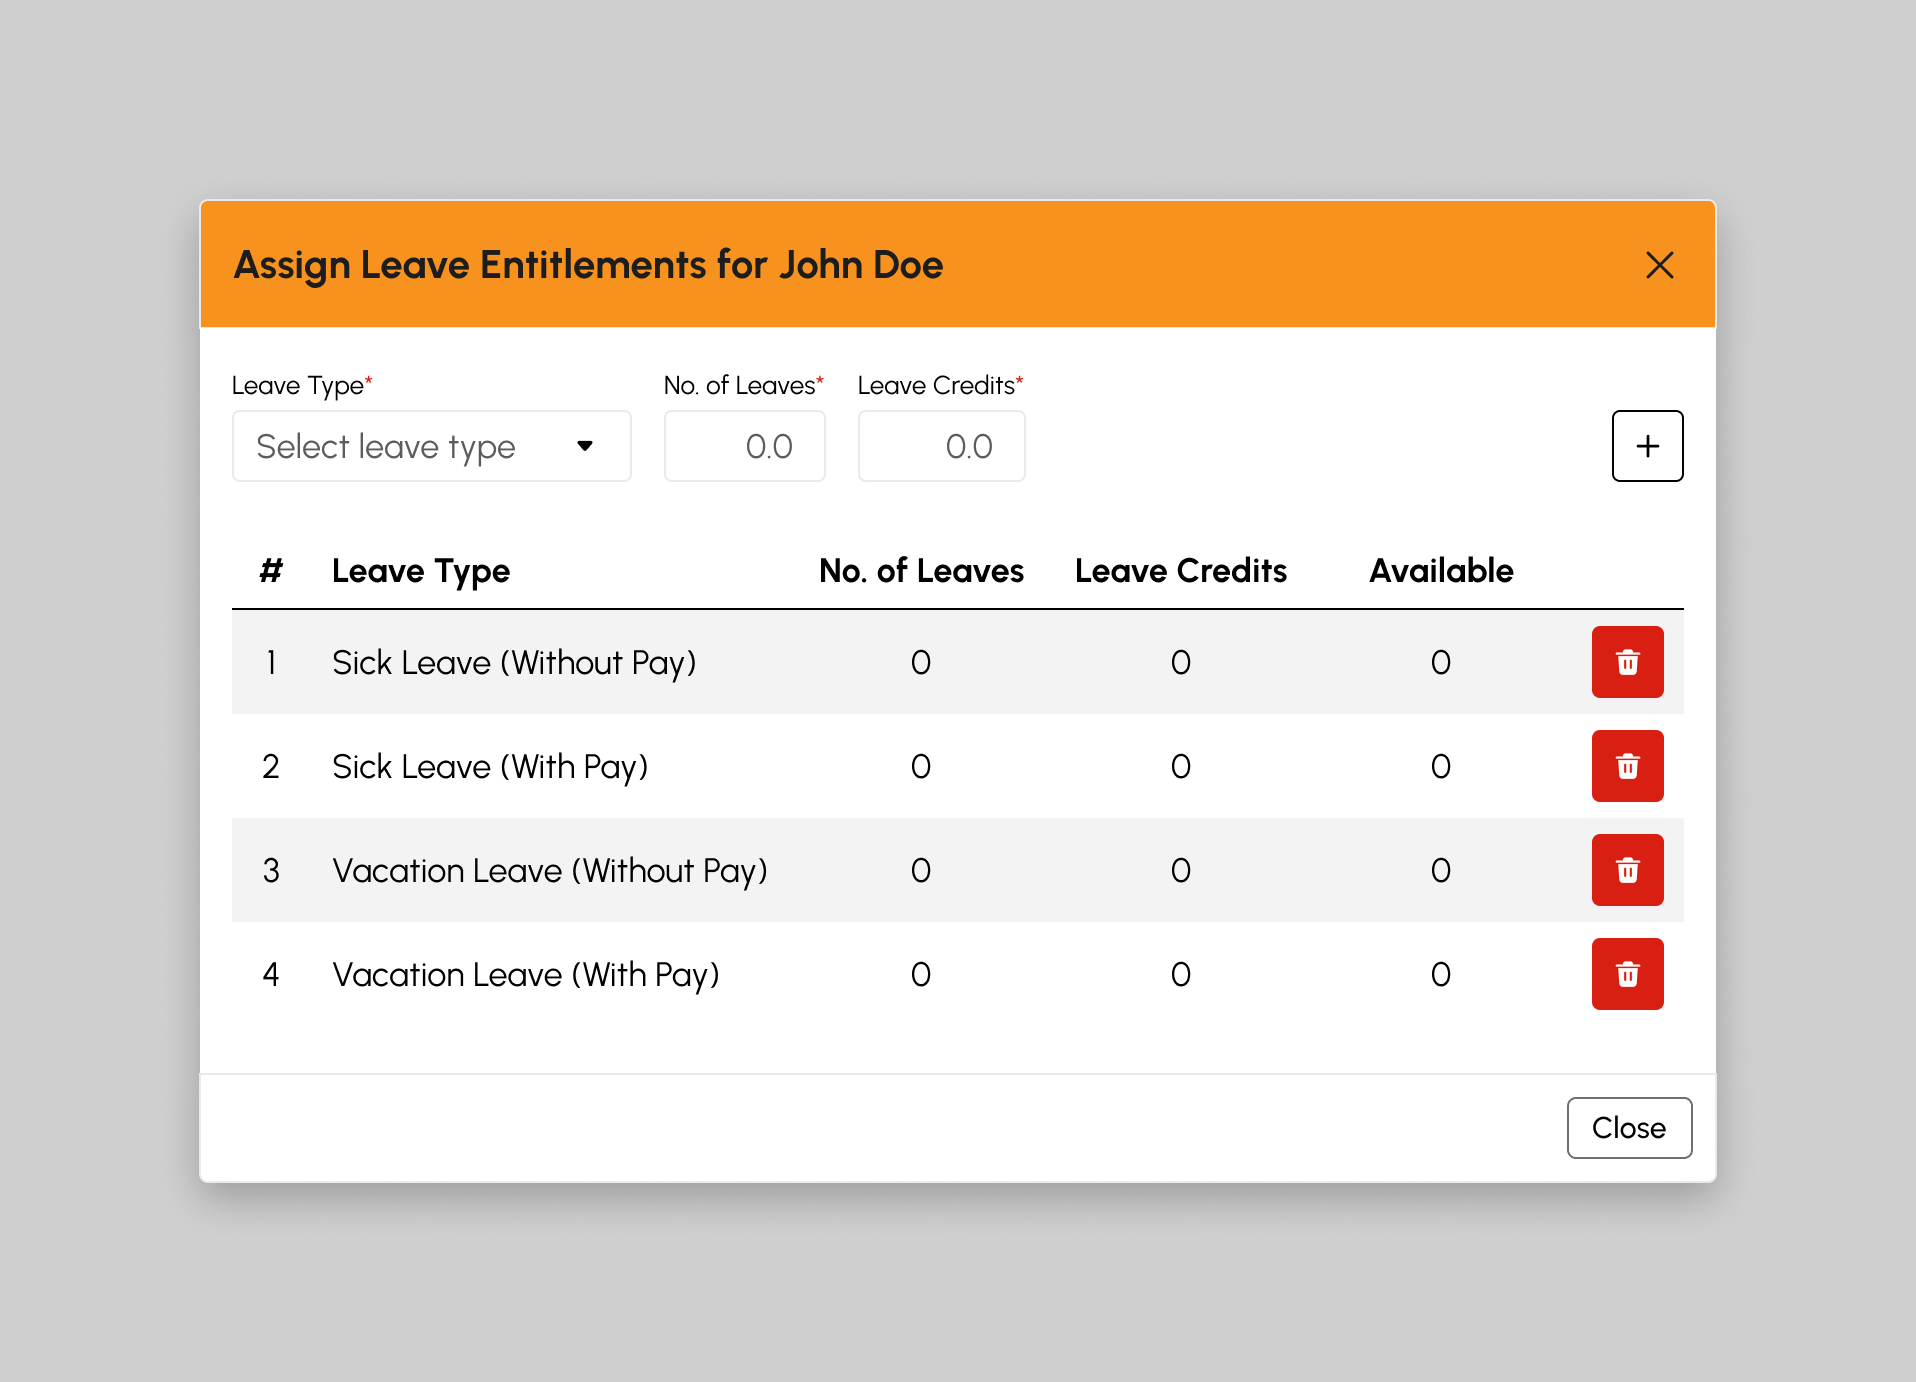
If Leave Credits are not accrued per month, set the Leave Credits field value to Zero (0) and disregard the auto-computed value for leave credits as shown in the table below:
Leave Type No. of Leaves Leave Credits Vacation Leave 10 0 - Click the Add button to add the leave entitlement type.
-
Review the details as shown in the table below:
- Column 1 represents the item list number.
- Column 2 displays the selected attendance type.
- Column 3 displays the number of leaves.
- Column 4 displays the leave credits.
-
Column 5 displays the total available leaves of an employee.
- The default value for accrued leaves is zero (0). Leave credits will accumulate every 1st day of the month through system job.
- For non-accrued leave types, the total number of leave shall be equal to the total number of available leave credits as shown in the image below:
- To remove the entitlement type, simply click the delete button to remove the assigned entitlement type.
- Repeat steps 1-7 to assign more Leave Entitlements to employee, otherwise proceed to Step 10.
- Click the Close button on the bottom right or close button on the top right of the modal to close the Assign Leaves Entitlement modal.
How to Load More Entitlements
If there more than twenty (20) employees on the list (active employees only), click the Load More button to display other employee names since the default item number displayed in the screen is from count 1-20.
Employee Positions
This page manages and maintains information related to the positions or job titles held by employees within the company.

The screen will redirect to the Employees Position page, showing several features to use that will be discussed in section.
Features in Employee Positions Page
The snip below is the high-level view of Employees Position page along with its built-in features.
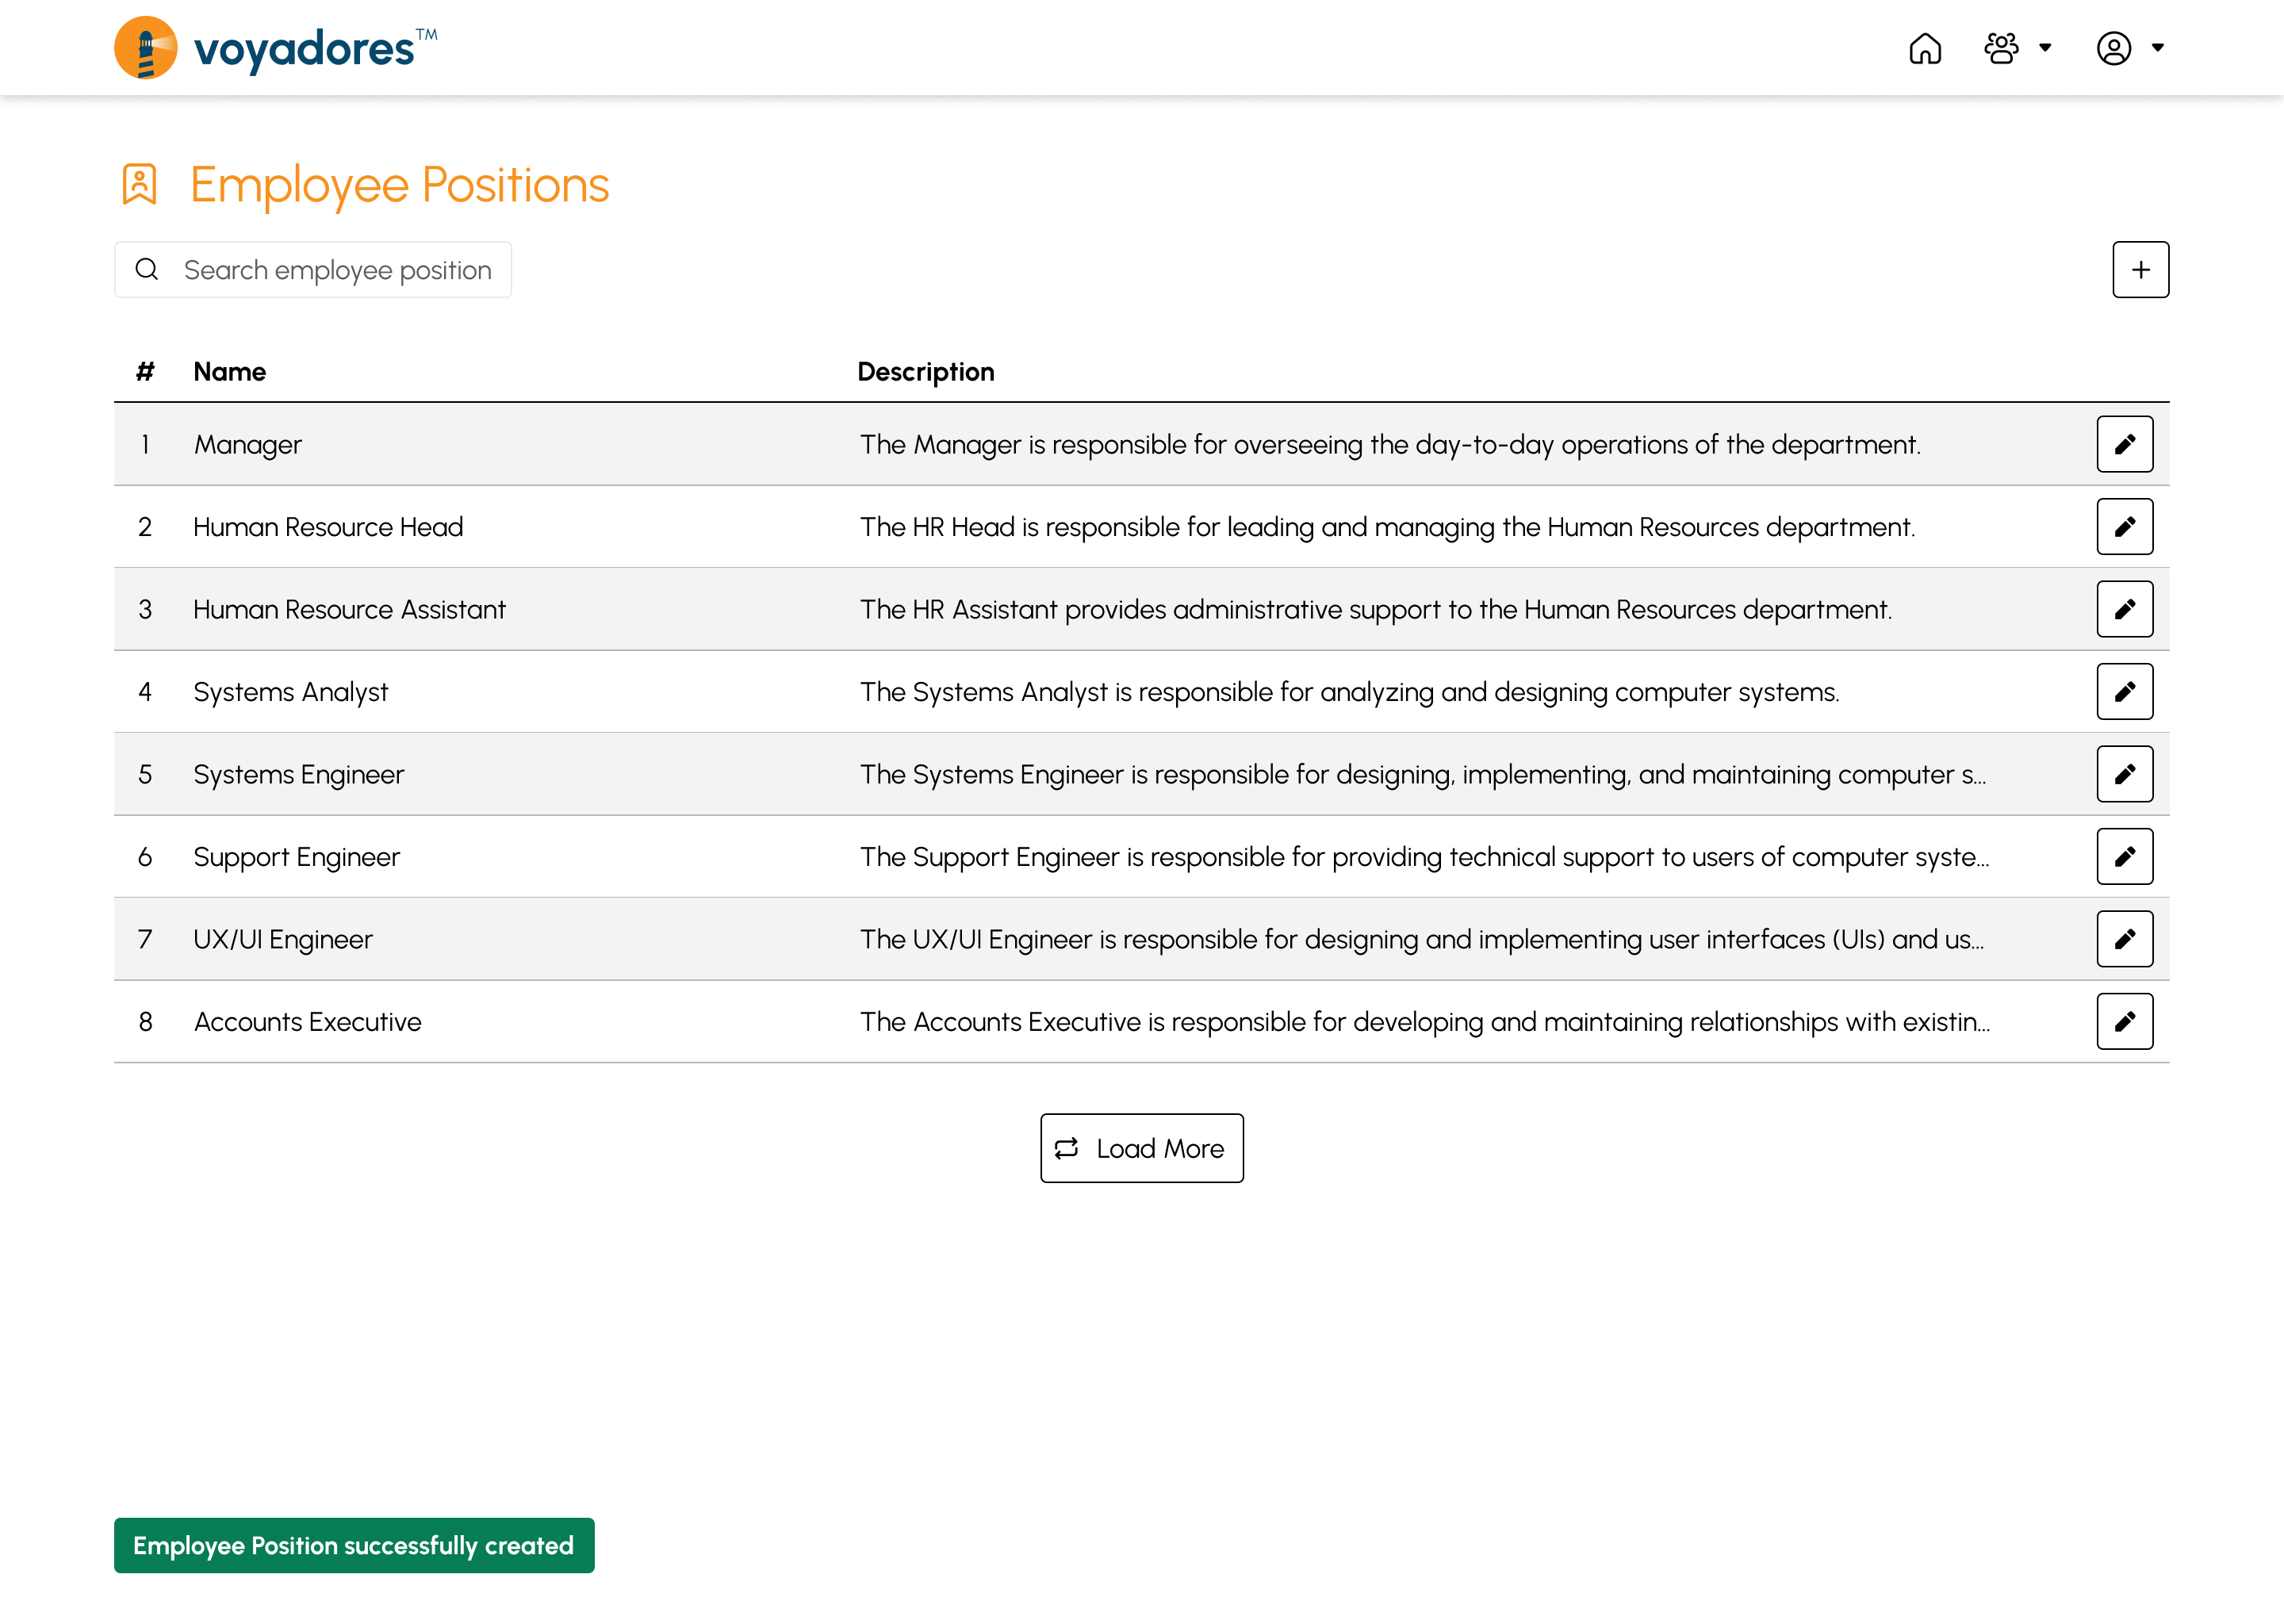
Summary Table
The summary table displays the list of Position with the following columns:
- Item number “#”
- Name
- Description
-
Action
- Edit Position
Search by Employee Position
To search for a particular Employee Position, key in the Position in the Search Bar as shown in the snip below:

Create Employee Position
- Click the Create button.
-
Fill in Employee Position details.
- Name
- Description
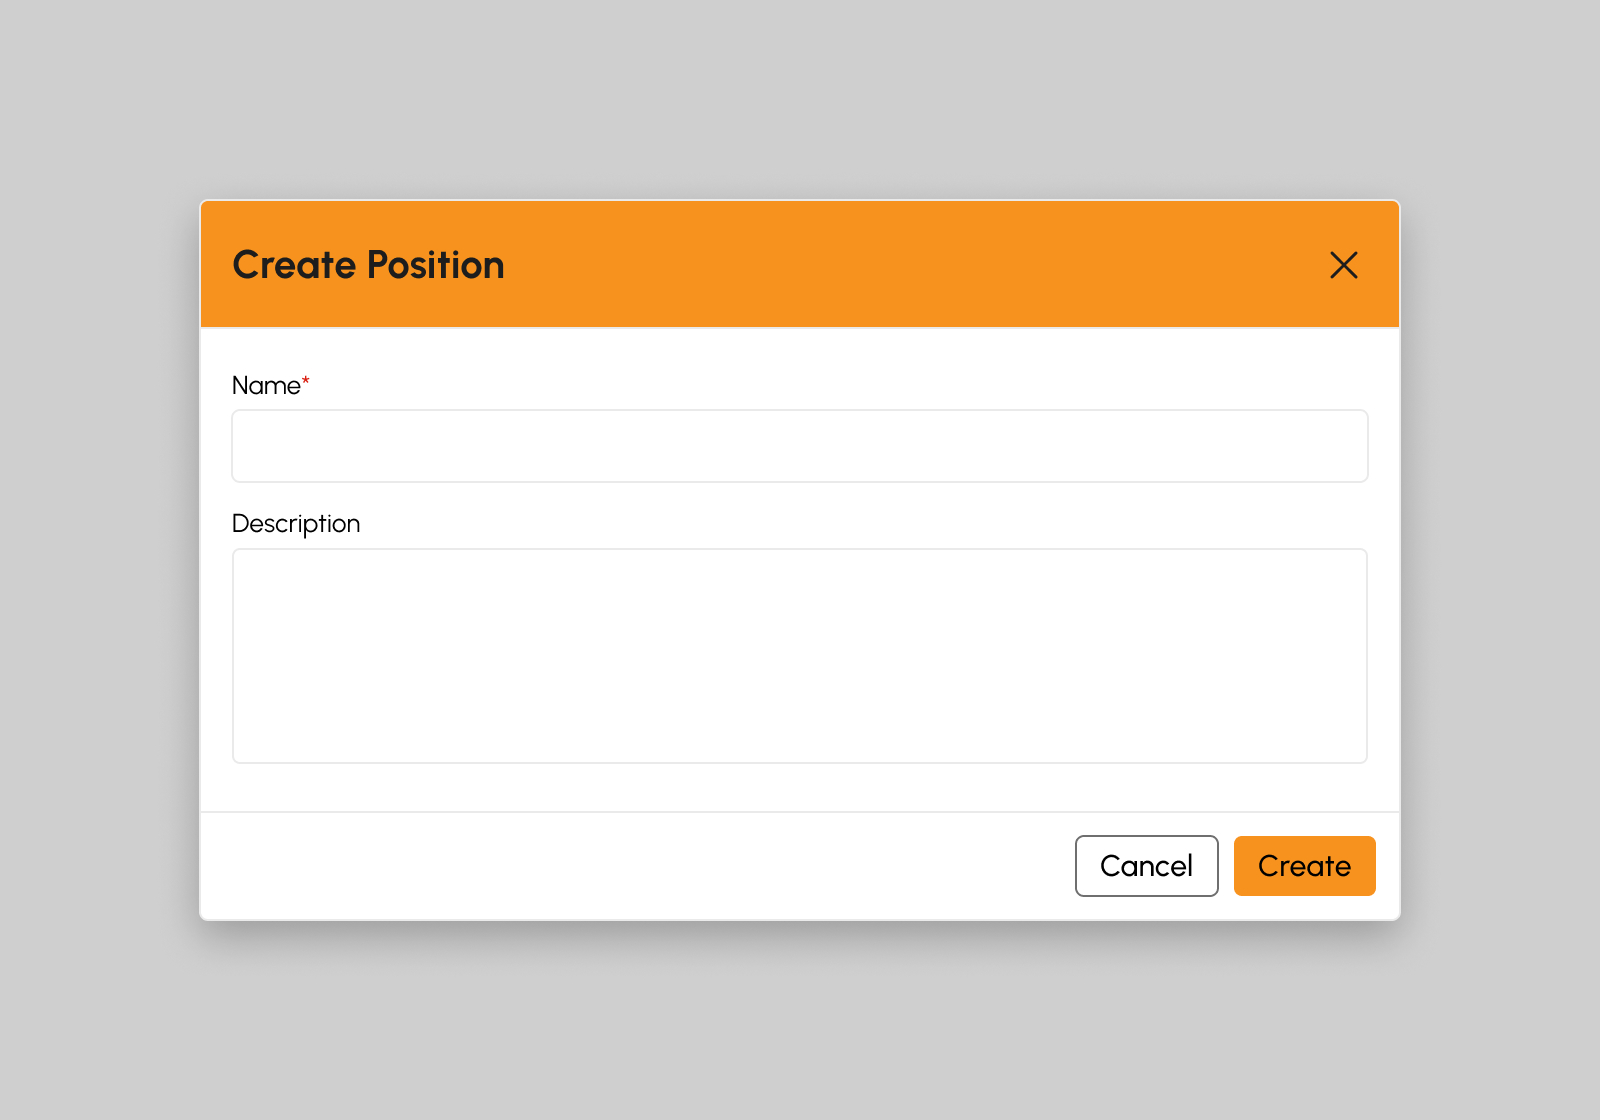
Note
Fields with (*) are required.
- Click the Create button.
-
A successful notification will show:
Employee Position successfully created
- Step 3 will successfully create new employee position otherwise, proceed to Step 6.
- Click the Cancel button to cancel the creation of new position.
- The screen closes the modal.
- System will not proceed on creation of new employees position.
Edit Employee Position
- Click the Edit button.
-
Update the Employee’s Position details
- Name
- Description
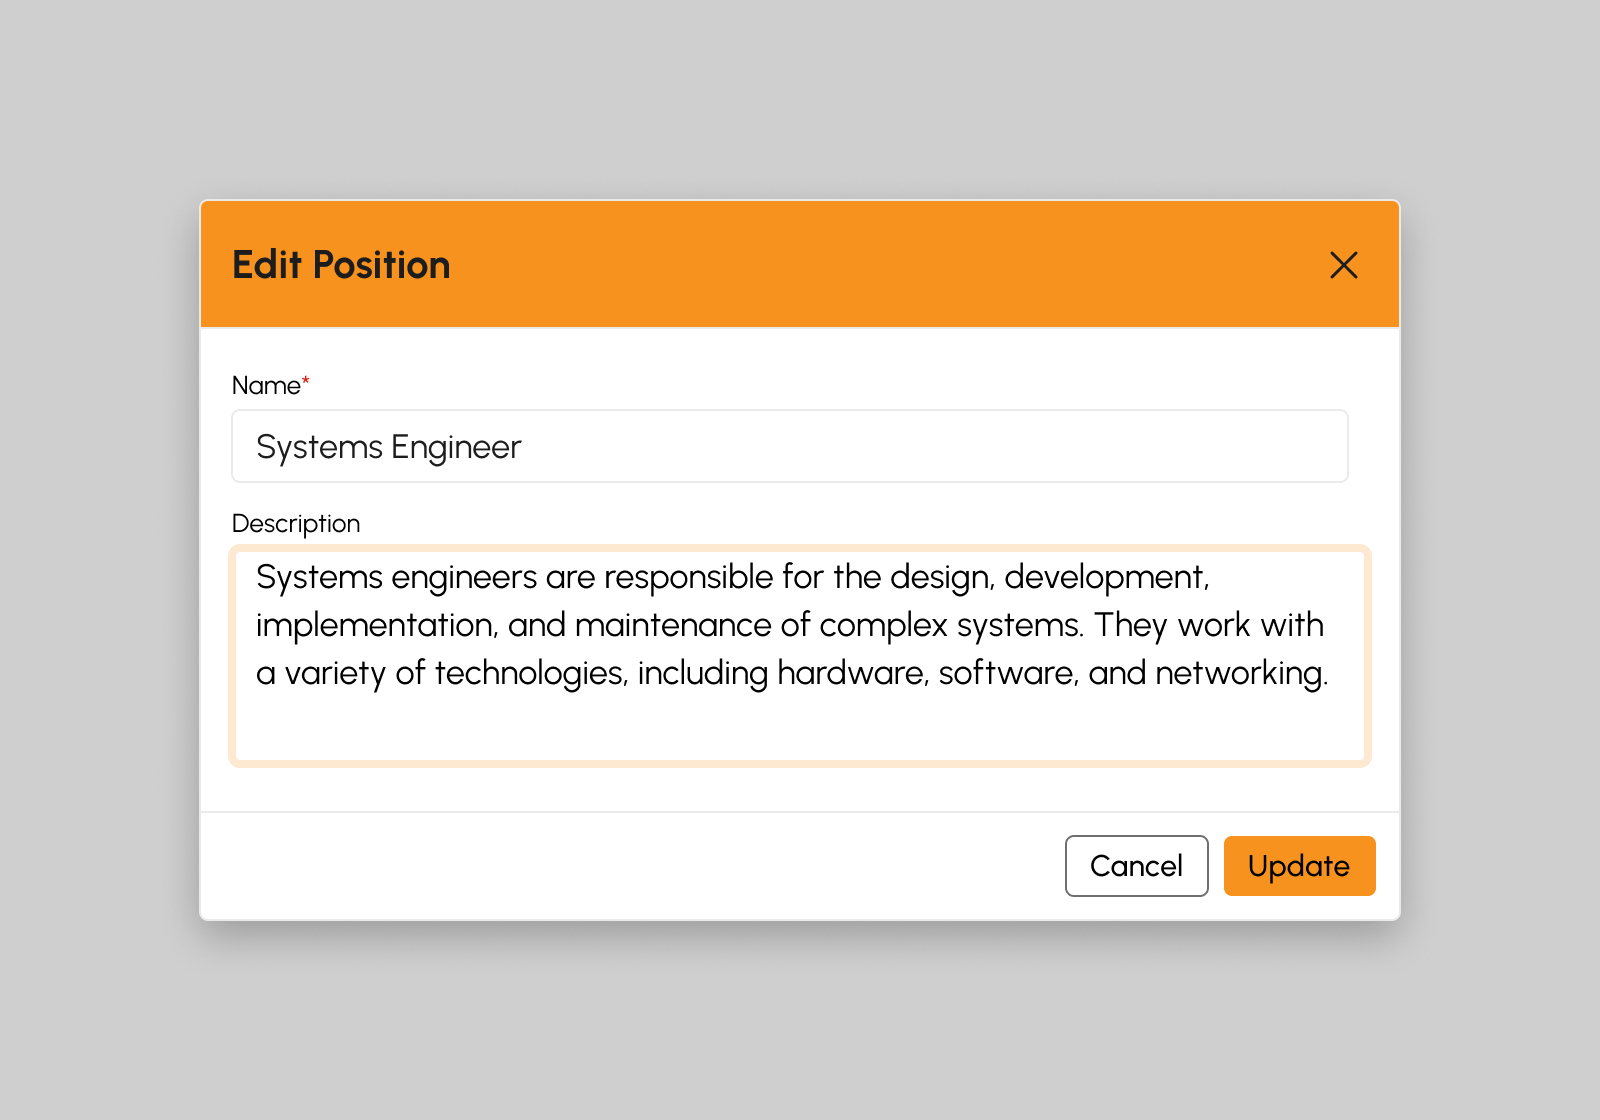
Note
Fields with (*) are required.
- Click the Update button.
-
A successful notification will show:
Employee Position successfully created
- Step 3 will successfully update employee’s position otherwise, proceed to Step 6.
- Click the Cancel button to cancel updating employees position.
- The screen closes the modal.
- System will not proceed on updating the employees position.
Load More Employee Positions
To verify if there are more than 20 Employee Positions created, click the Load More button to display other Positions since the default item number displayed in the screen is from count 1-20.
Employee Schedules
This page manages and maintain information related to the work schedules of employees within the company. It is designed to assist in the effective scheduling and tracking of employee working hours, shifts, and availability.

Features in Employee Schedules Page
The snip below is the high-level view of Employees Schedule page along with its built-in features.
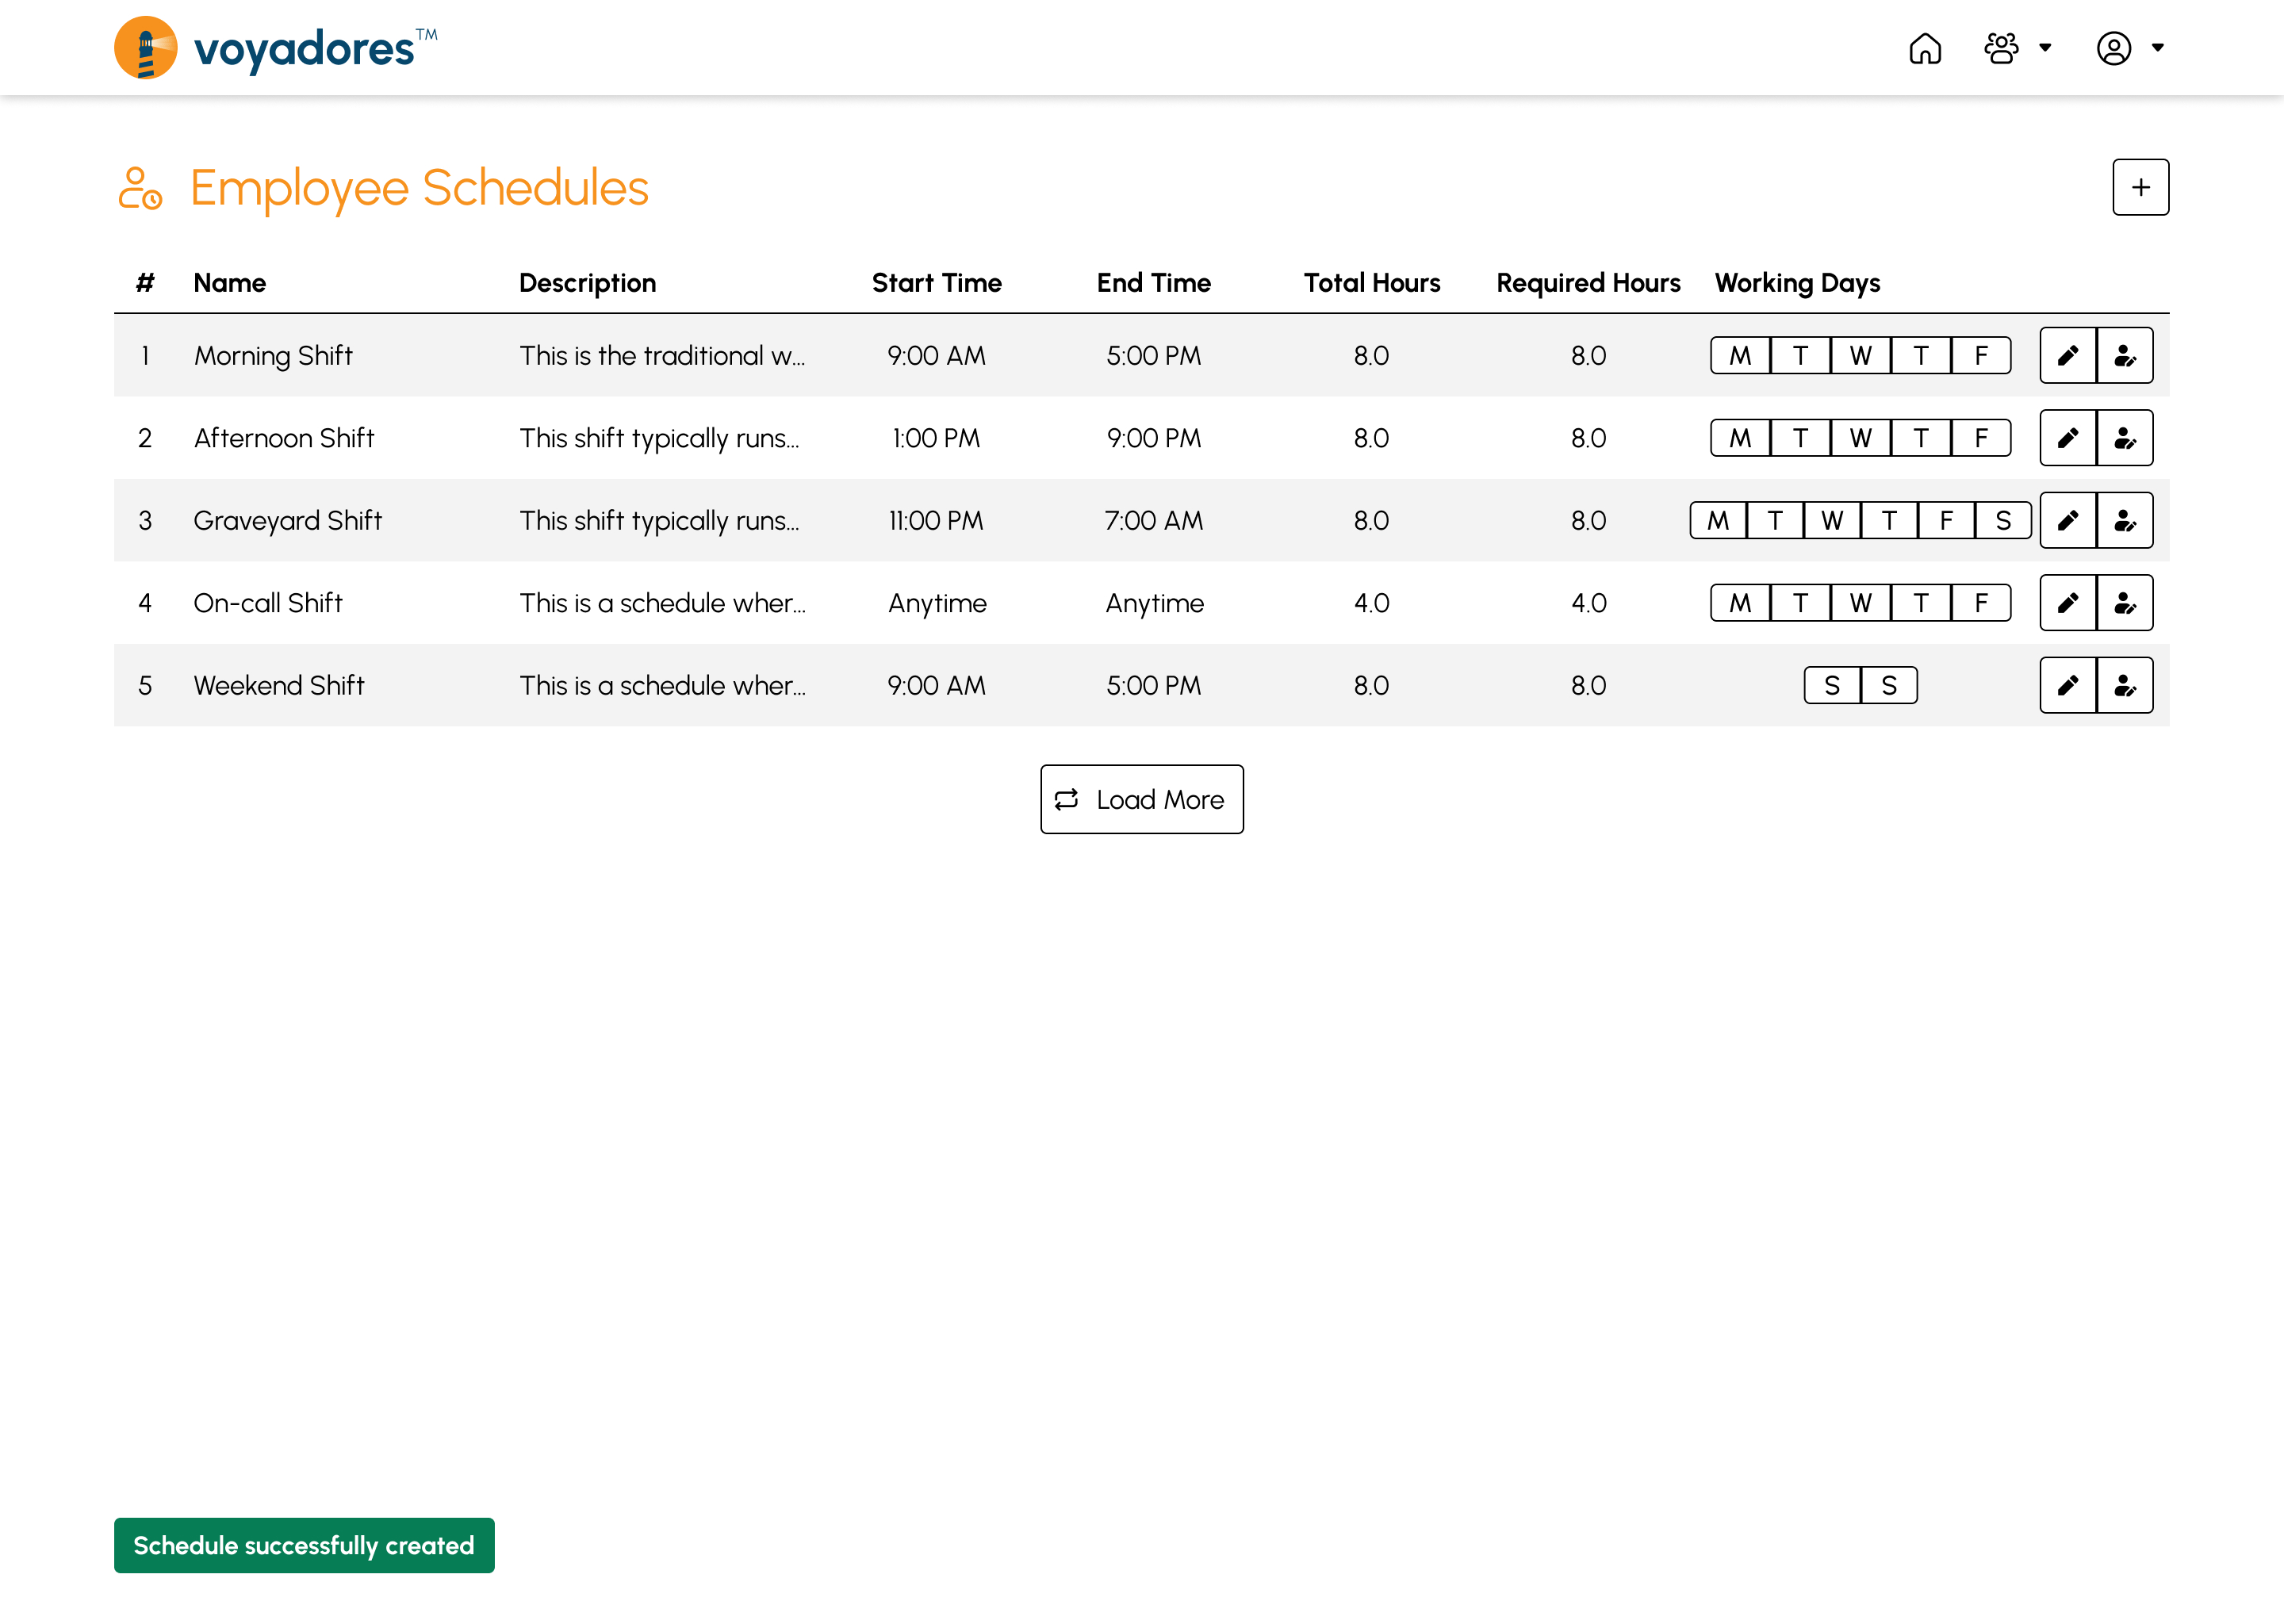
Summary Table
The summary table displays the list of Schedule with the following columns:
- Item number “#”
- Name
- Description
- Start Time
- End Time
- Total Hours
- Required Hours
-
Action
- Edit Schedule
- Assign Schedule
Create Employee Schedule
- Click the Create button.
-
Fill in Schedule details.
- Name
- Description
- Start Time
- End Time
- Total Hours
- Required Hours
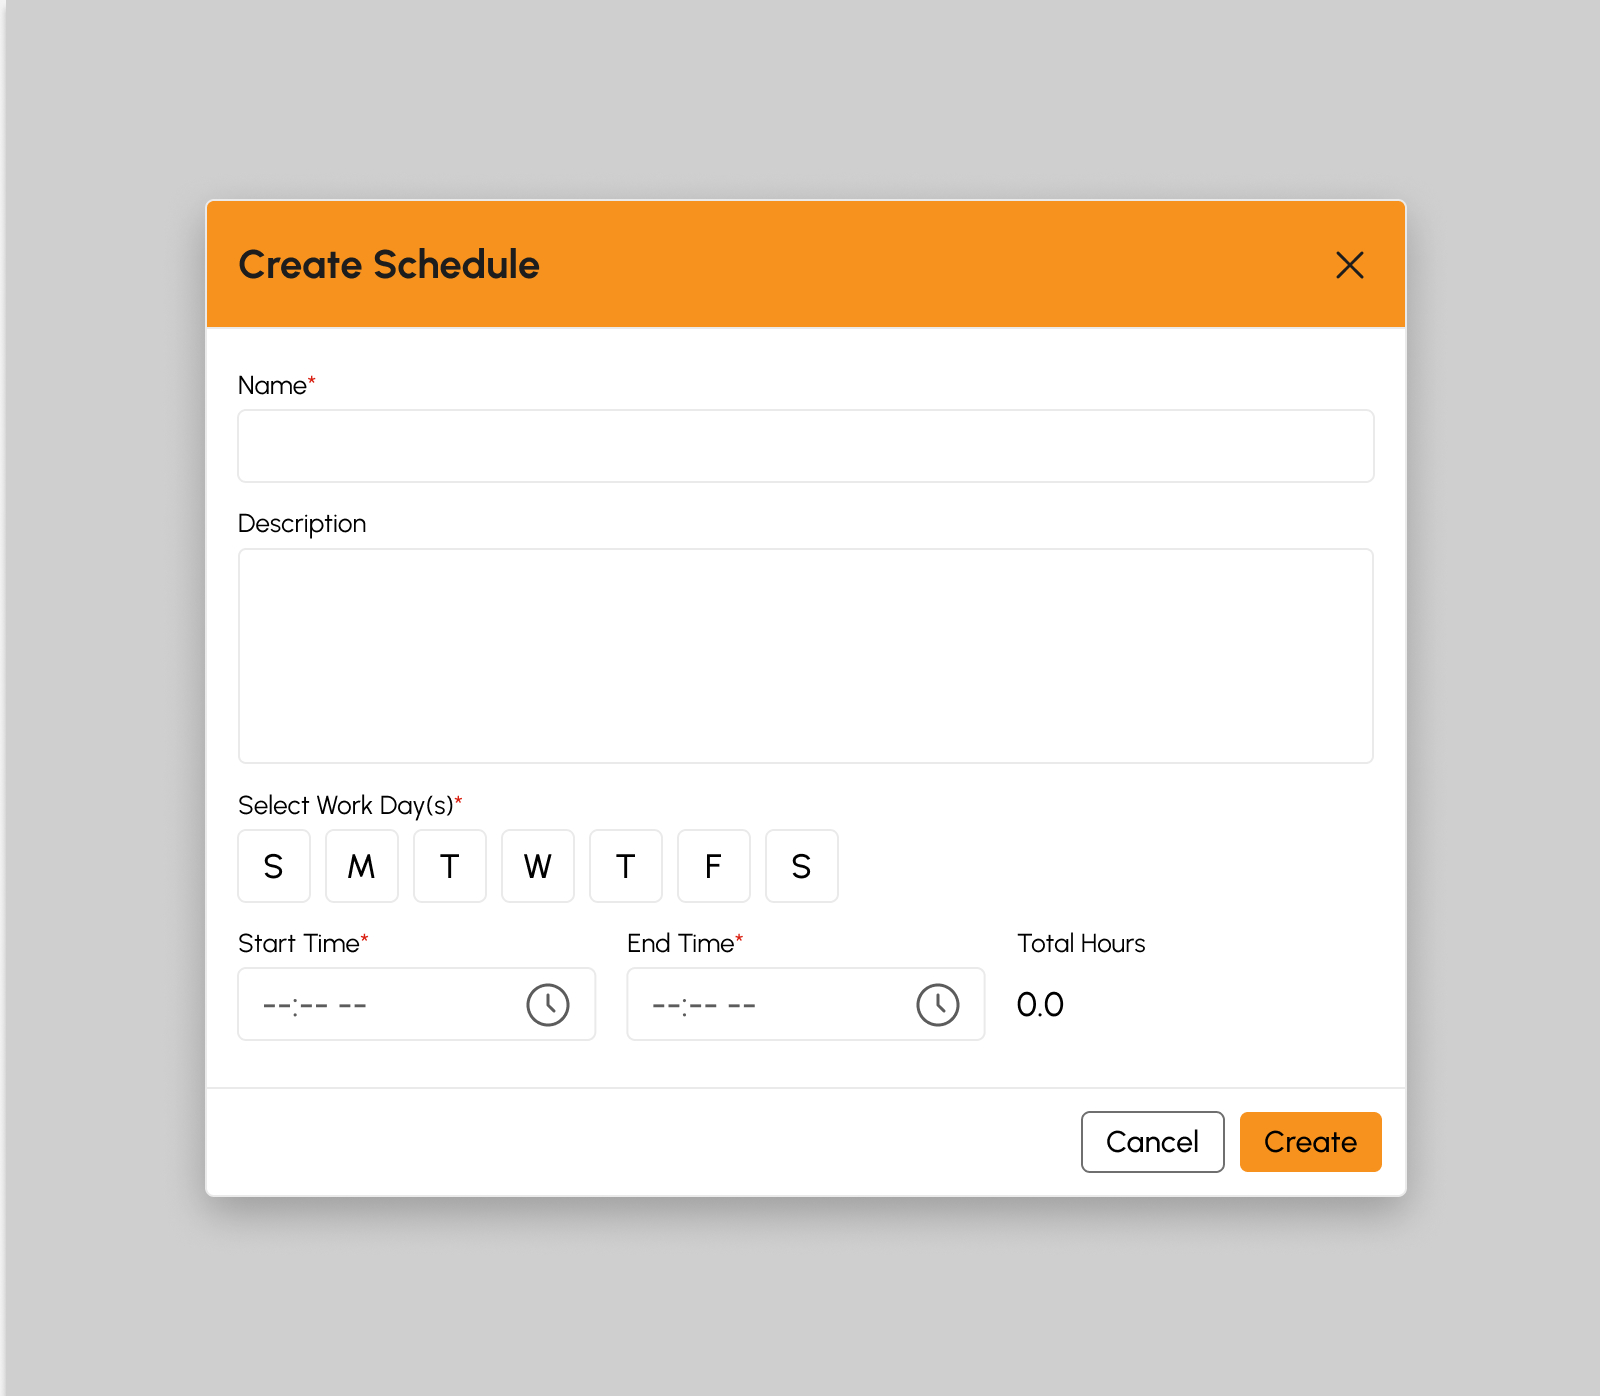
Note
Fields with (*) are required.
- Click the Create button.
-
A successful notification will show:
Schedule successfully created
- Step 3 will successfully create new schedule otherwise, proceed to Step 6.
- Click the Cancel button to cancel the creation of new schedule.
- The screen closes the modal.
- System will not proceed on creation of new employees schedule.
Edit Employee Schedule
- Click the Edit button.
-
Update Schedule details.
- Name
- Description
- Start Time
- End Time
- Total Hours
- Required Hours
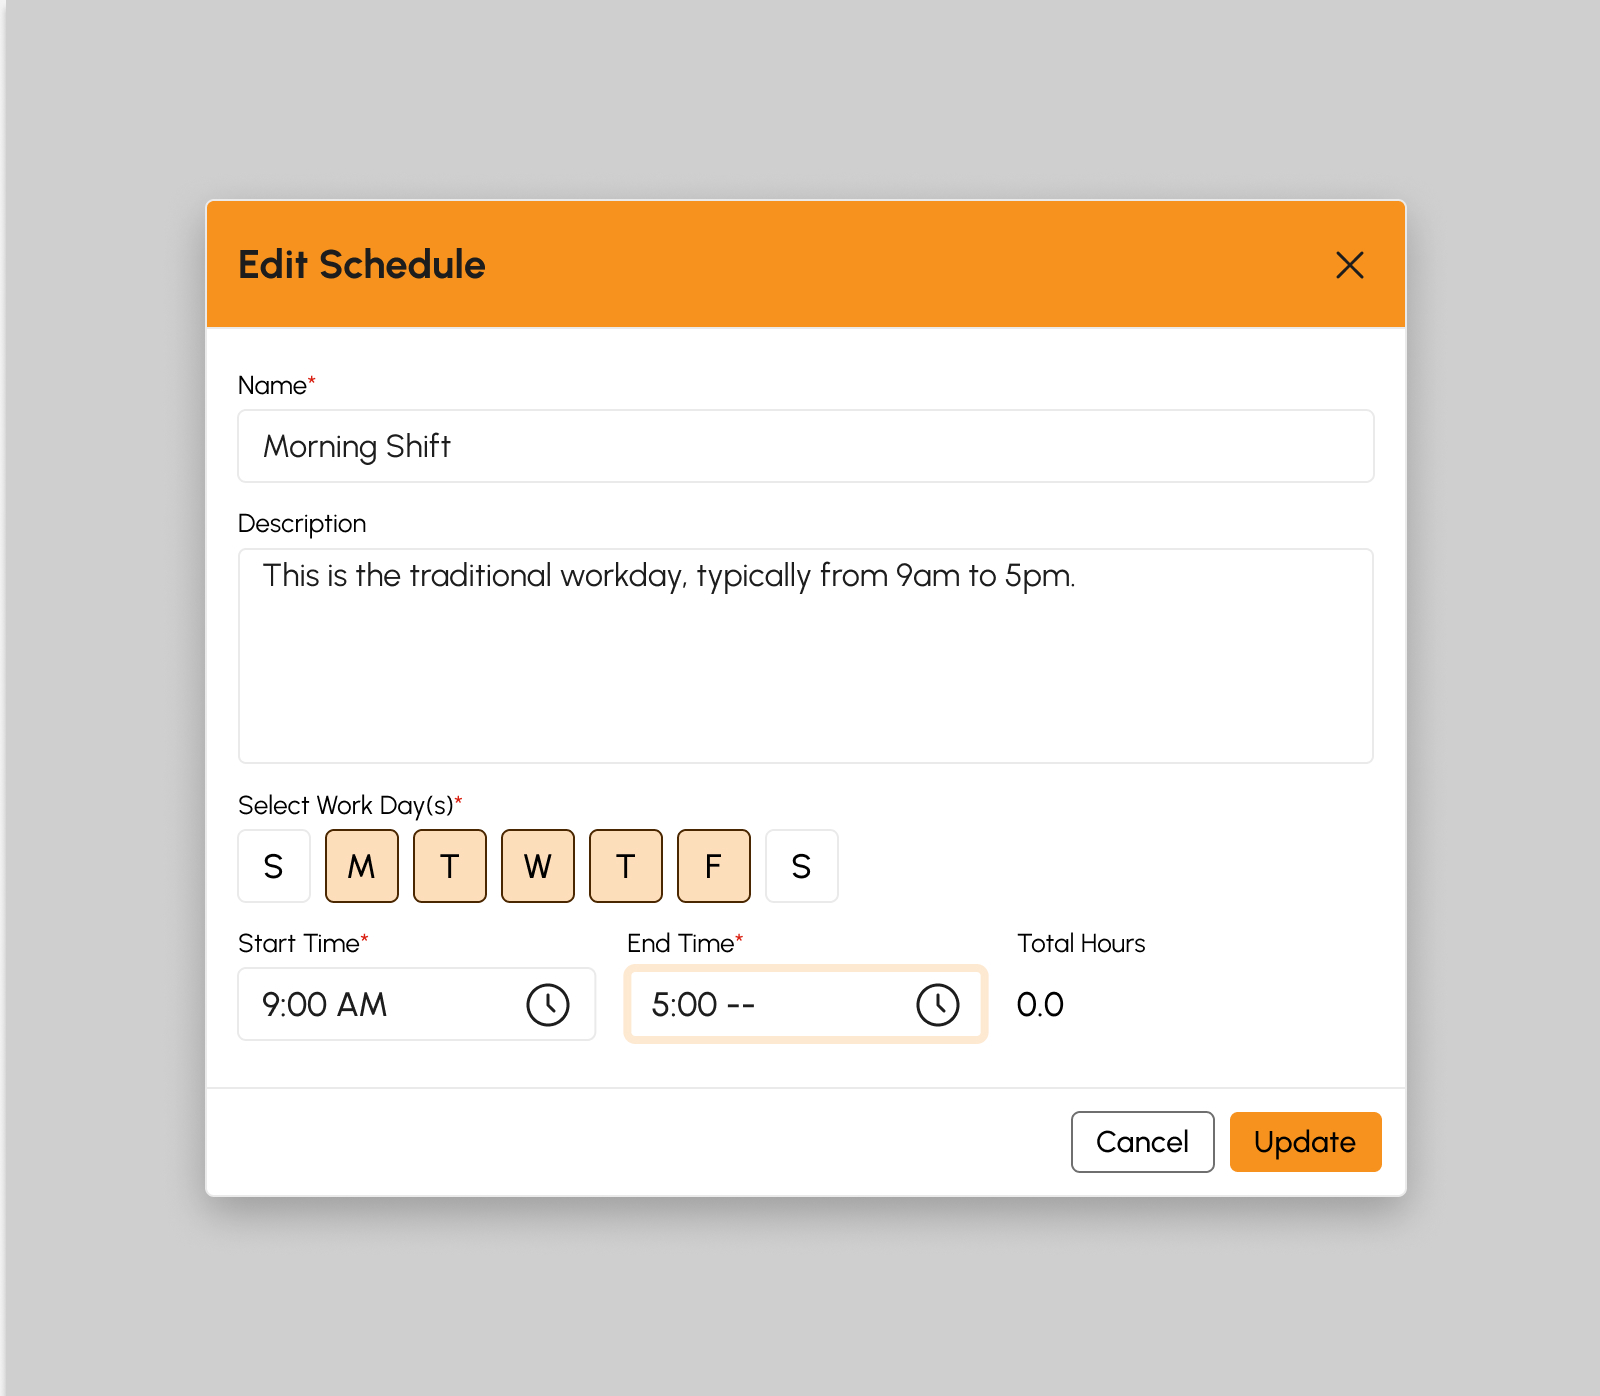
Note
Fields with (*) are required.
- Click the Update button.
-
A successful notification will show:
Schedule successfully updated
- Step 3 will successfully update schedule details otherwise, proceed to Step 6.
- Click the Cancel button to cancel updating the work schedule.
- The screen closes the modal.
- System will not proceed on updating the work schedule.
Assign Employees Schedule
- Click the Assign button.
-
On the Employee dropdown select the name of the Employee to be added on the schedule.
- Fill-in the Effectivity Date.
- Click the Add button.
-
A successful notification will show:
Employee Schedule successfully added
- Step 3 will successfully add schedule to the selected employee otherwise, proceed to Step 6.
- Click the Cancel button to cancel assigning work schedule.
- The screen closes the modal.
- System will not proceed on assigning work schedule to employee.
Load More Employee Schedules
To verify if there are more than 20 Work Schedule created, click the Load More button to display other schedule since the default item number displayed in the screen is from count 1-20.