Leaves
Who can use this feature
Anyone with Administrator and HR Manager role can access all the Leaves pages
Anyone with Payroll Manager, and Employee role can only access the Employee Leaves page
Introduction to Leaves Submodule
With this submodule, populate HR essentials by creating Leave Benefits, Attendance entitlements, and Holidays applicable in the organization. In this submodule, configure leave credits, assign leave entitlements (with and without pay) and attendance entitlements (offsets, undertime, early-in and others) to employees, and lastly, create a list of Holidays and assign respective pay-rates.
In addition, filing and approval of leaves is in this submodule.
Definition of Terms
Defined in this section are the available pages under the Leaves submodule as follows:
- Leave Types. This page grants allows creation of Leave entitlements applicable in the organization.
- Entitlements. This page is all about assigning and configuring entitlements for both leave benefits and attendance entitlements to employees. This page configure available leave credits to assign with the employees.
- Holidays. This page is all about creating lists of applicable Holidays in the company and configure pay rates per Holiday type.
- Employee Leaves. This page is about the filing and approval of leaves
Roles and Permissions
The table below shows the defined standard roles and permissions when accessing pages and features under Leaves Submodule.
| Functions | Administrator | HR Manager | Payroll Manager | Employee |
|---|---|---|---|---|
| Leave Types | ||||
| Add | ||||
| Edit | ||||
| Activate/Deactivate | ||||
| Entitlements | ||||
| Assign | ||||
| Holidays | ||||
| Add | ||||
| Edit | ||||
| Activate/Deactivate | ||||
| Employee Leaves | ||||
| Apply | ||||
| Edit | ||||
| Cancel | ||||
| Approve | ||||
| Reject | ||||
Roles and Permissions
Enhance access control and refine user privileges by effortlessly adding and configuring additional roles and permissions. This aligns system functionality with the organizational structure and security requirements, ensuring that users are appropriately given levels of access and responsibilities.
To do so, contact [email protected]
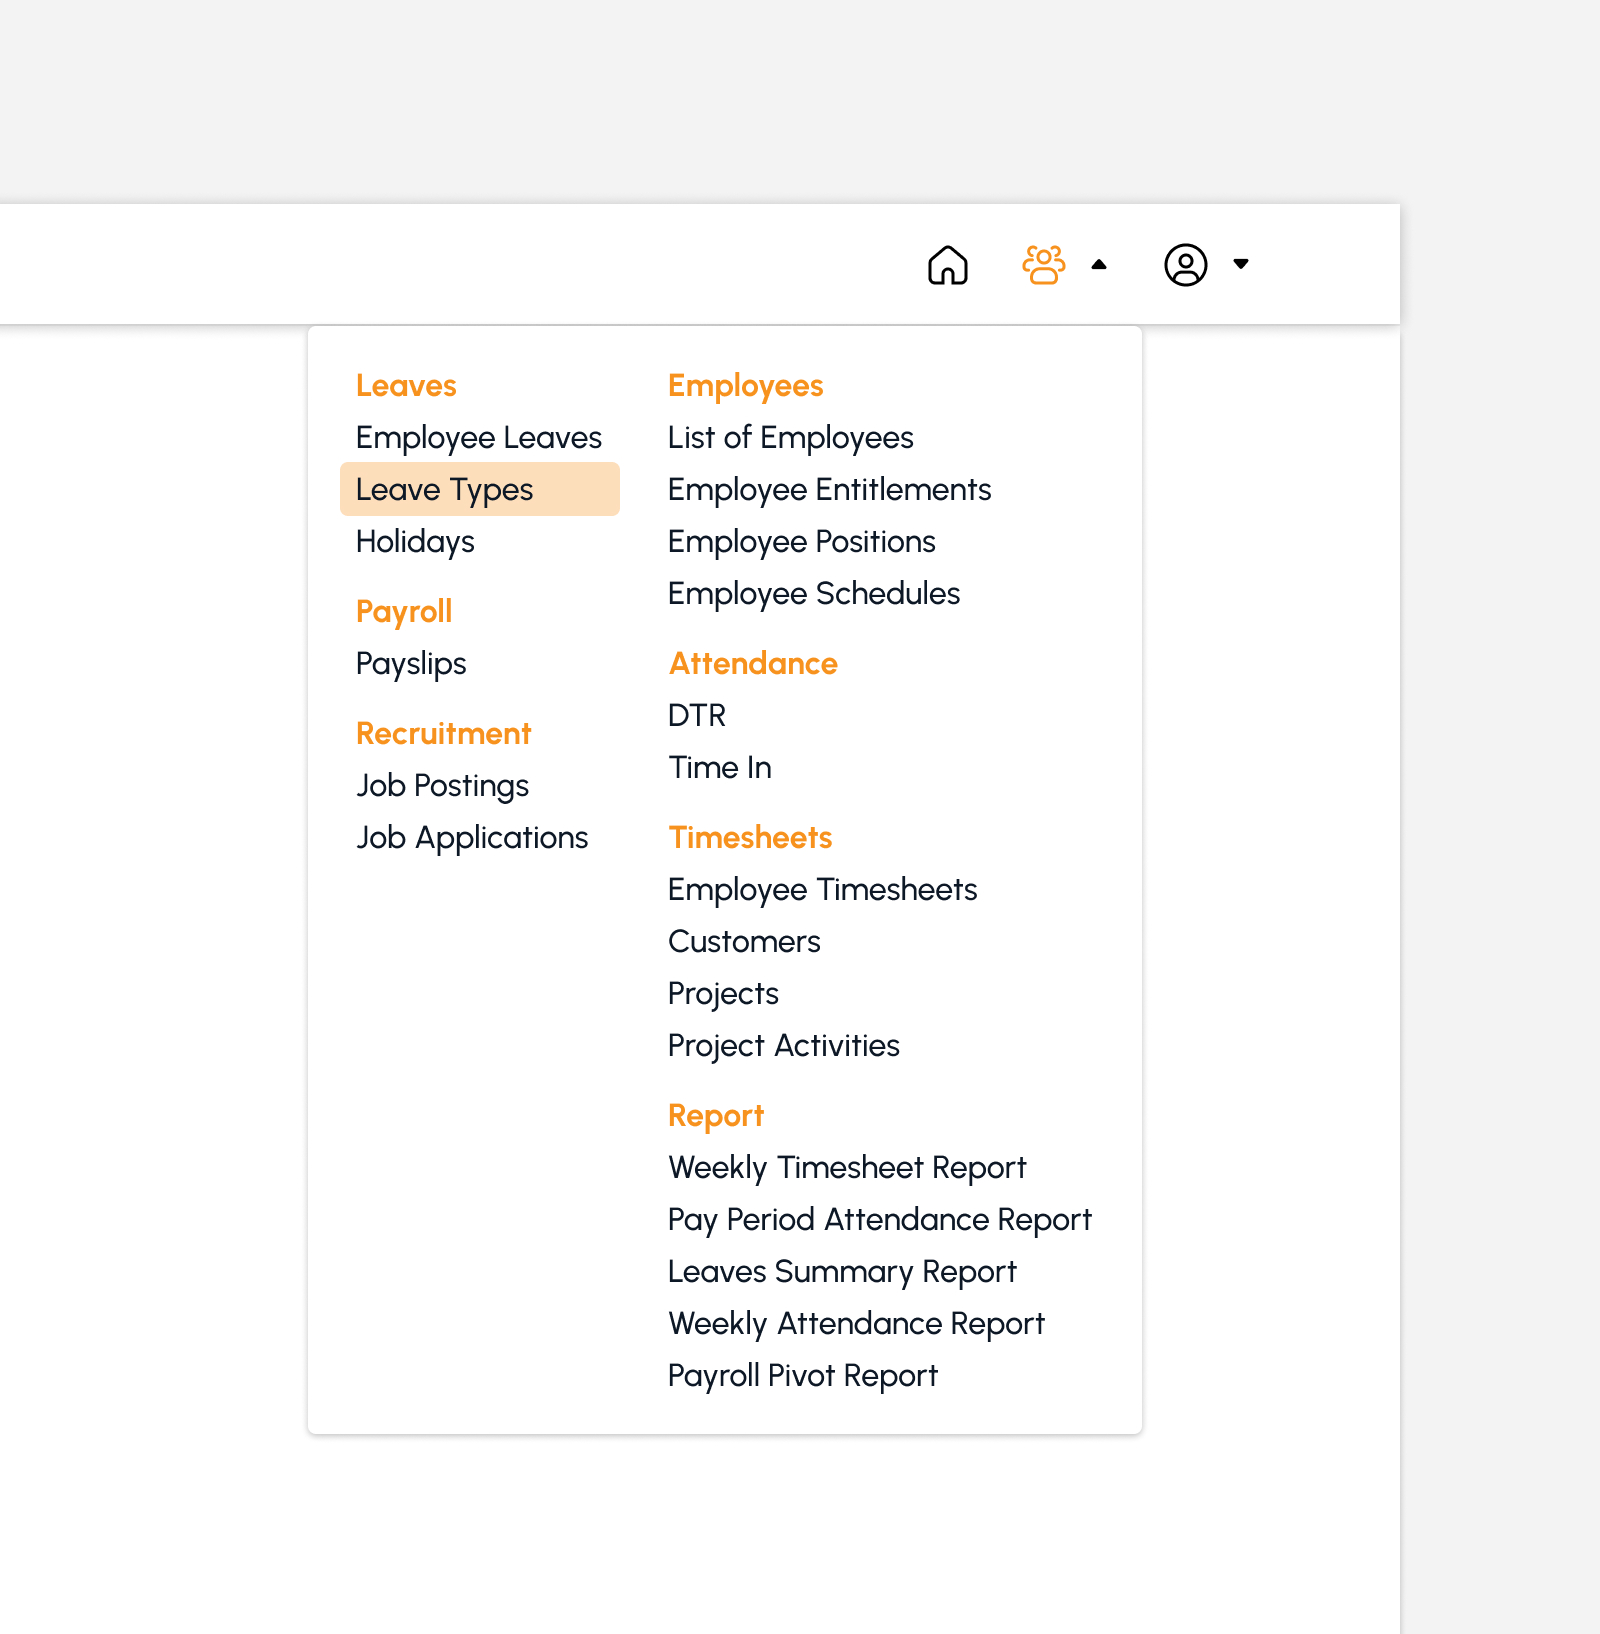
Leave Types
Introduction to Leave Types Page
This page allows creation and management of leave benefits applicable in the company. The overall function of this page is to create, edit, activate, and deactivate Leave Types.
To access this page, navigate to the Human Resources Module and click “Leave Types” under Leaves Submodule as shown in the image below:
The screen will redirect to the Leave Types page, showing several features to use that will be discussed in the next section.
Features in Leave Types Page
The snip below is the high-level view of Leave Types page along with its built-in features.
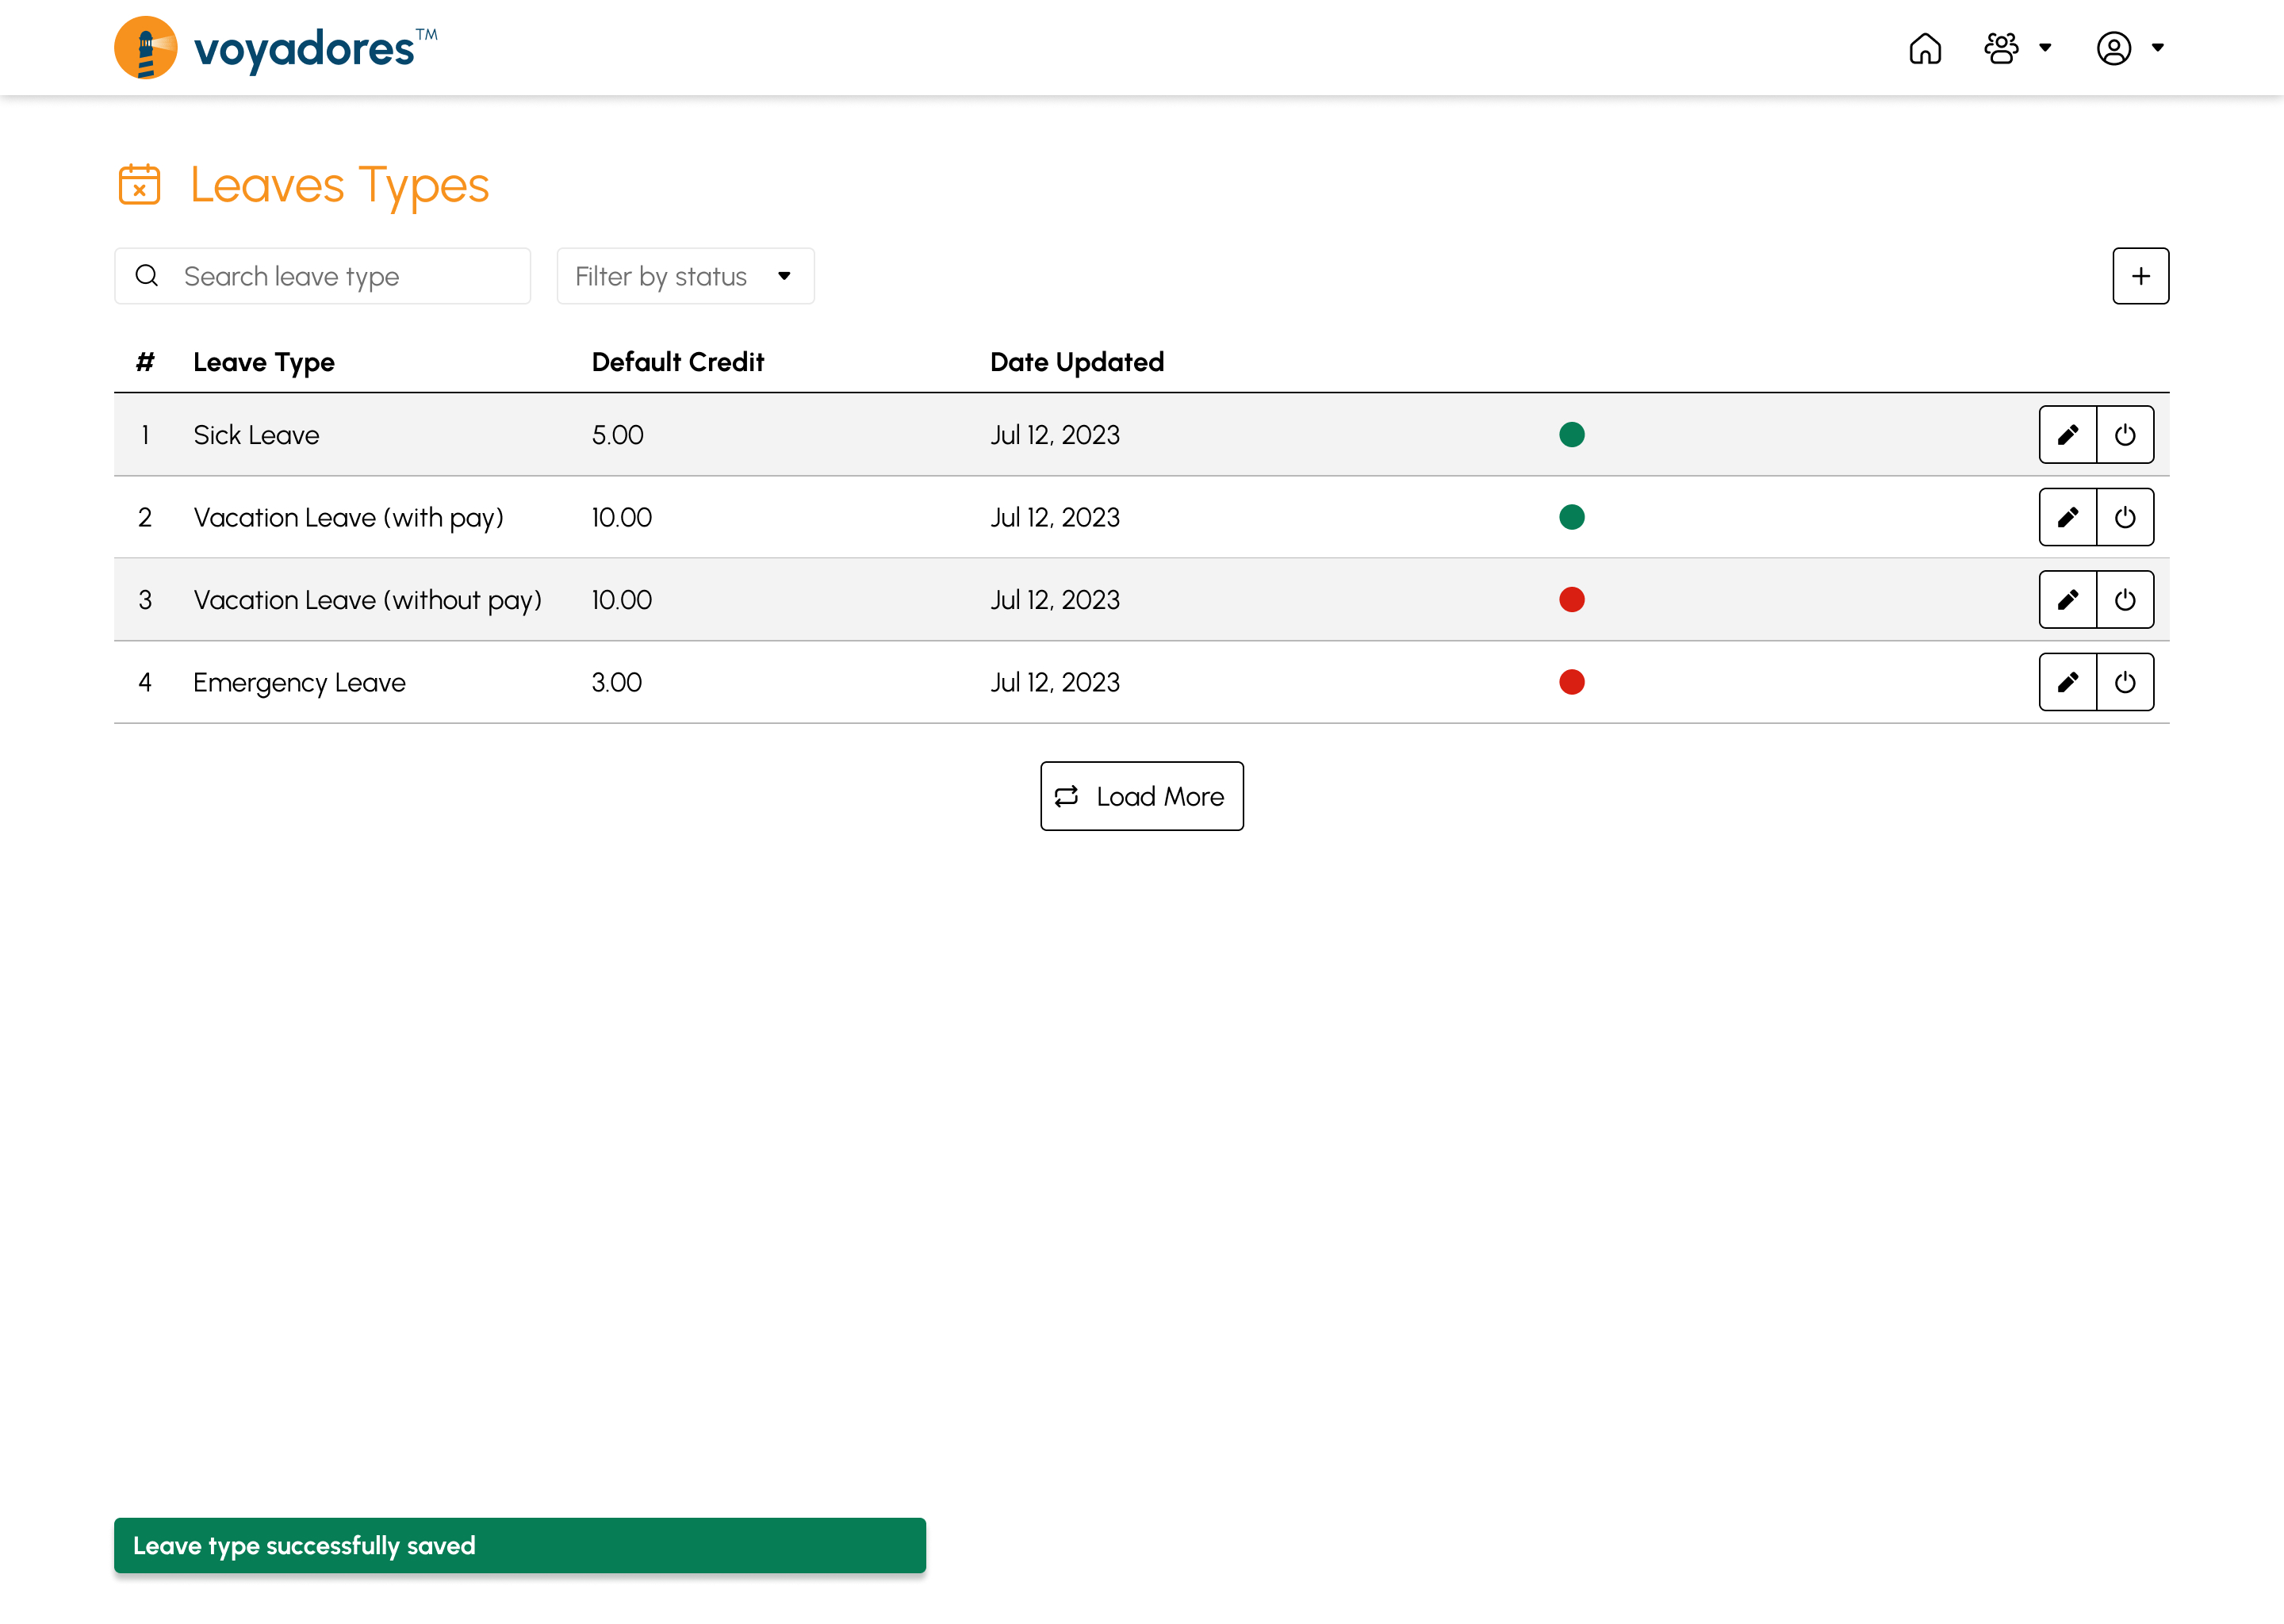
Leave Types Summary Table
The Leave Type Summary Table displays the following columns:
- Item number “#”
- Leave Type name
- Default Credit
- Date Updated
- Status
-
Actions
- Edit Leave Type
- Activate/Deactivate Leave Type
Searching Leave Types
-
Key in the name of the Leave Type in the Search Bar to look for a particular Leave Type.
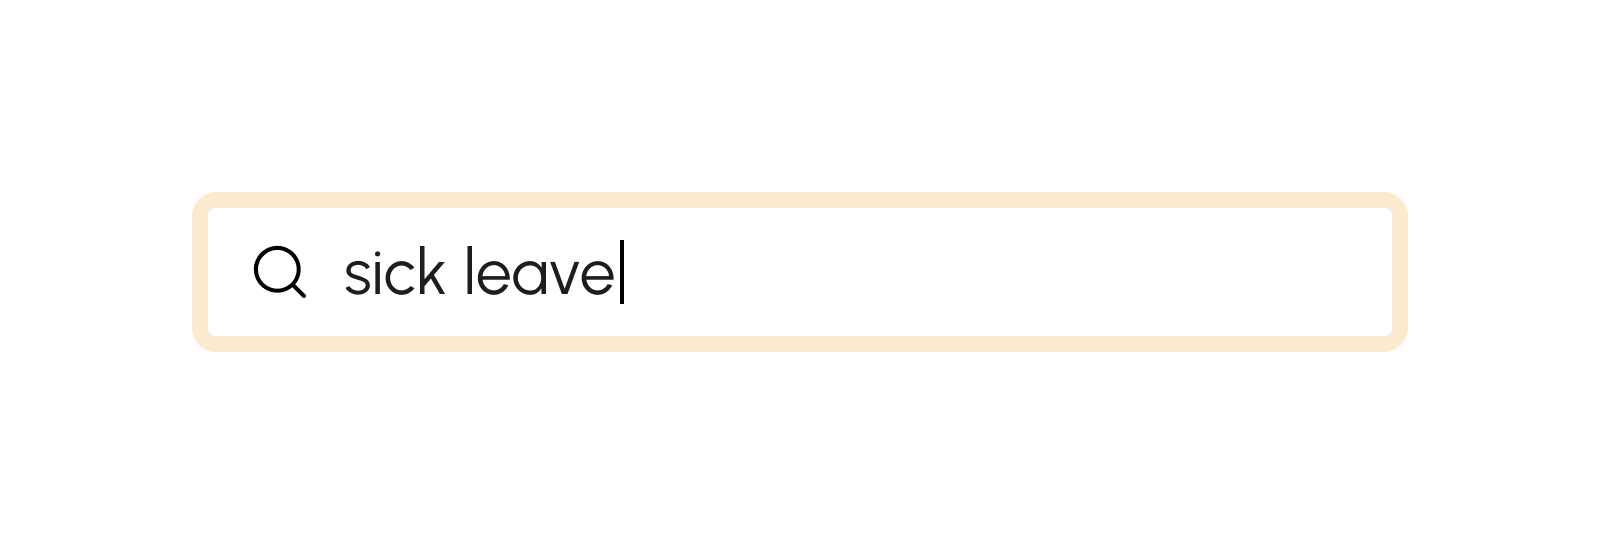
- The Leave Type Summary Table will display the searched Leave Type.
How to Filter Leave Types by Status
-
Click the Filter by status drop down to display and select the desired status.
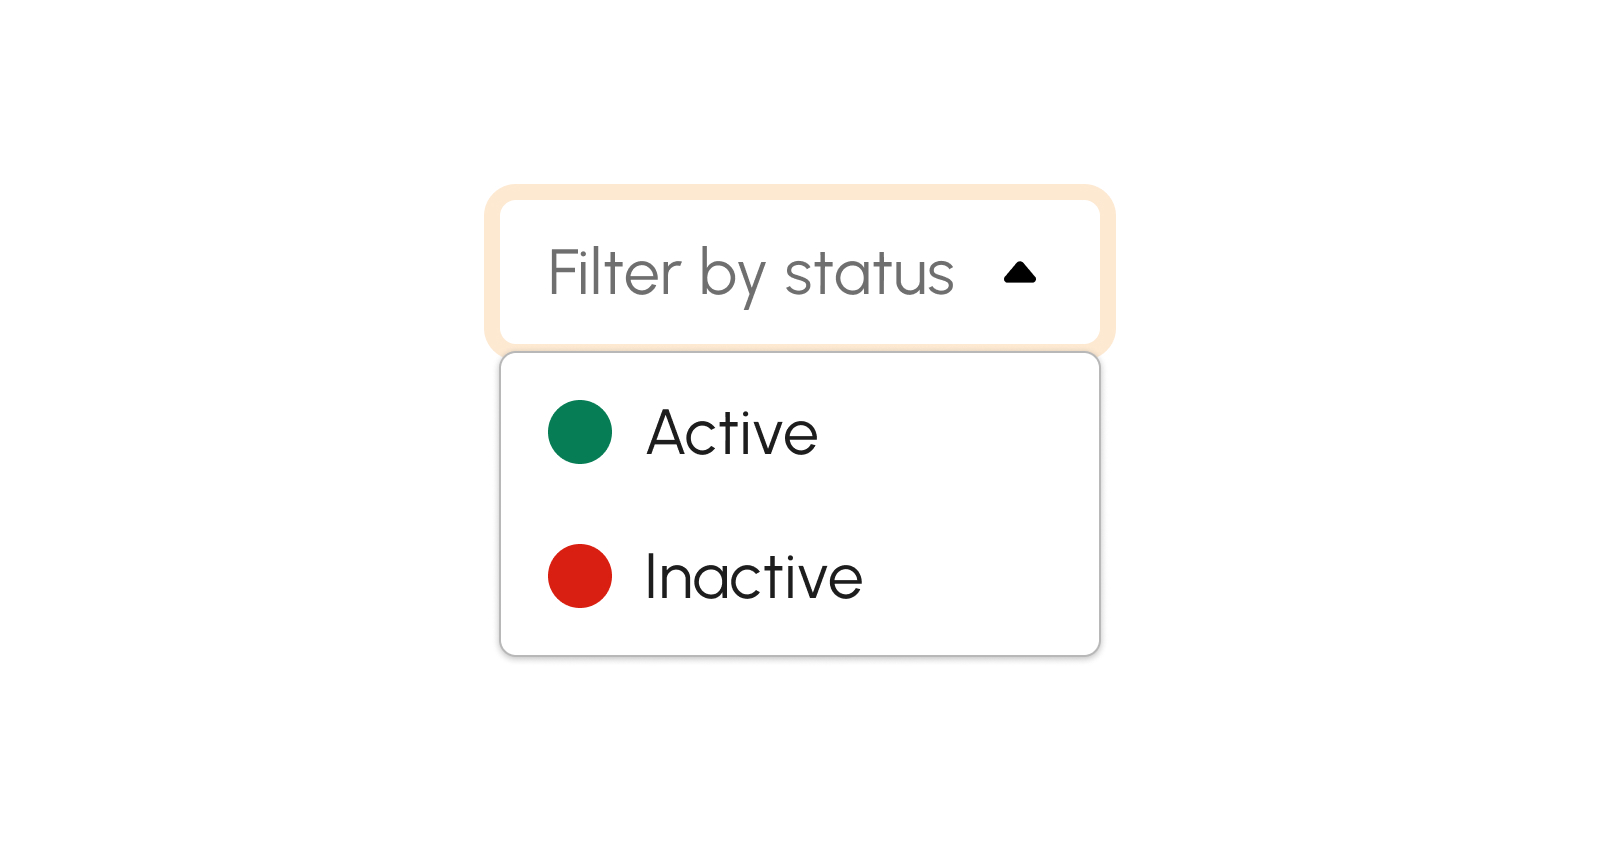 There are several statuses as follows:
- Active. This status shows the active Leave Types. Click the filter by status drop-down and select “Active”.
- Inactive. This status shows the inactive Leave Types. Click the filter by status drop-down and select “Inactive”.
Creating Leave Types
To begin creating Leave Types, follow the procedures below:
- Click the Create button to create a Leave Type.
-
The screen displays a modal below to key in the required details in the following fields:
- Leave Type
-
Type
- With Pay
- Without Pay
- Default Leave Credit
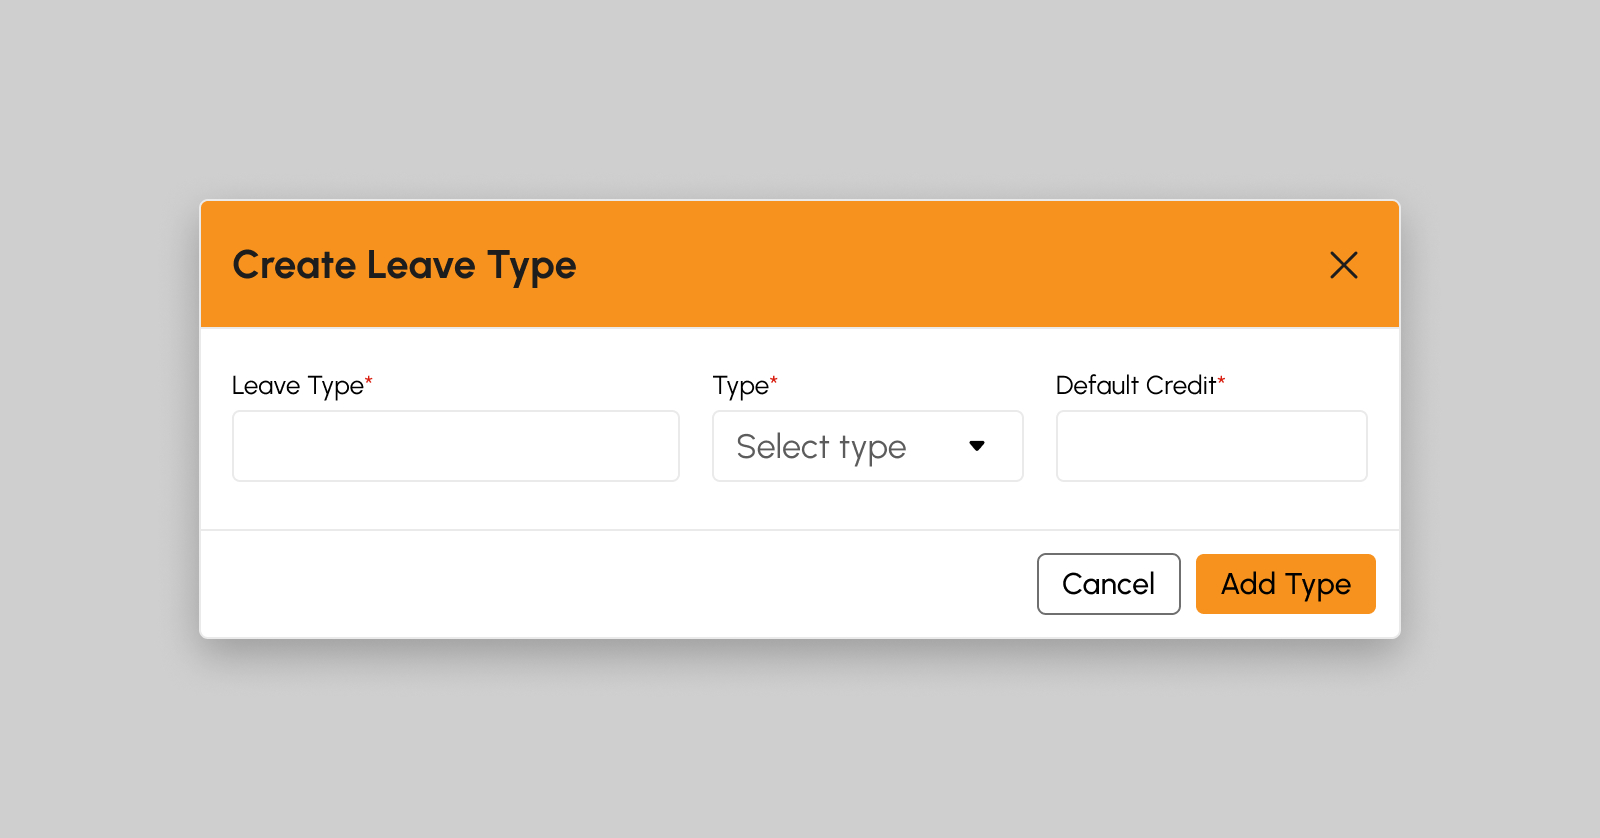
Note
Required (*) fields should not be empty.
- Click the Add Type button to create the Leave Type successfully.
-
A successful notification message will show:
Leave type successfully saved
-
Created leave type will be added to the list of Leave Types in the Summary Table.
Note
Default status for newly created Leave Types is ”Active”.
To cancel the creation of Leave Types, follow the procedures below:
- Click the Cancel button to cancel the creation of Leave Type.
- The screen closes the modal.
- System will not proceed creating and saving a Leave Type.
Editing Leave Types
Edit and modify Leave Types by following the steps below:
- Click the Edit button to modify Leave Type.
-
The screen displays a modal below to key in the updates in the following fields:
- Leave Type Name
-
Type
- With Pay
- Without Pay
- Default Leave Credit
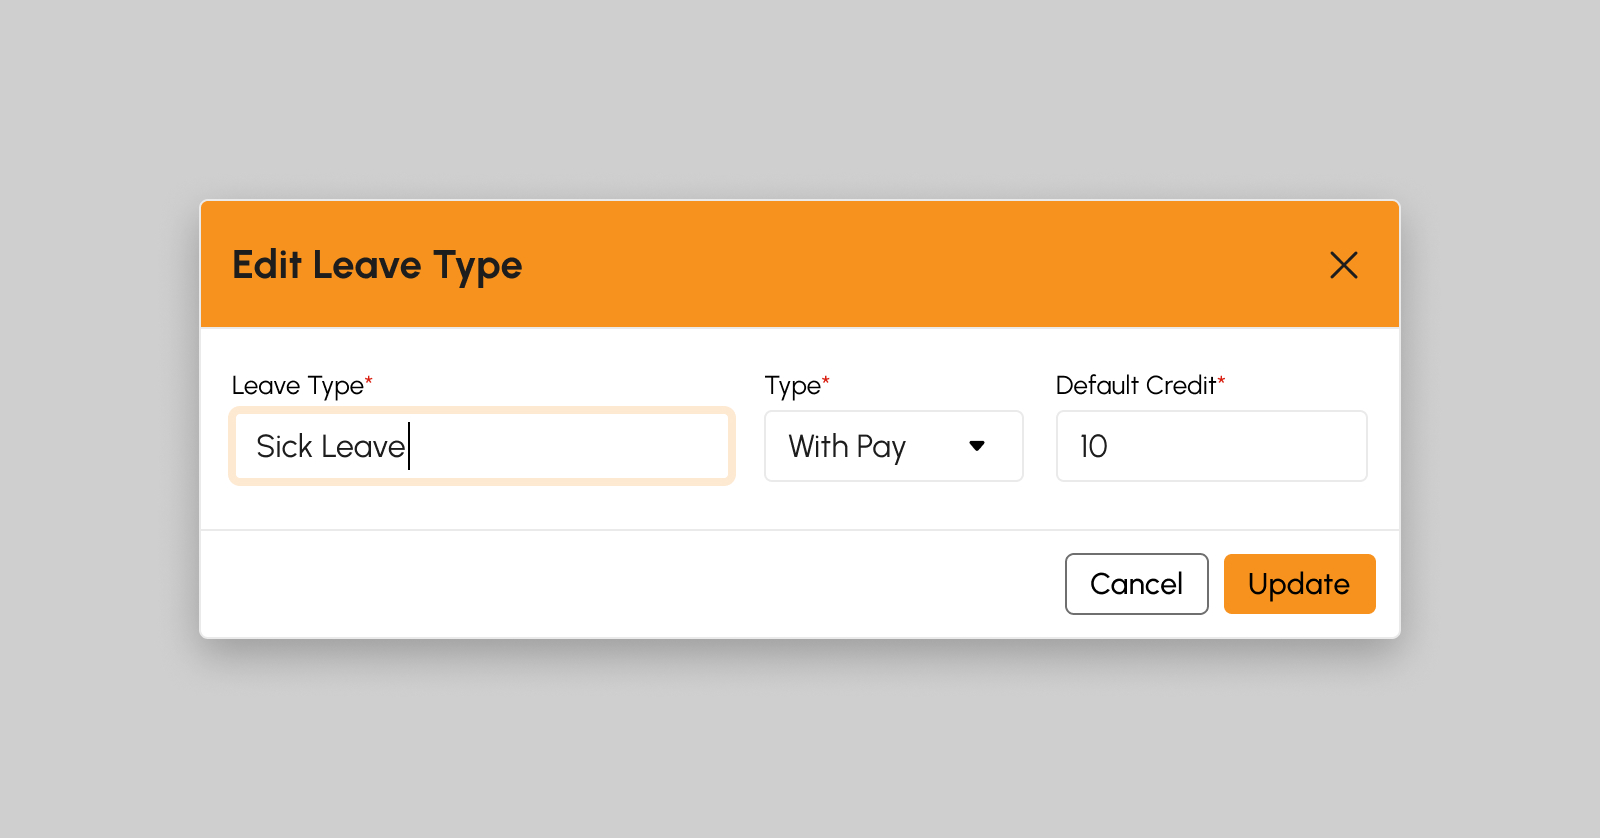
Note
Required (*) fields should not be empty.
- Click the Update button to update the Leave Type.
-
A successful notification message will show:
Leave type successfully updated
- Saves the applied changes.
To cancel the update of Leave Types, follow the procedure/s below:
- Click the Cancel button to cancel the update of Leave Type.
- The screen closes the modal.
- System will not proceed updating and saving a Leave Type.
Deactivating Leave Types
- To deactivate a Leave Type, click deactivate button.
-
Successful deactivation will show a notification message:
Leave type successfully deactivated
Activating Leave Types
- To activate a Leave Type, click activate button.
-
Successful activation will show a notification message:
Leave type successfully activated
How to Load More Leave Types
If there more than twenty (20) Leave Types on the list, click the Load More button to display other Leave Types since the default item number displayed in the screen is from count 1-20.
Holidays
Introduction to Holidays Page
This page creates lists of applicable Holidays in the company and configure pay rates per Holiday type.
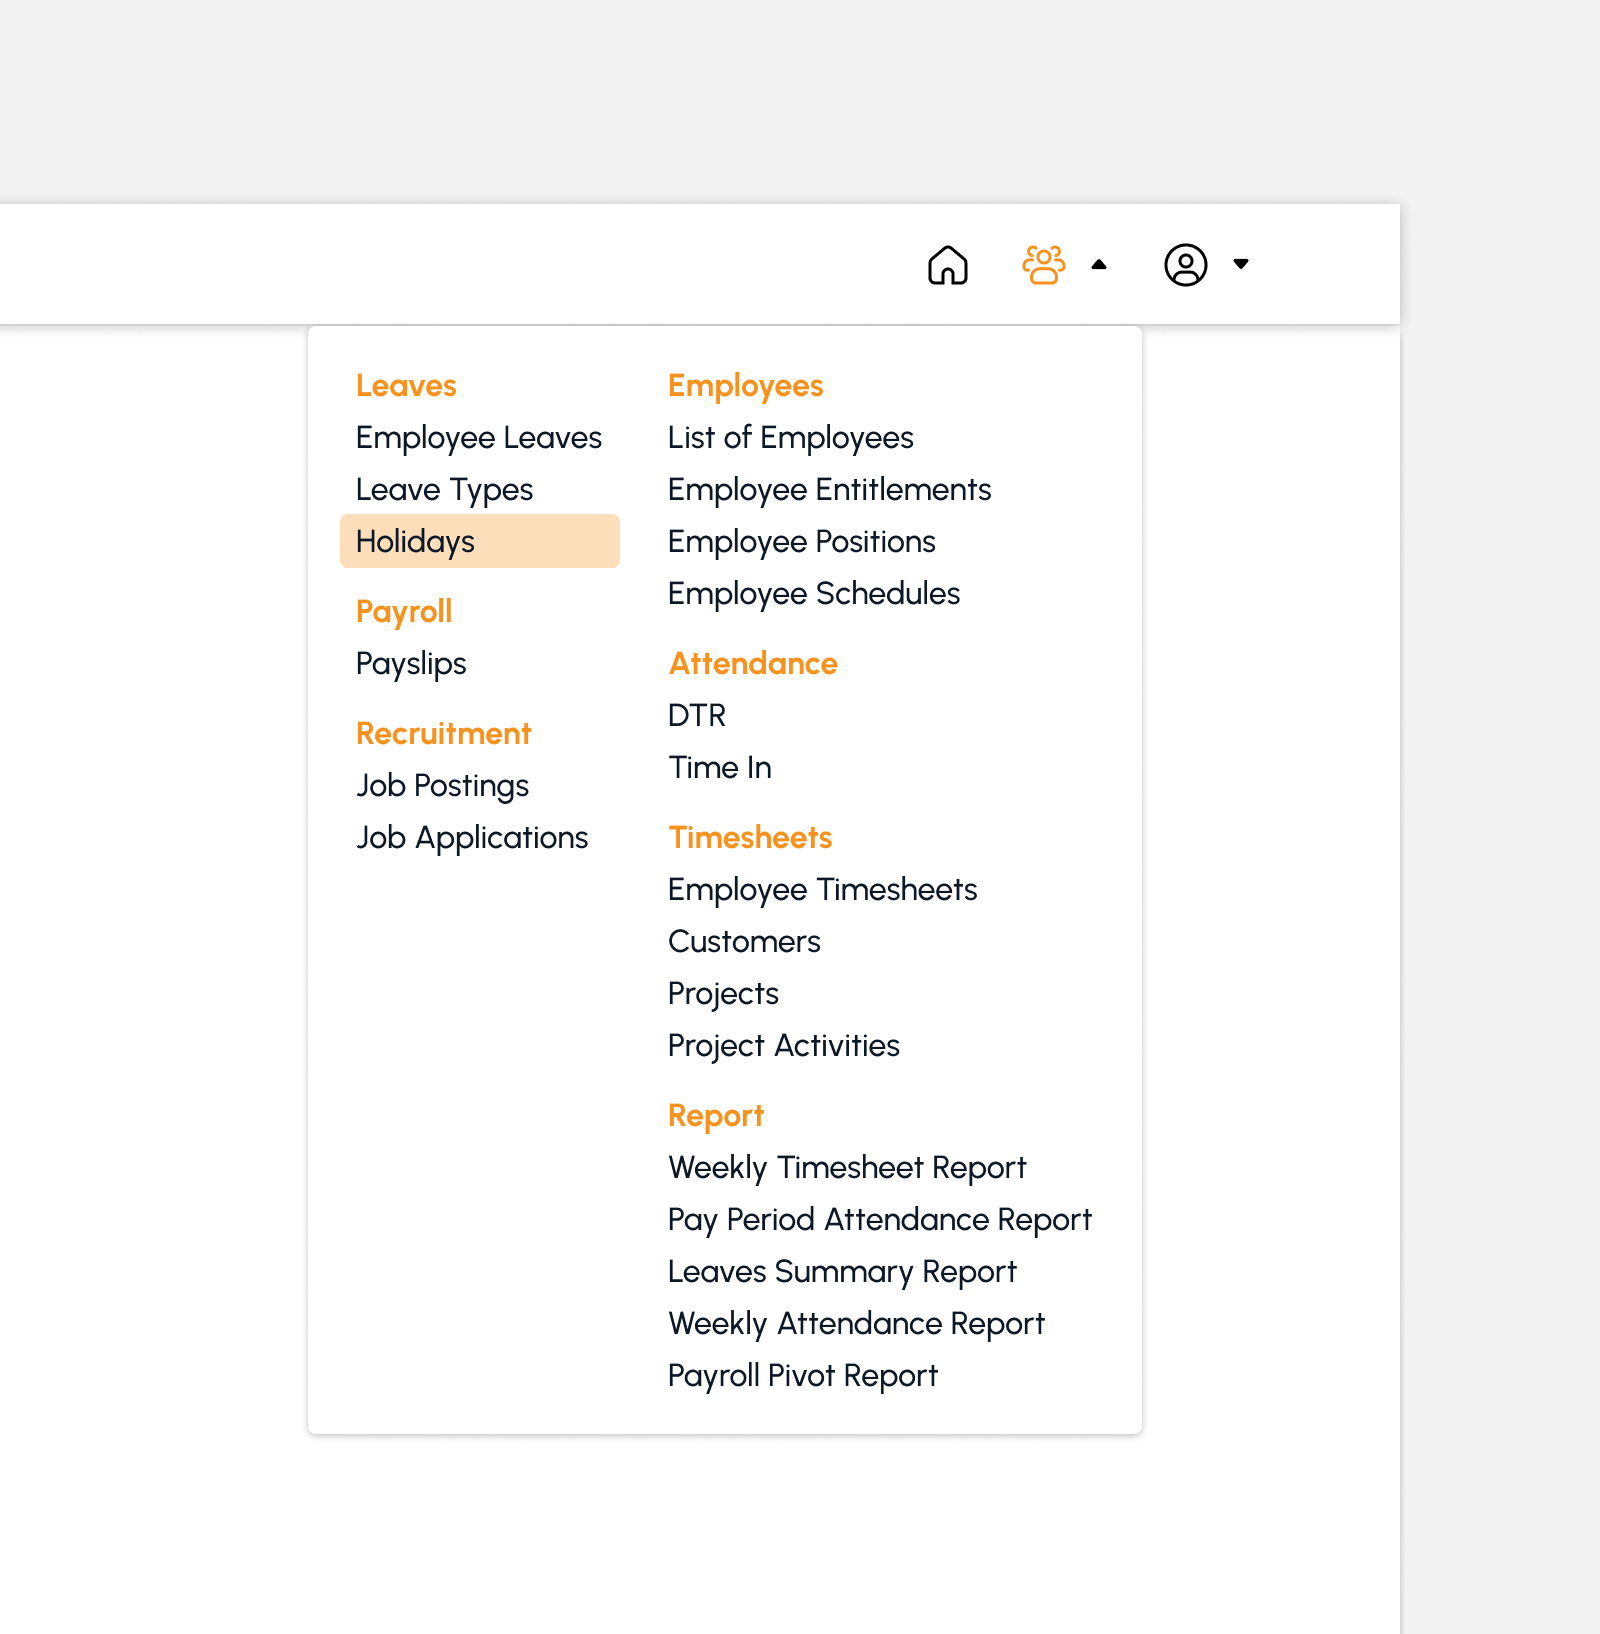
To access this page, navigate to the Human Resources Module and click "Holidays” under Leaves Submodule as shown in the image below:
The screen redirects to the Holidays page, showing several features to use that will be discussed in the next section.
Features in Holidays Page
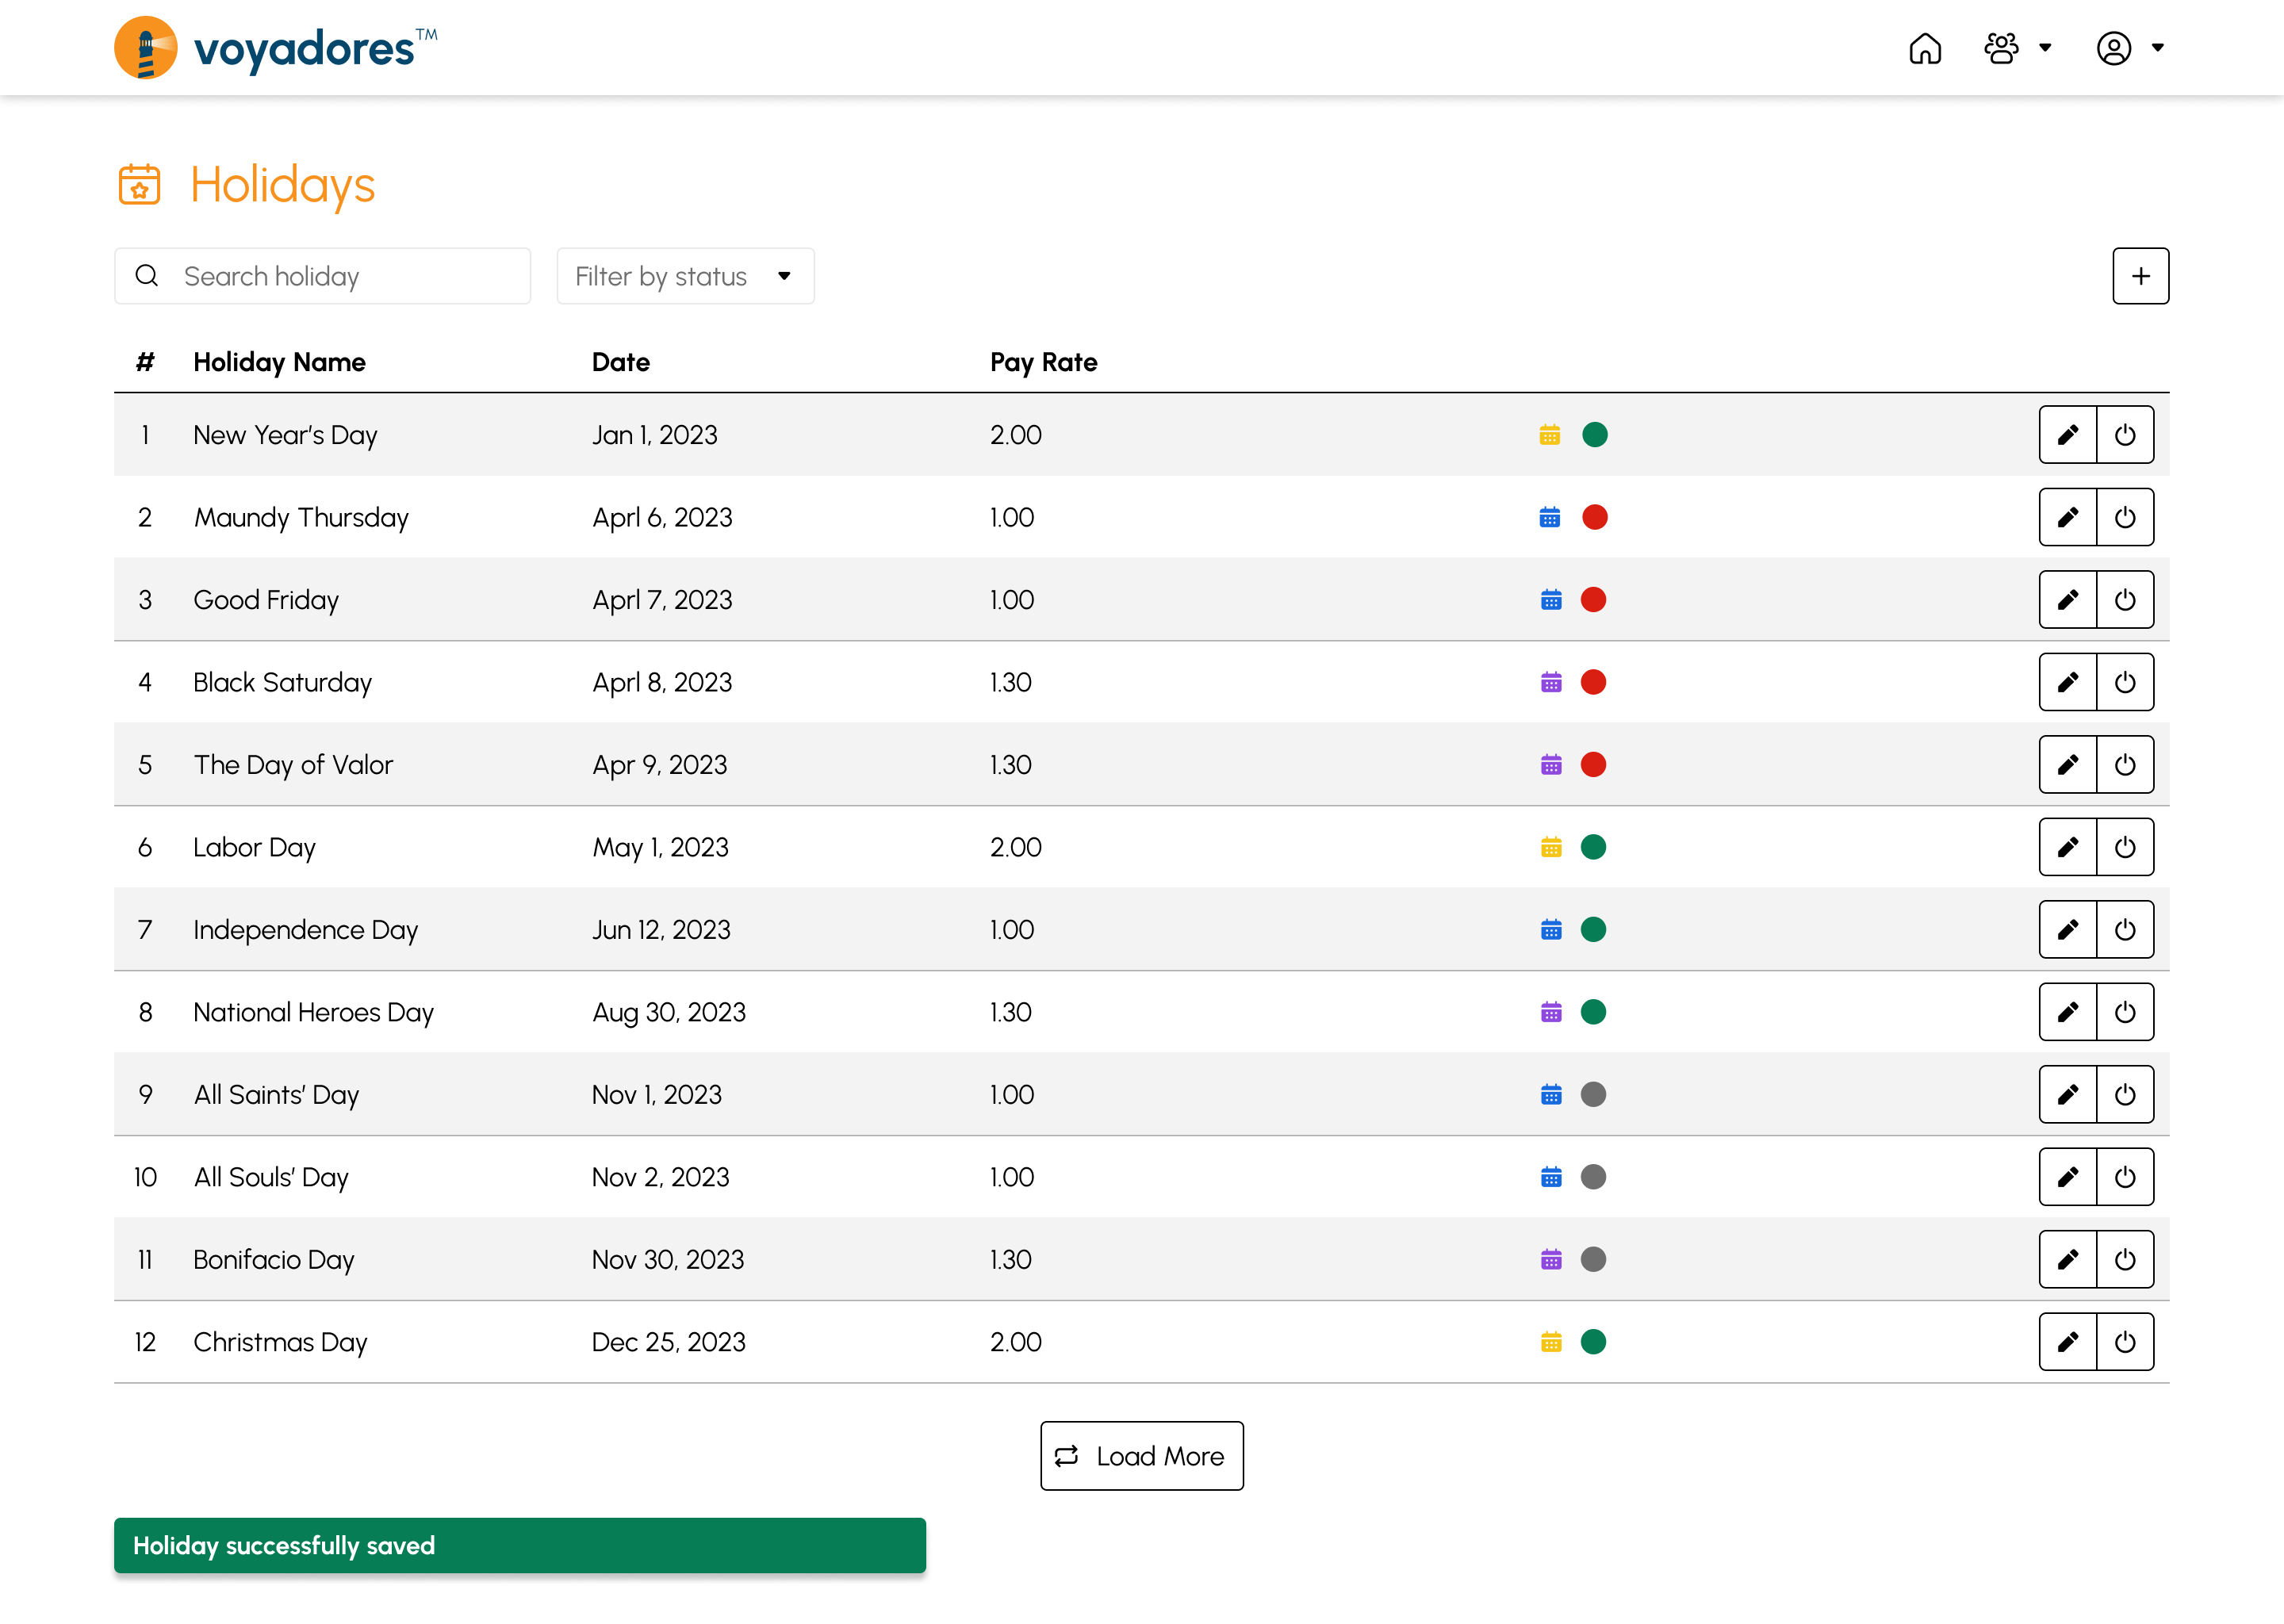
Holidays Summary Table
The summary table displays the list of created holidays with the following columns:
- Item number “#”
- Holiday Name
- Date of Holiday
- Pay Rate
- Status
-
Actions
- Edit Holiday
- Activate/Deactivate Holiday
Searching Holidays
To search for a holiday, follow the steps below:
-
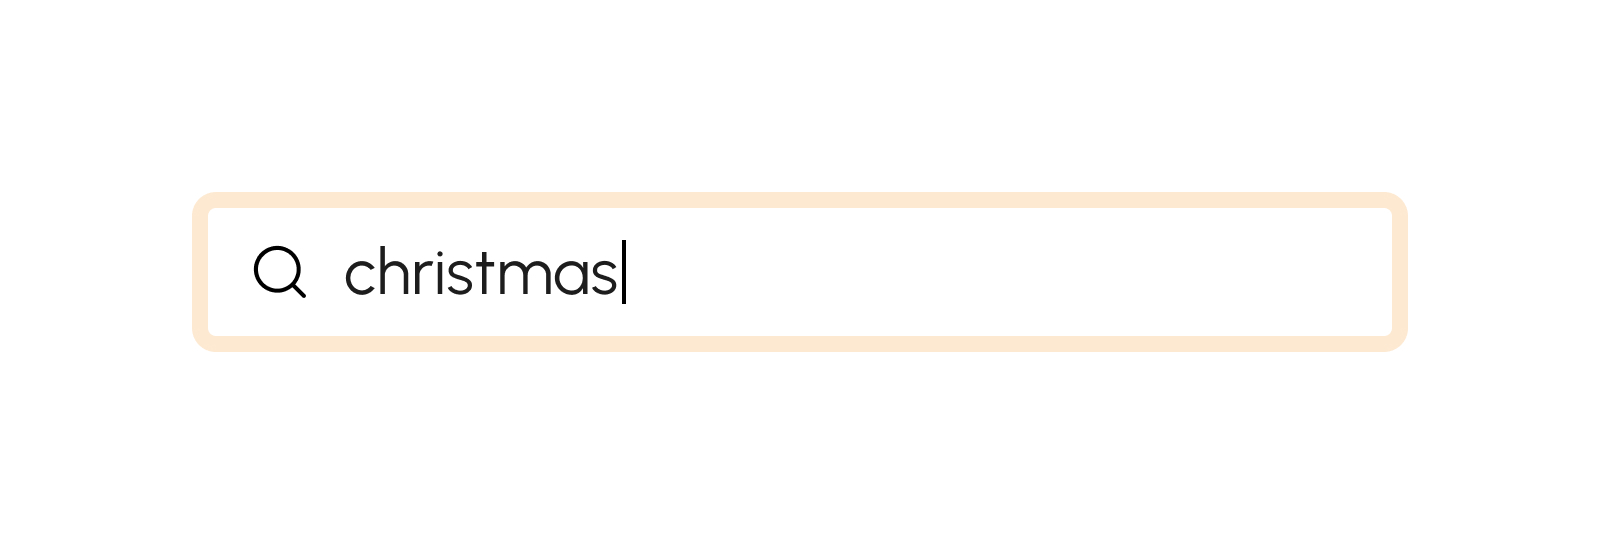
Key in the name of holiday in the Search Bar as shown in the snip below:
- The Holidays Summary Table will display the searched holiday.
Filtering Holidays by Status
This feature is to filter Holidays by status.
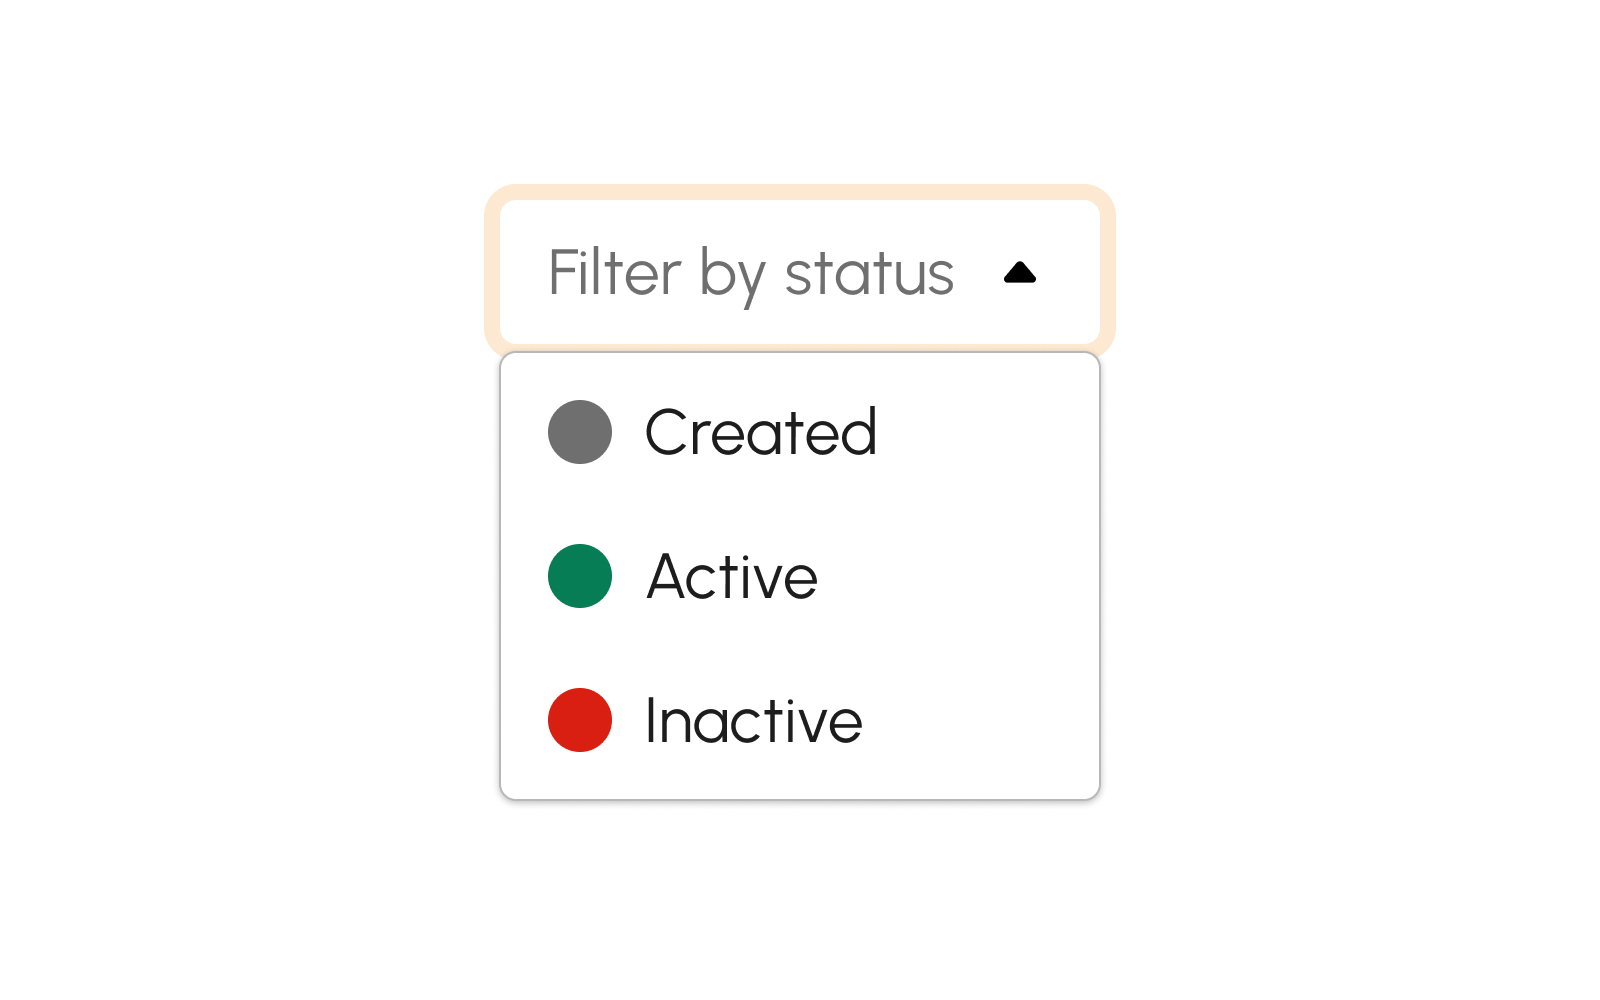
- Created. This gray-colored status shows the newly created Holiday. Click the filter by status drop-down and select “Created”.
- Active. This green-colored status shows the active Leave Types. Click the filter by status drop-down and select “Active”.
- Inactive. This red-colored status shows the inactive Leave Types. Click the filter by status drop-down and select “Inactive”.
Creating Holidays
Create a record of Holidays by following the procedures as follows:
-
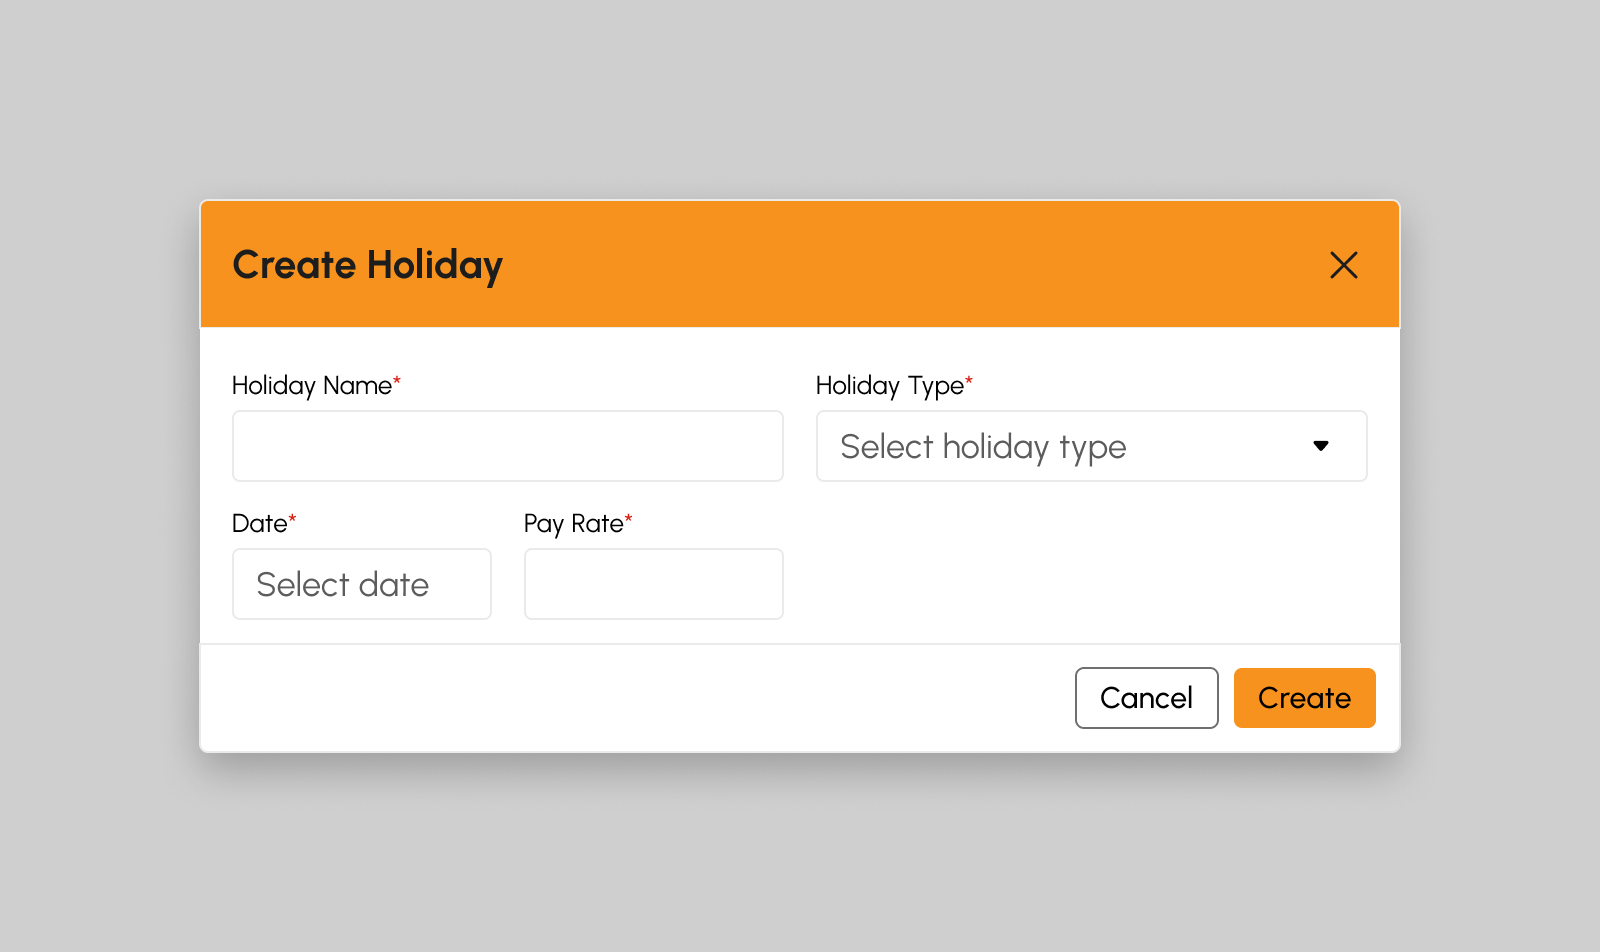
Click the Create button. A modal will display to begin creation of holidays.
-
Fill in the necessary fields displayed in the modal.
- Holiday Name
-
Holiday Type
- Regular Holiday
- Special Non-Working Holiday
- Special Working Holiday
Note
Customize more holiday types according to the company’s preference or holiday types that are applicable in the organization.
- Date of Holiday
-
Pay Rate
- Regular Holiday (x2)
- Special Non-Working Holiday (x1.3)
- Special Working Holiday (x1)
Note
Customize holiday rates according to the company’s preference or rates that are applicable in the organization.
Note
Required (*) fields should not be empty.
-
Click the Create button to create the holiday.
-
A successful notification message will show:
Holiday successfully added
-
If one of the required fields is empty or creation is unsuccessful, an error message will show:
Please fill the required fields
-
A successful notification message will show:
To cancel the creation of Holiday, follow the procedures below:
- Click the Cancel button.
- Create Holiday modal will close.
Editing Holidays
-
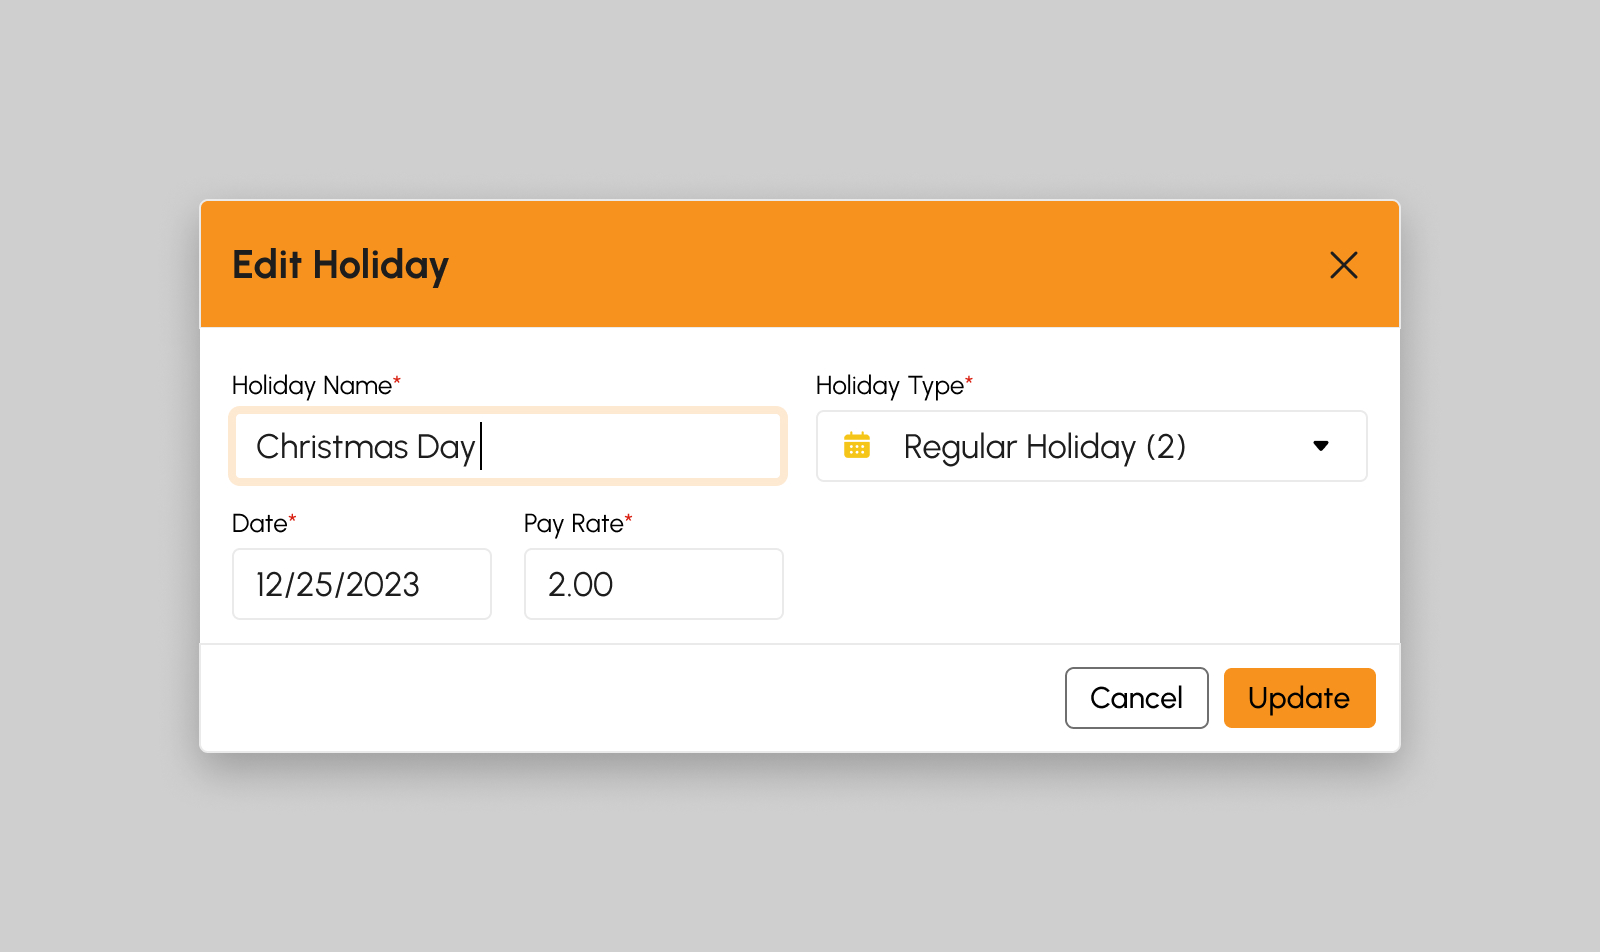
Click the Edit button. This will show the Edit Holiday modal.
-
Fill in the necessary fields displayed in the modal.
- Holiday Name
-
Holiday Type
- Regular Holiday
- Special Non-Working Holiday
- Special Working Holiday
Note
Customize more holiday types according to the company’s preference or holiday types that are applicable in the organization.
- Date of Holiday
-
Pay Rate
- Regular Holiday (x2)
- Special Non-Working Holiday (x1.3)
- Special Working Holiday (x1)
Note
Customize holiday rates according to the company’s preference or rates that are applicable in the organization.
Note
Required (*) fields should not be empty.
-
Click the Update button to update the holiday.
-
A successful notification message will show:
Holiday successfully updated
-
If one of the required fields is empty or creation is unsuccessful, an error message will show:
Please fill the required fields
-
A successful notification message will show:
To cancel updating the Holiday, follow the procedures below:
- Click the Cancel button.
- Edit Holiday modal will close.
Activating Holidays
-
Click the Activate button to activate the holiday type. This will show a confirmation modal.
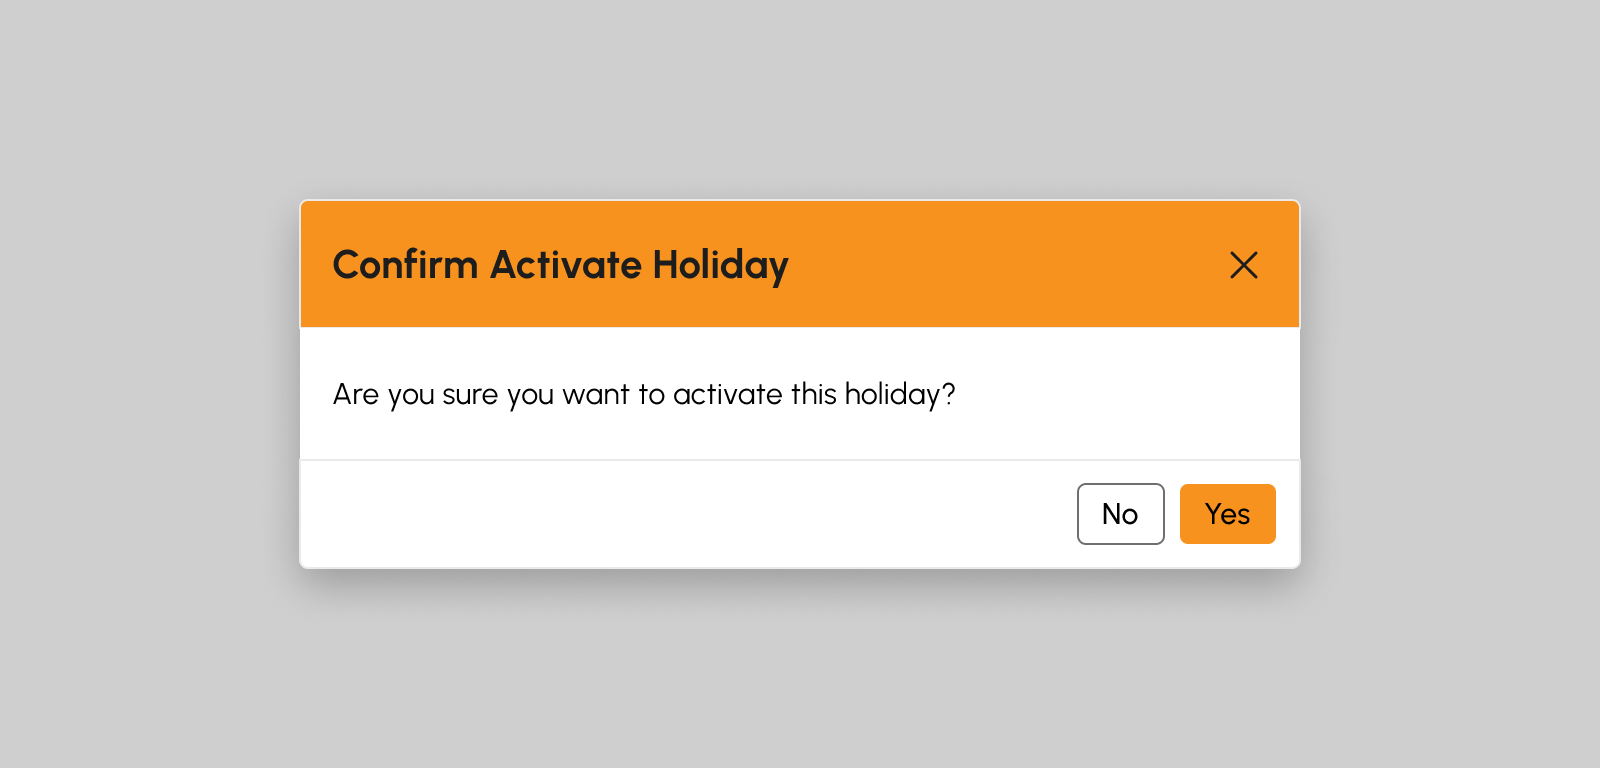
- From the modal, click Yes to successfully activate the holiday type, otherwise, click No button.
-
Activation success message will show.
Holiday successfully activated
Deactivating Holidays
-
Click the Deactivate button to deactivate the holiday type. This will show a confirmation modal.
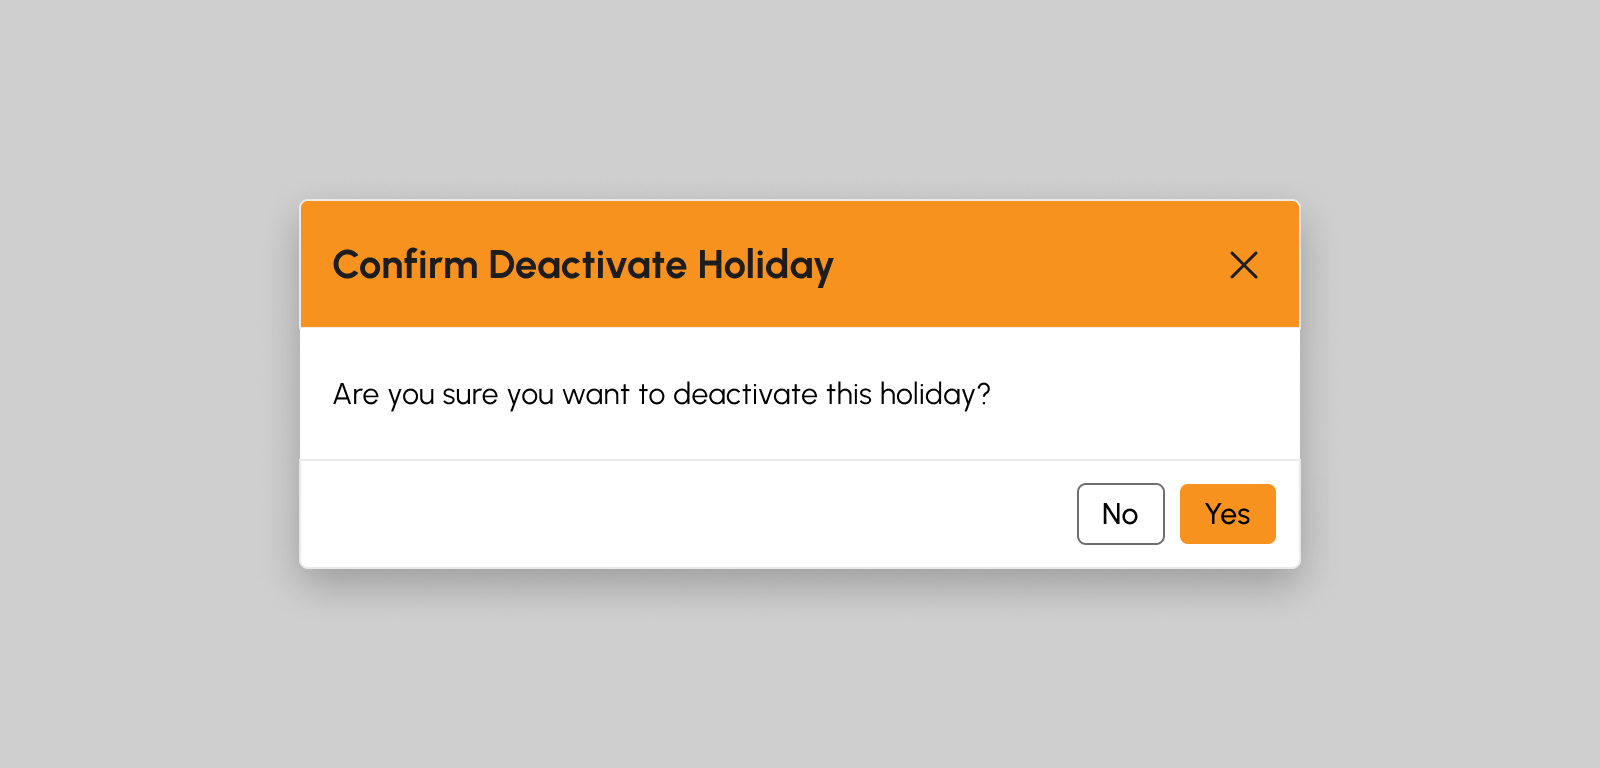
- From the modal, click Yes to successfully deactivate the holiday type, otherwise, click No button.
-
Deactivation success message will show.
Holiday successfully deactivated
How to Load More Holidays
If there are more than 20 holidays on the list, click the Load More button to display other holidays since the default item number displayed in the screen is from count 1-20.
Employee Leaves
Introduction to Employee Leaves Page
After creation of Leave Types and assigning Leave entitlements, next is the application and approval of Leaves is discussed on this page.
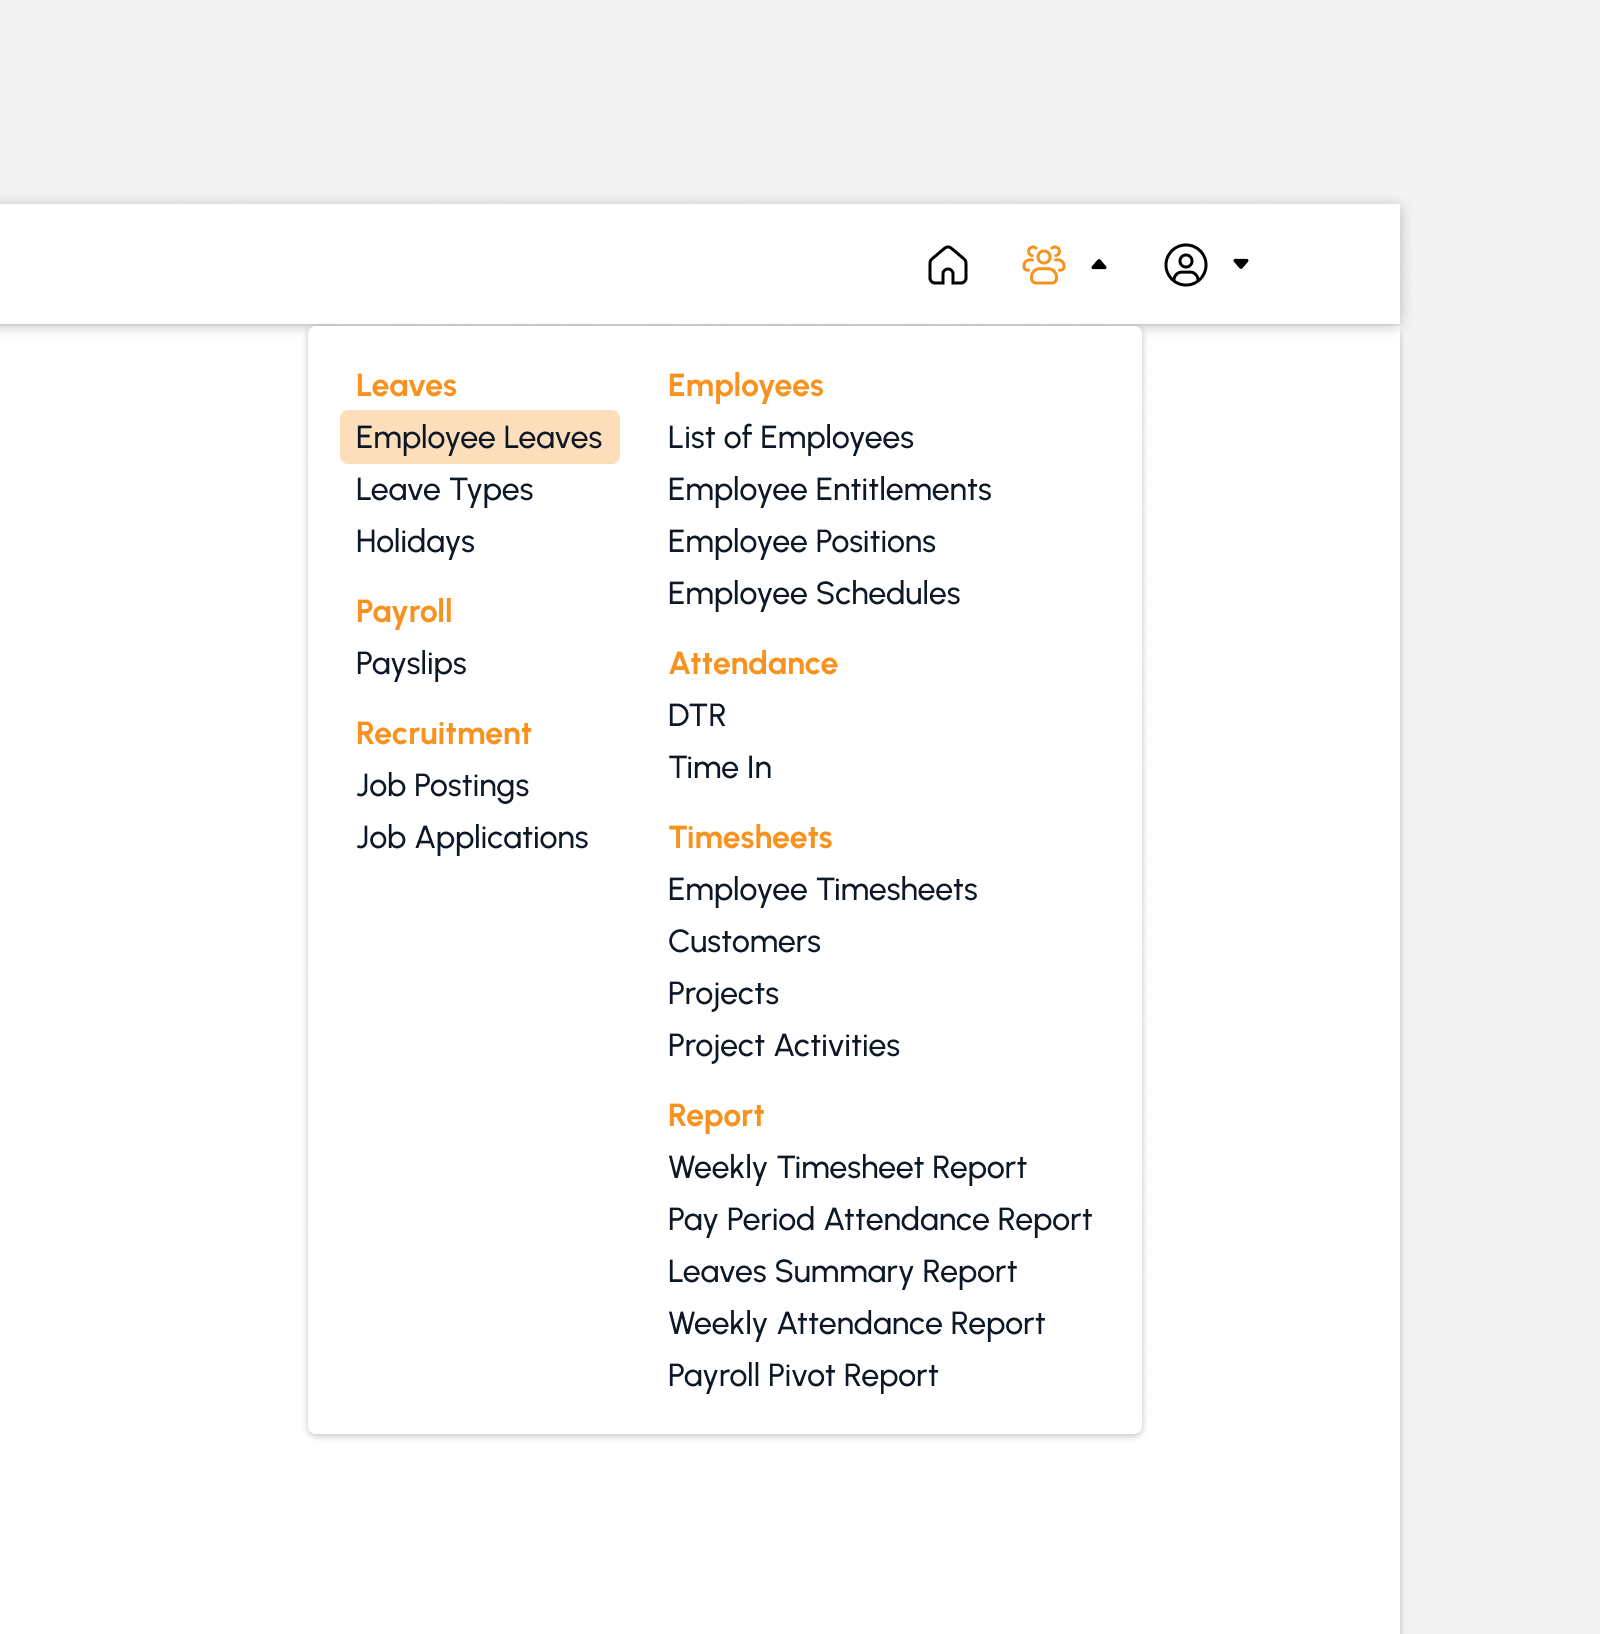
To access this page, navigate to the Human Resources Module and click "Employee Leaves” under Leaves Submodule as shown in the image below:
Features in Employee Leaves Page
Applications Summary Table
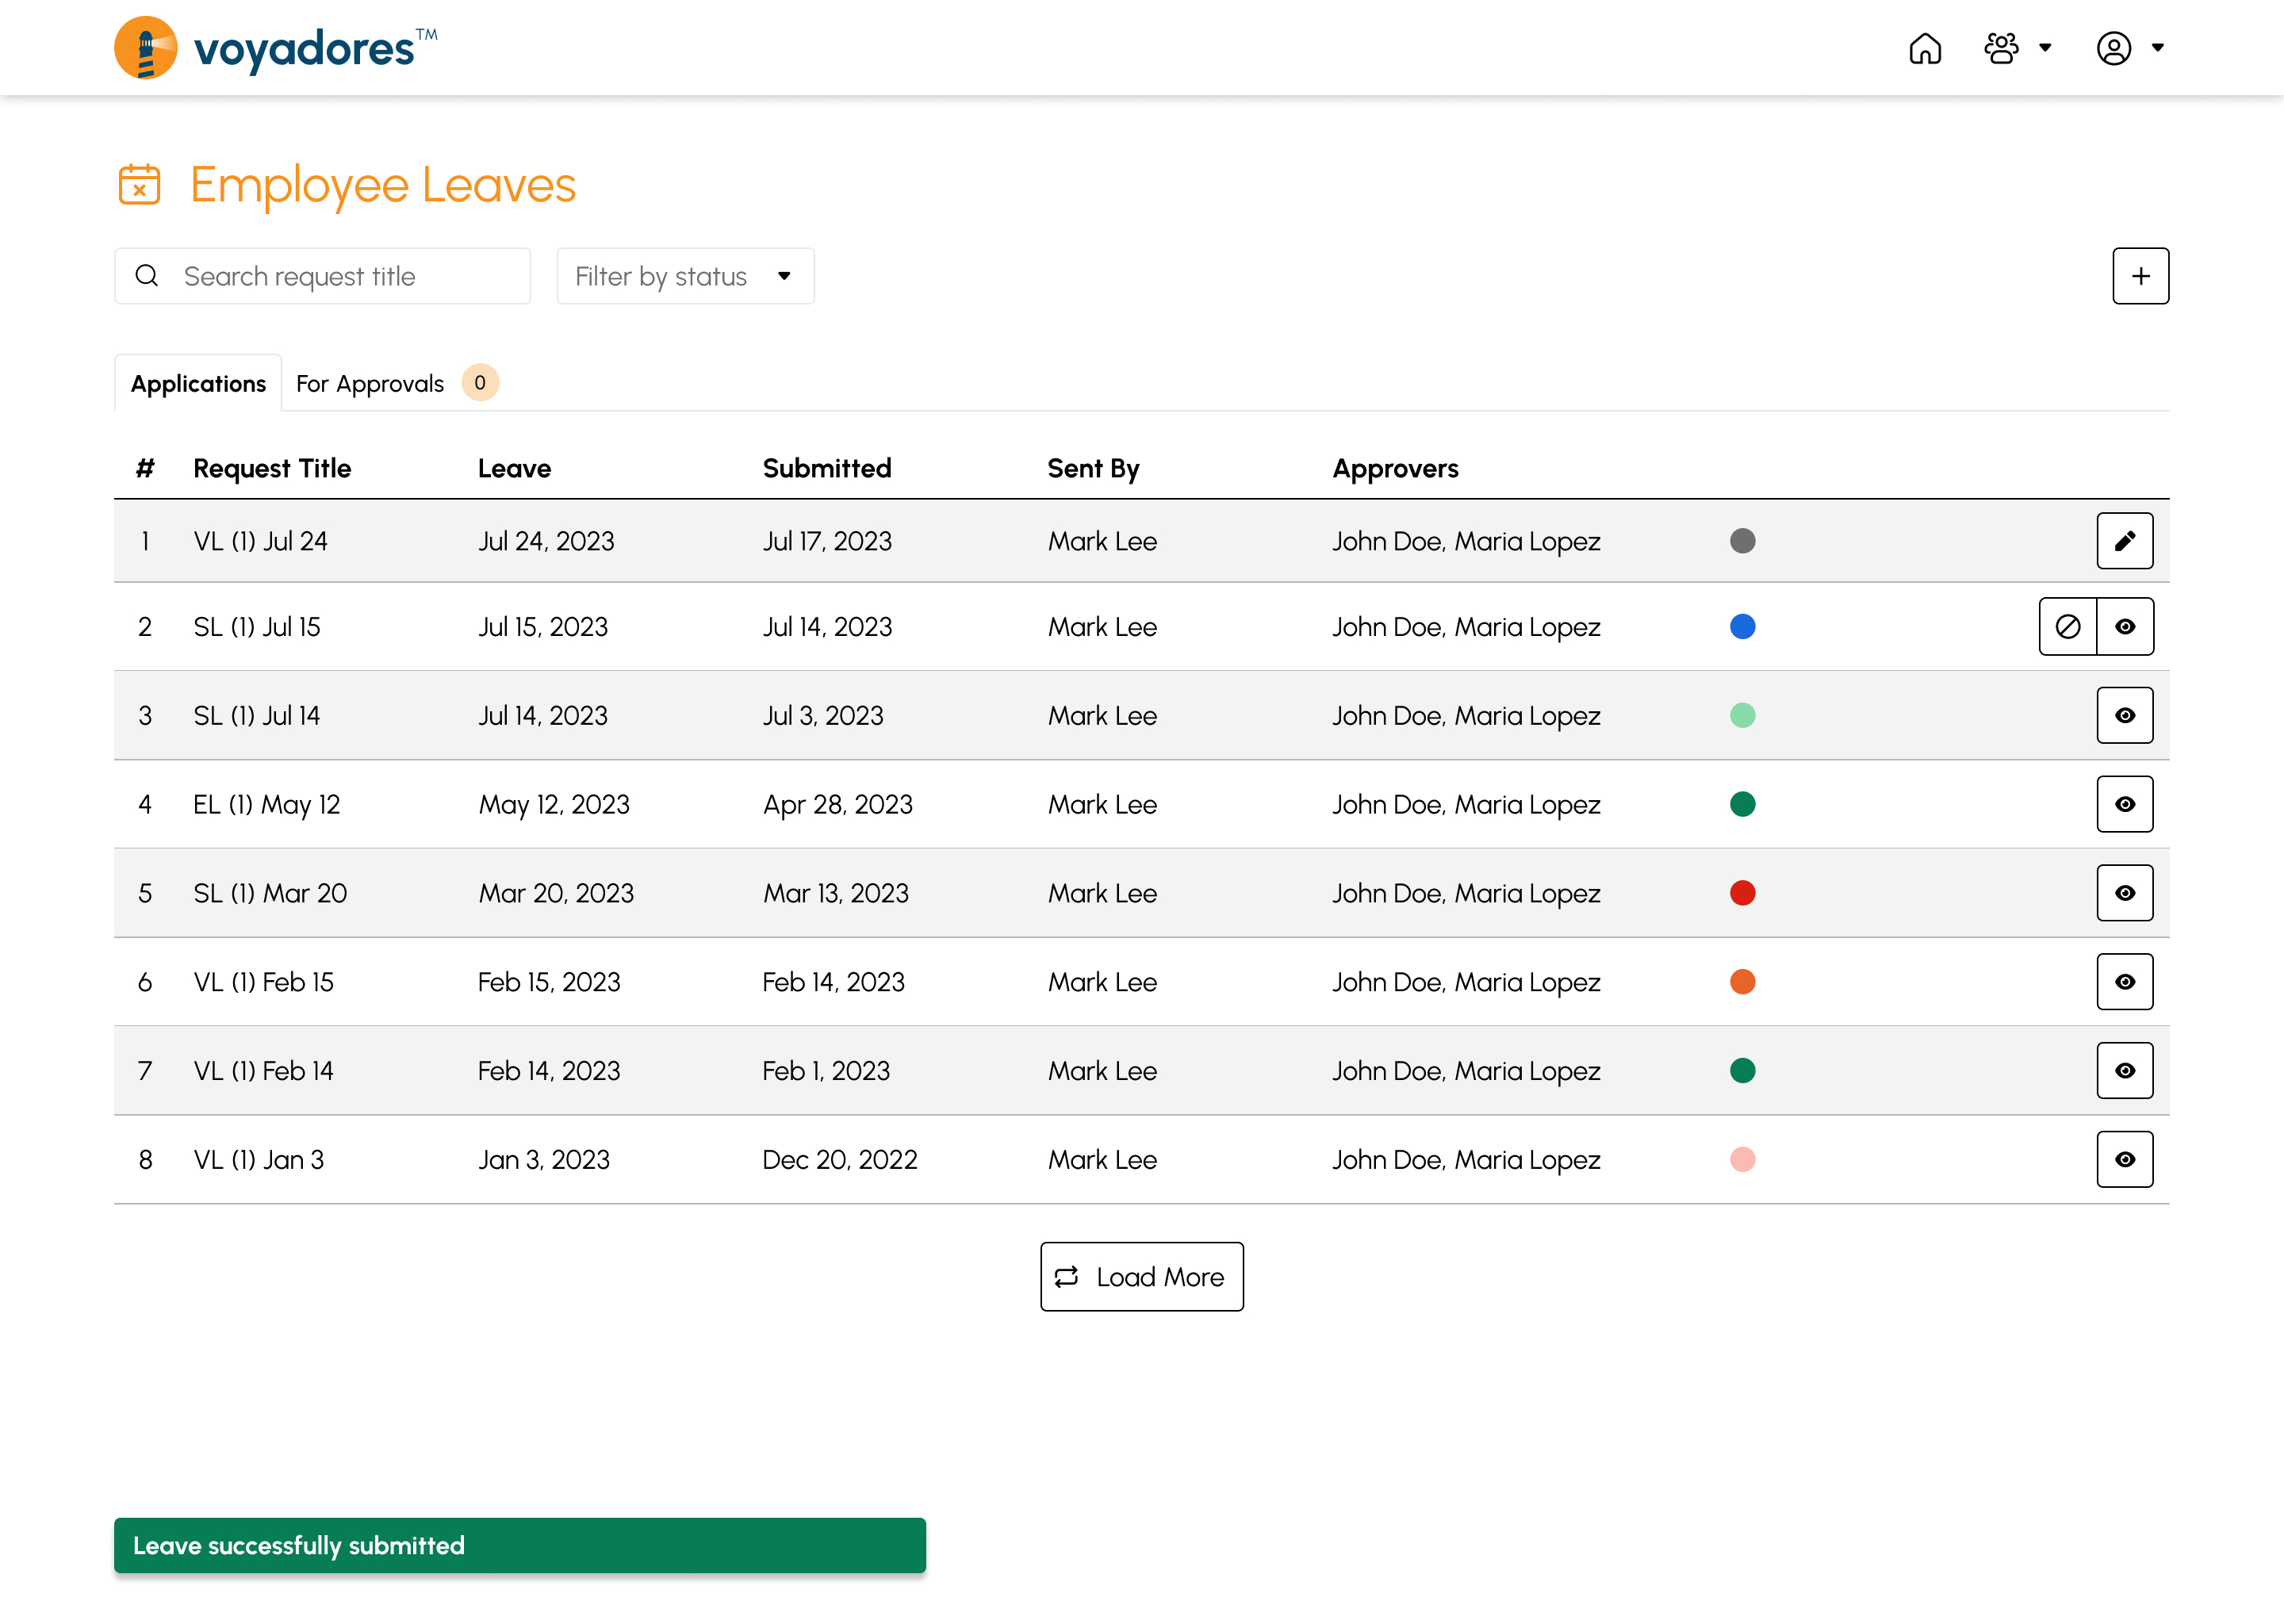
The Applications Summary Table displays all applied leaves whether it is VL, SL, EL, along with its status. The summary table contains the following columns:
- Item number “#”
- Request Title
- Date of Leave
- Date Submitted
- Sent By
- Approvers
- Status
-
Actions
- Edit Leave
- Cancel Leave
- View Leave
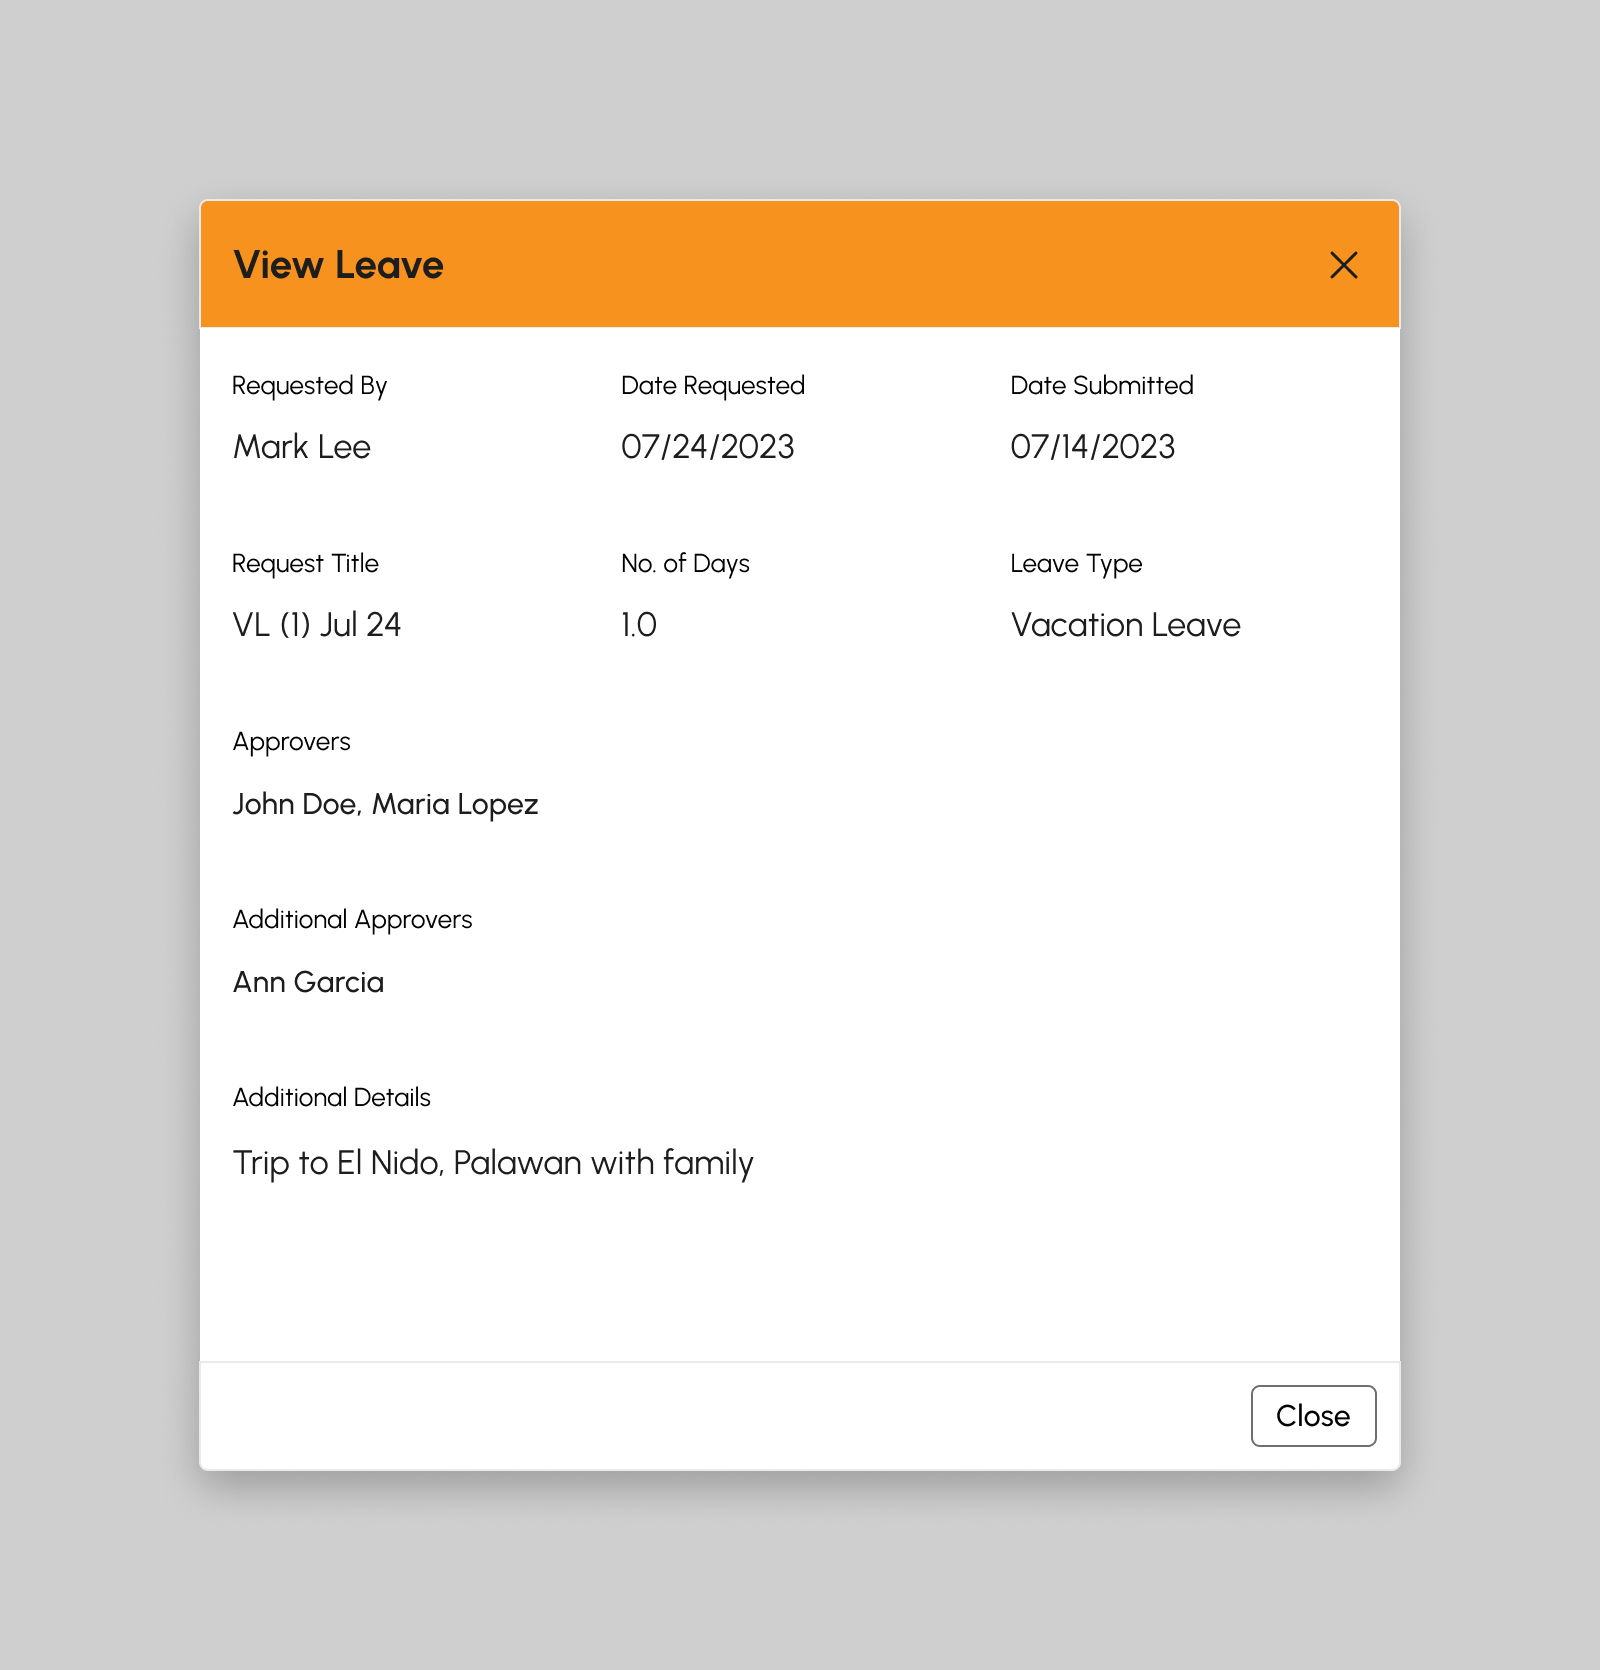
Viewing Details of Applied Leave
To view the details of an applied Leave, follow the procedures below:
-
Click the View Leave button to display the View Leave modal as shown in the snip below:
-
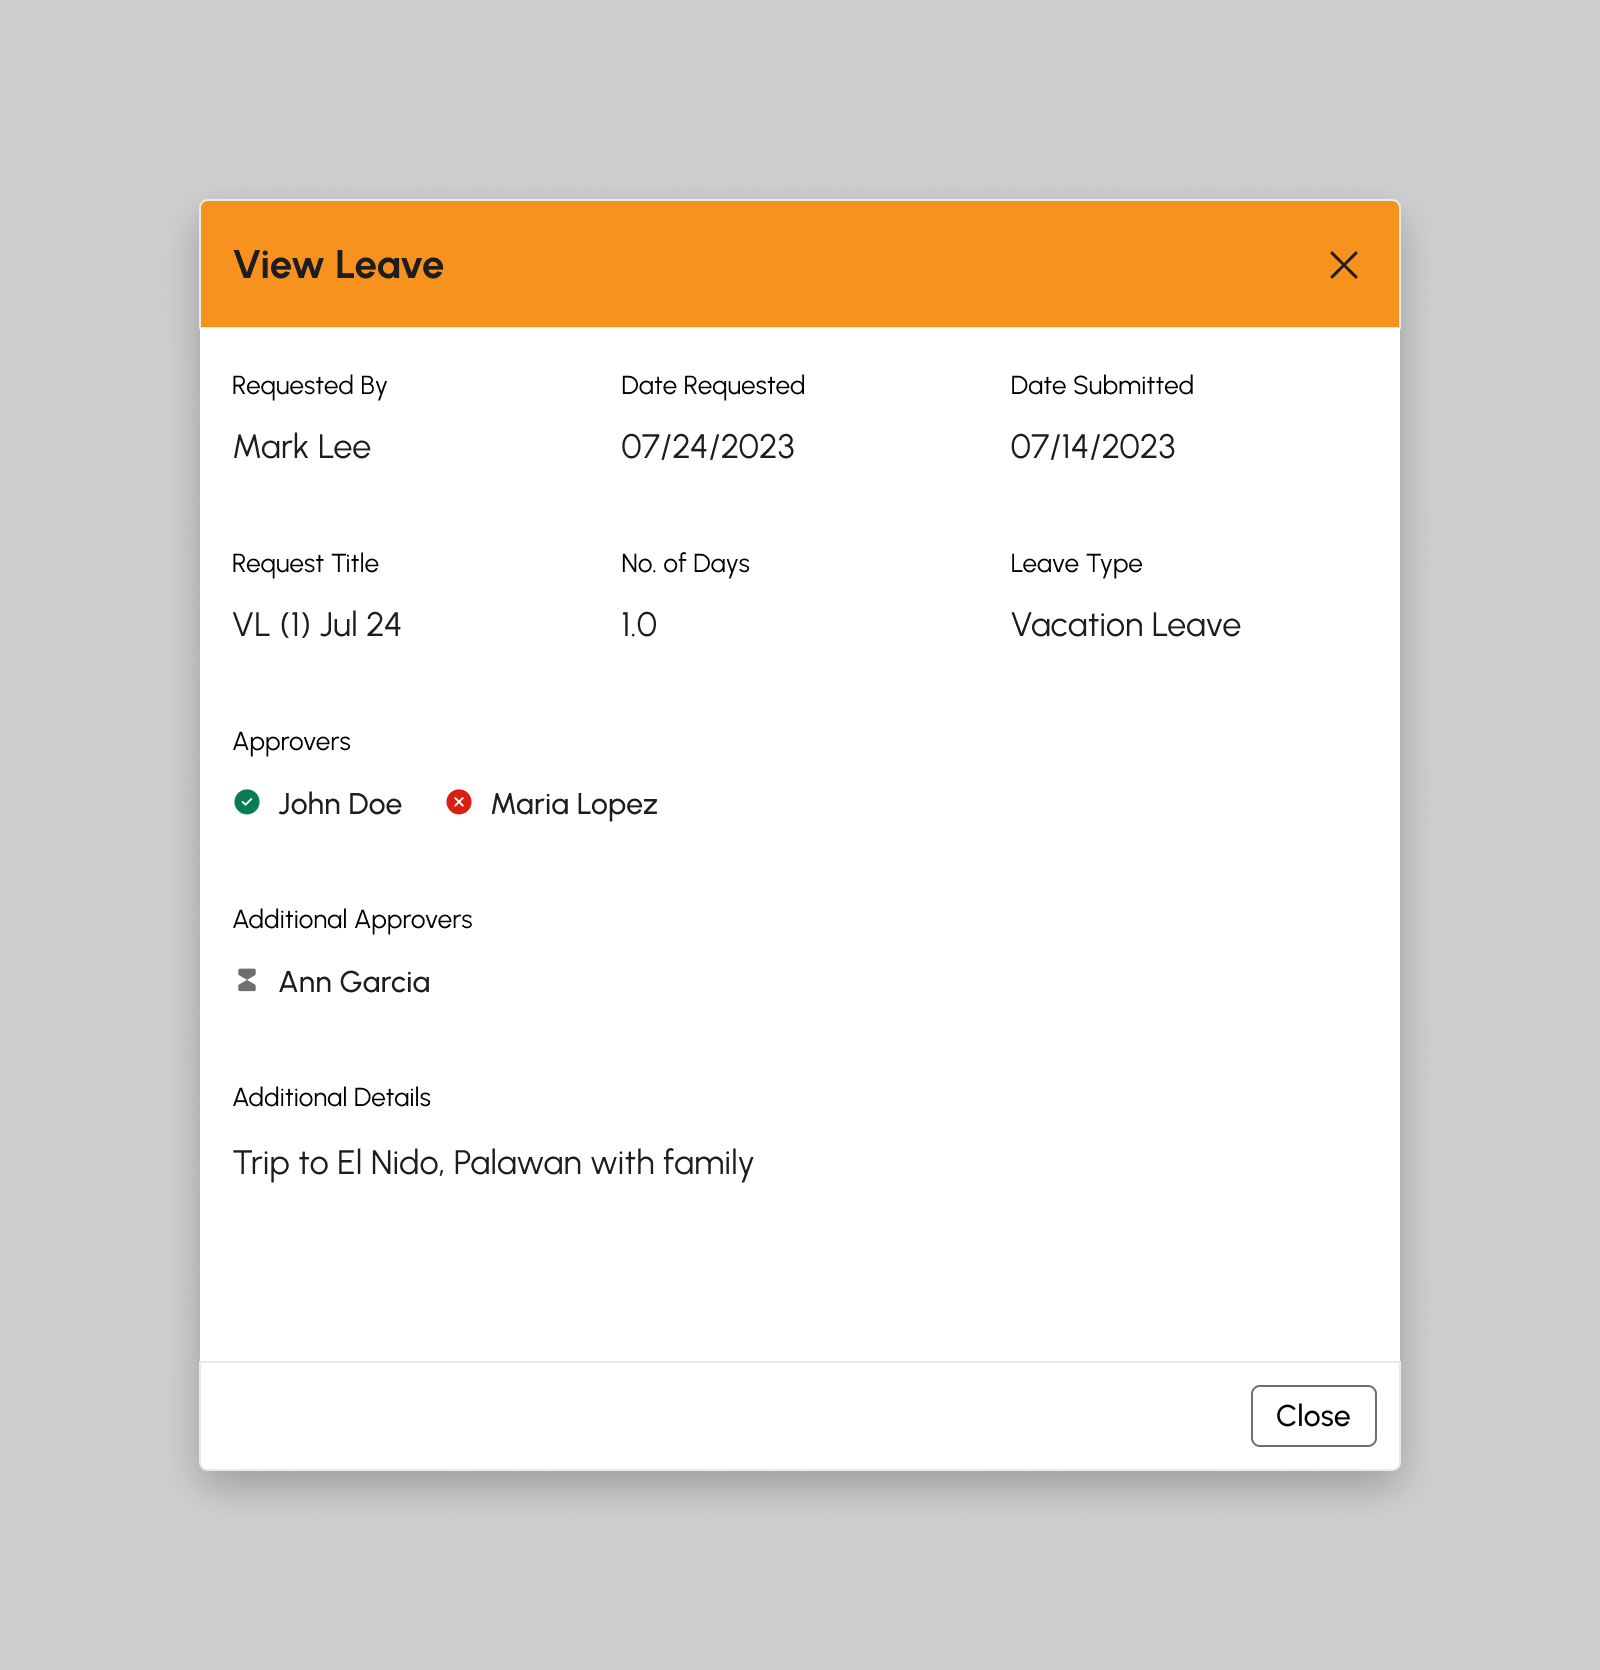
The View Leave modal displays the following information:
- Requested By. Displays the name of the requestor
- Date Requested. Displays the date from when the requestor shall be on Leave
- Date Submitted. Displays the date from when the requestor submitted the Leave request
- Request Title. Title of Leave request
- No. of Days. Leave number of days
- Leave Type. Vacation Leave, Sick Leave, and others.
- Approvers. The role of the approver/s assigned is displayed here.
-
Approver Status
- Pending. This icon beside the Approver name indicates that the Approver did not yet approve/rejected the request.
- Approved. This icon beside the Approver name indicates that the Approver approves the Leave request.
- Rejected. This icon beside the Approver name indicates that the Approver rejects the Leave request.
- Additional Approver. The name of the approver is displayed here. (Name of Supervisor or Manager)
- Additional Details. Displays further details about the applied Leave such as Time, Reason, and others.
For Approvals Summary Table
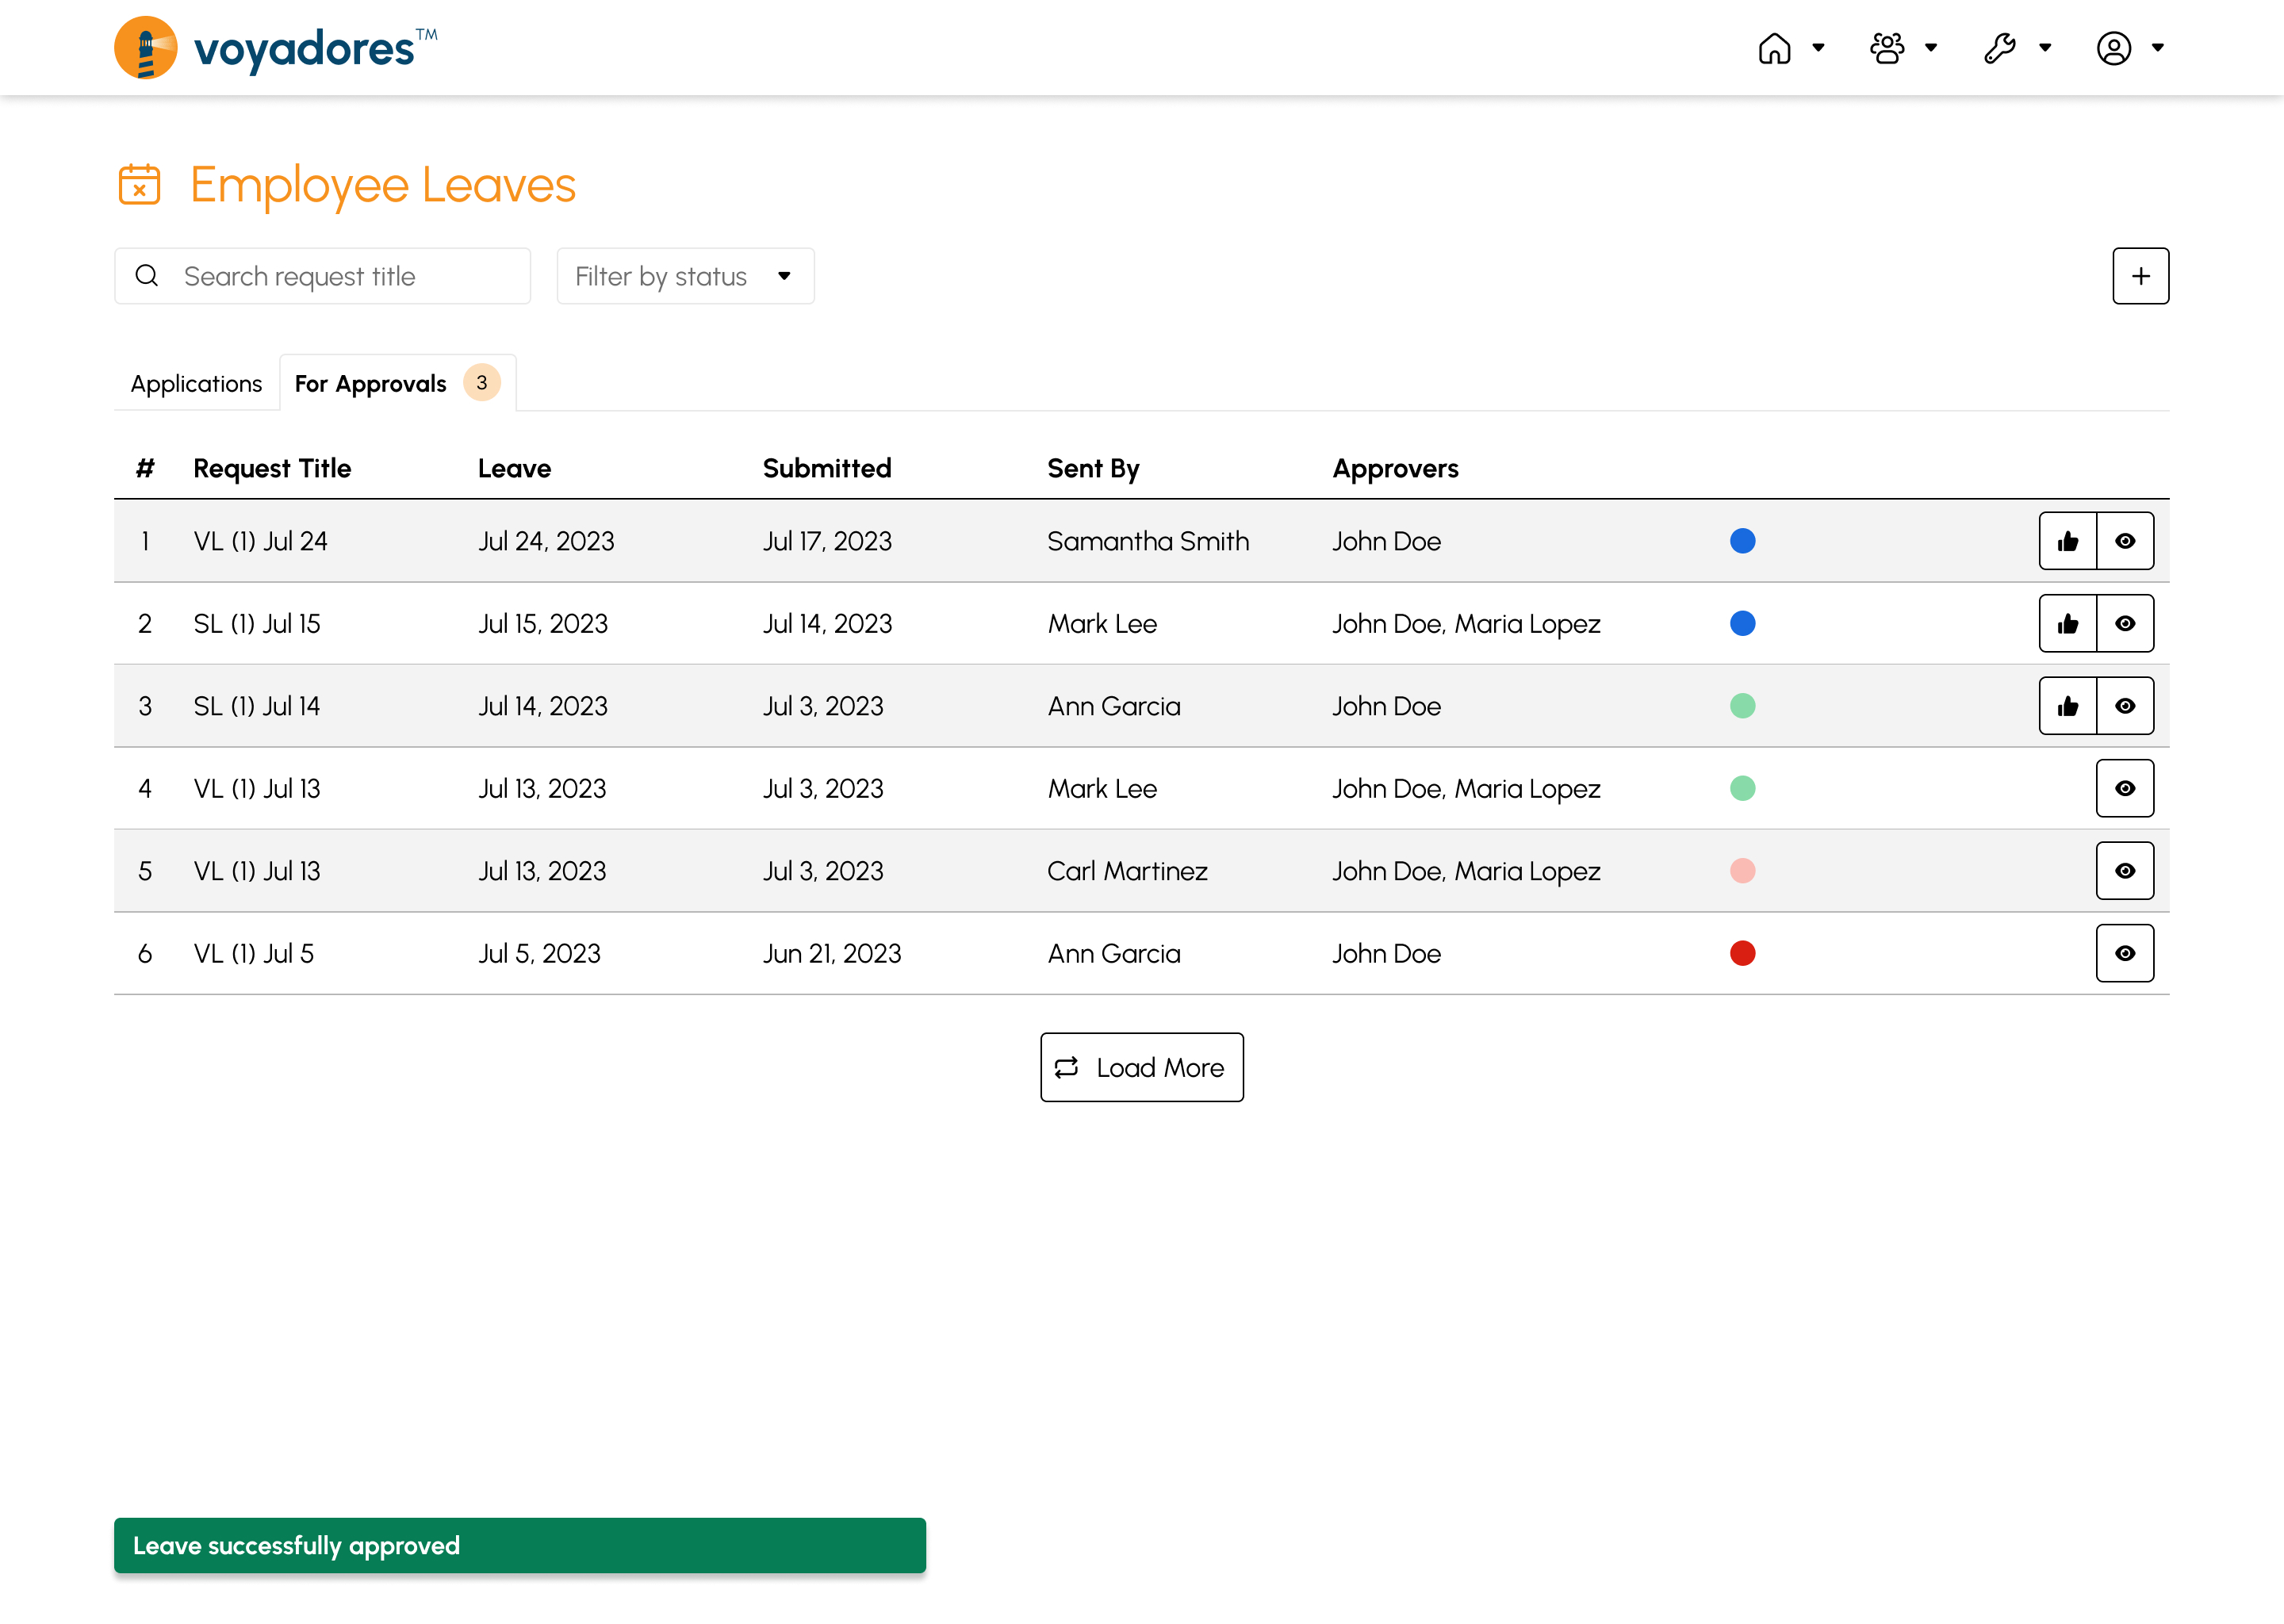
The For Approval Summary Table displays all created leaves needing approval. The summary table contains the following columns:
- Item number “#”
- Request Title
- Date of Leave
- Date Submitted
- Sent By
- Approvers
- Status
-
Actions
- Approve Leave
- Cancel Leave
- View Leave
Viewing Details of Leave Request
To view the details of a Leave needing approval, follow the procedures below:
-
Click the View Leave button to display the View Leave modal as shown in the snip below:
-
The View Leave modal displays the following information:
- Requested By. Displays the name of the requestor
- Date Requested. Displays the date from when the requestor shall be on Leave
- Date Submitted. Displays the date from when the requestor submitted the Leave request
- Request Title. Title of Leave request
- No. of Days. Leave number of days
- Leave Type. Vacation Leave, Sick Leave, and others.
- Approvers. The role of the approver/s assigned is displayed here.
-
Approver Status
- Pending. This icon beside the Approver name indicates that the Approver did not yet approve/rejected the request.
- Approved. This icon beside the Approver name indicates that the Approver approves the Leave request.
- Rejected. This icon beside the Approver name indicates that the Approver rejects the Leave request.
- Additional Approver. The name of the approver is displayed here. (Name of Supervisor or Manager)
- Additional Details. Displays further details about the applied Leave such as Time, Reason, and others.
Searching Records of Leaves
To search for a leave, follow the steps below:
-
Key in the name of the leave record in the Search Bar as shown in the snip below:

- The Summary Table will display the searched leave title.
Filtering Leaves by Status
This feature is to filter Leaves by status.
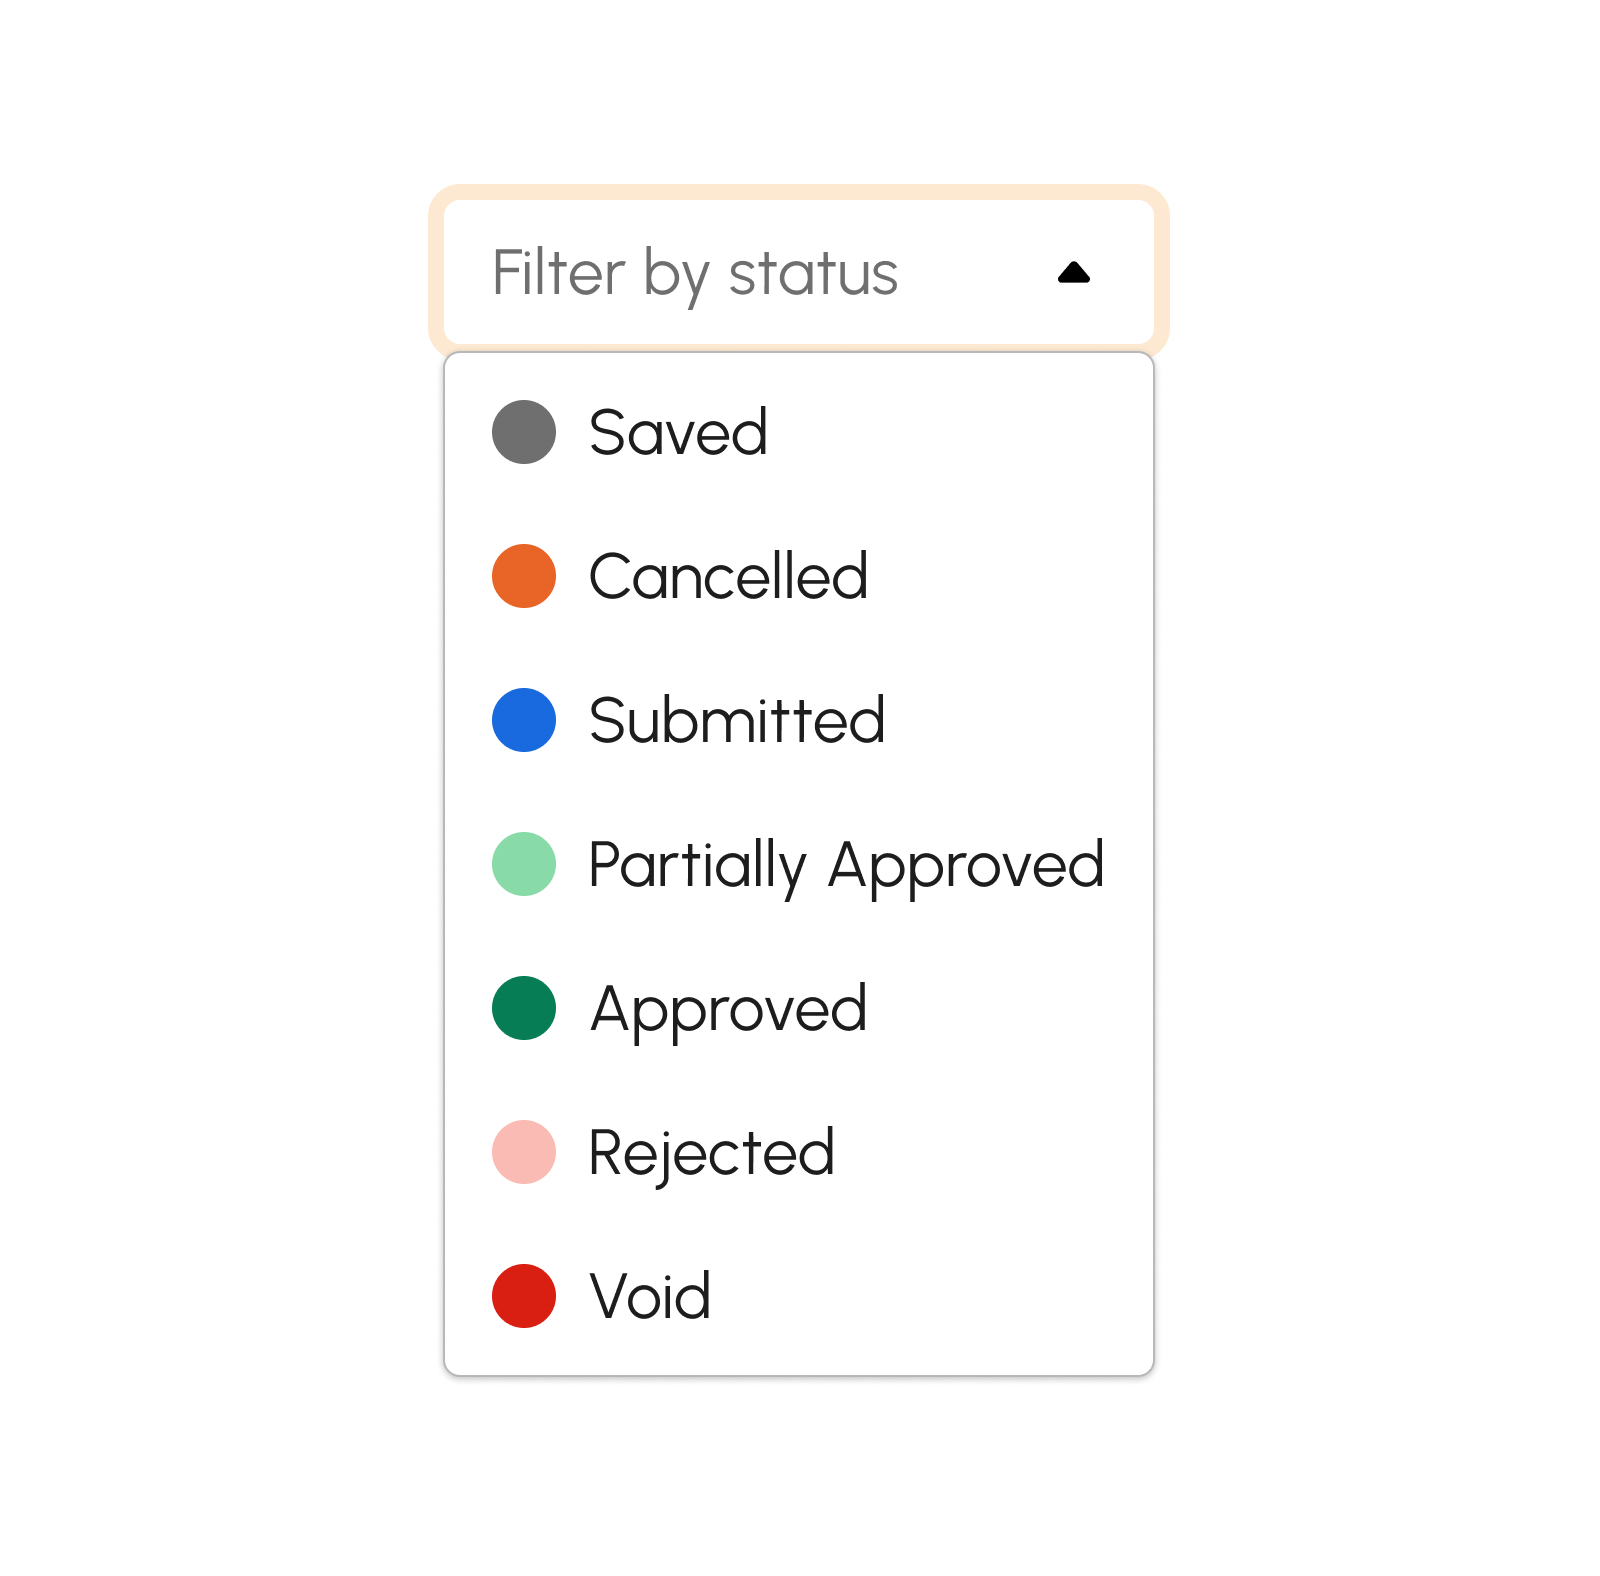
- Saved. This gray-colored status shows all saved Leave requests. Leaves with this status are still editable for submission. To display all saved Leaves, click the filter by status drop-down and select “Saved”.
- Cancelled. This light-orange-colored status shows all cancelled leaves. To display all cancelled Leaves, click the filter by status drop-down and select “Cancelled”.
- Submitted. This blue-colored status shows all submitted Leaves. Submitted Leaves are not editable unlike saved Leaves. To display all submitted Leaves, click the filter by status drop-down and select “Submitted”.
- Partially Approved. This light-green-colored status shows all partially approved Leaves. This Leave status indicates that one of the Approvers had already approved the Leave request. To display all partially approved Leaves, click the filter by status drop-down and select “Partially Approved”.
- Approved. This green-colored status shows all Approved Leaves. These Leaves indicate that all the Approvers approved the Leave request. To display all approved Leaves, click the filter by status drop-down and select “Approved”.
- Rejected. This light-red-colored status shows all rejected Leaves. These leaves are rejected by one of the Approvers. Click the filter by status drop-down and select “Rejected” to display all rejected Leaves.
- Void. This dark-red-colored status shows all applied Leaves voided by one of the Approvers. To display Leaves with void status, click the filter by status drop-down and select “Void”.
Applying for Leave
Follow the systematic guide below to apply/file for Leave.
-
Click the Apply button to begin filing for Leave.
Upon clicking the Apply button, a modal will display (see snip below).
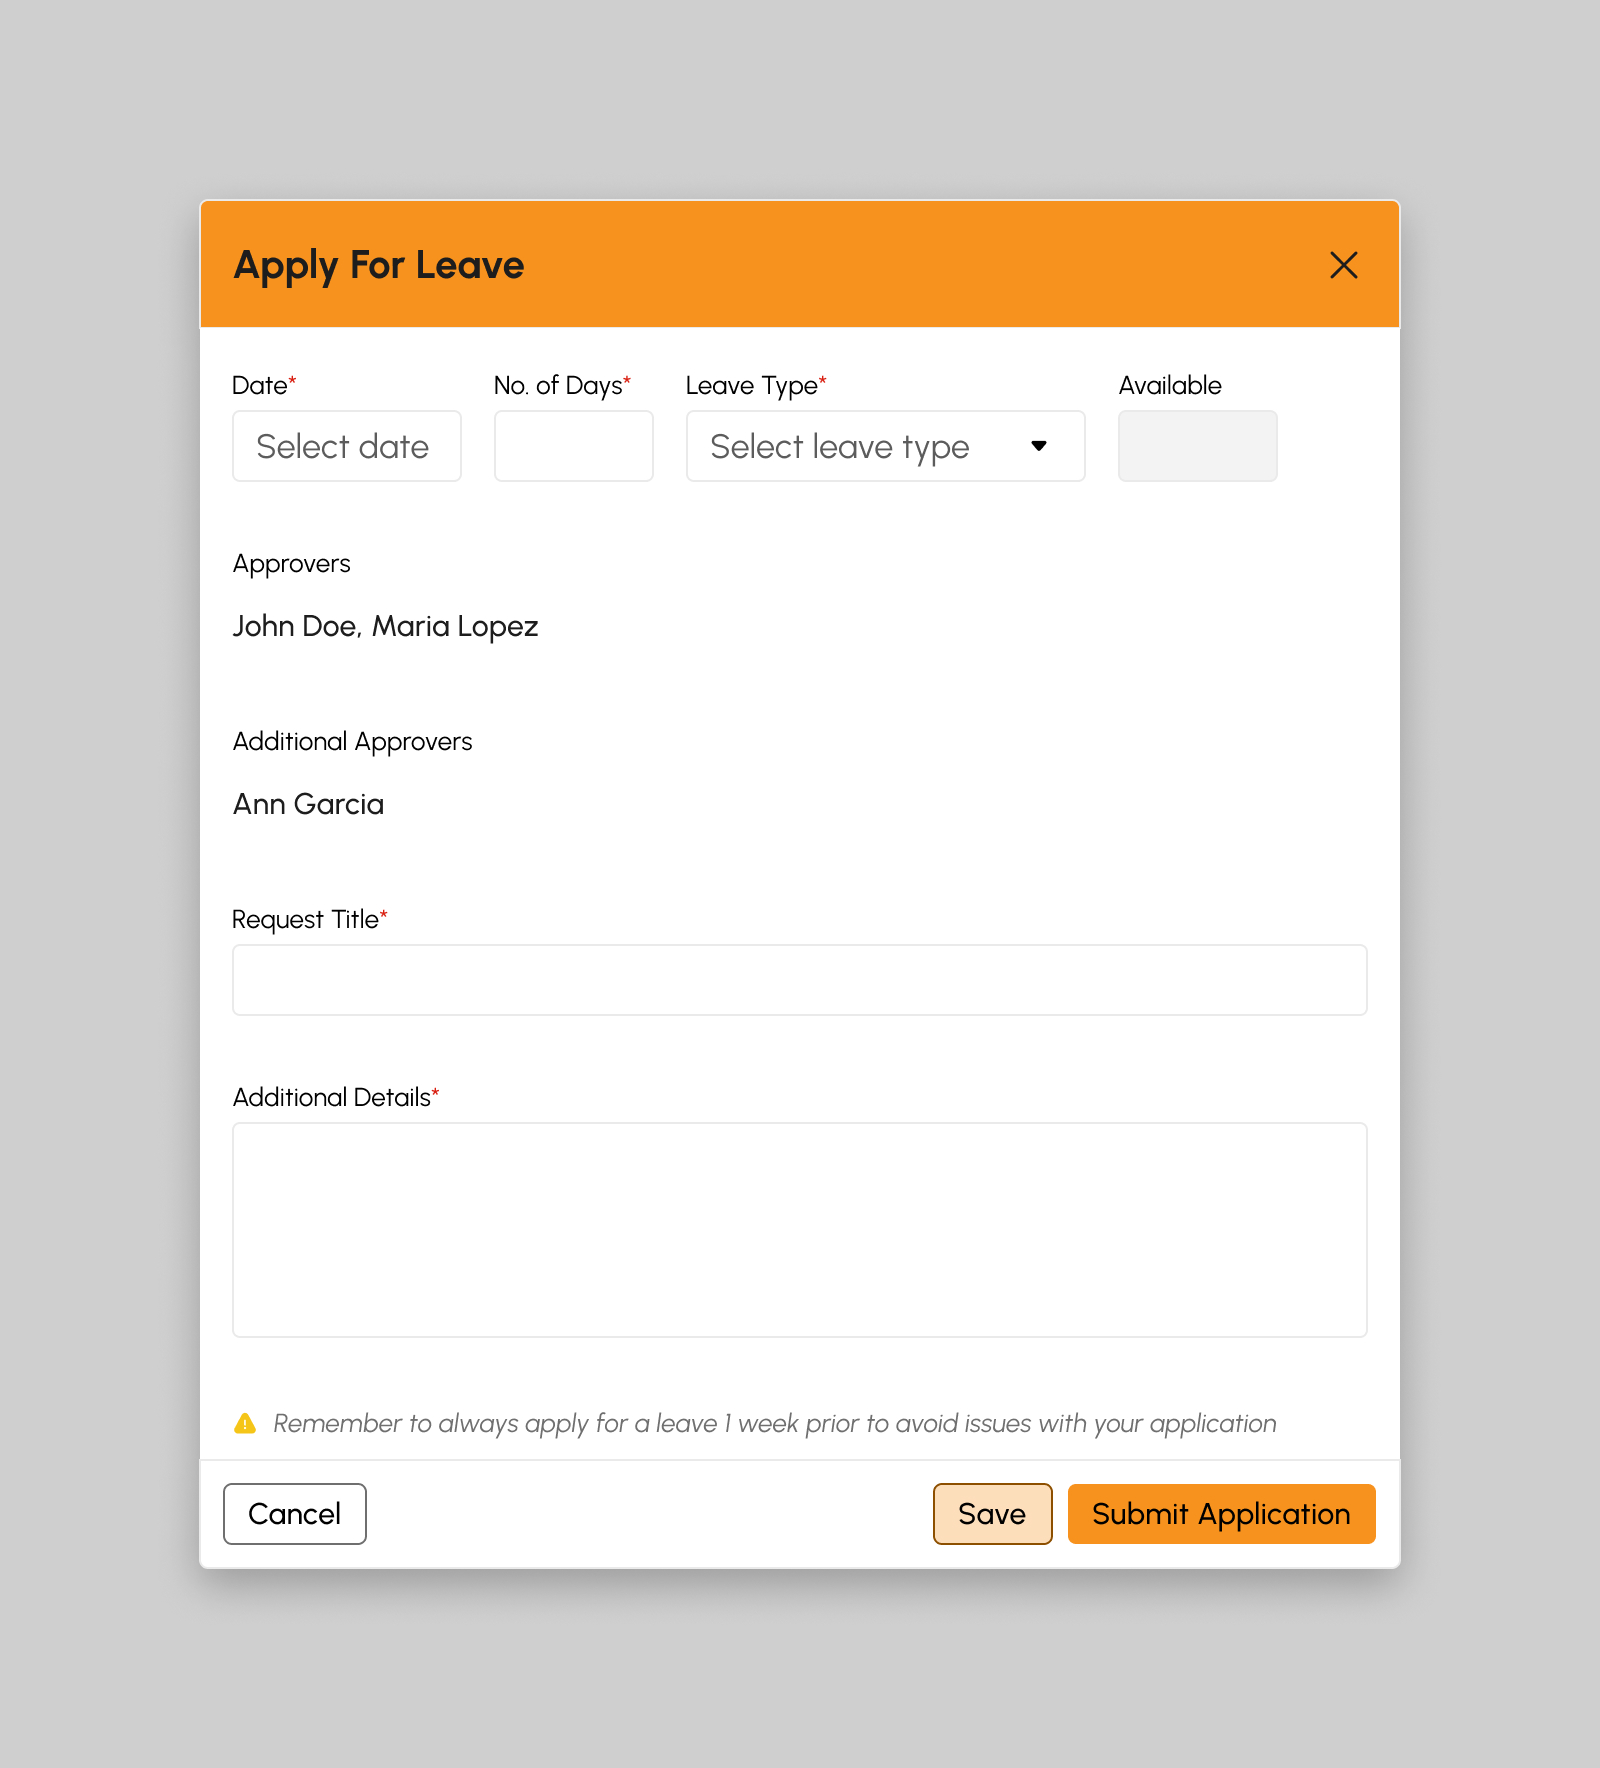
Key in the necessary information asked in the modal indicated with an asterisk (*) as follows:
- Date. The date of Leave.
- No. Of Days. Days off-duty for Leave.
- Leave Type. The type of Leave e.g., Vacation Leave, Sick Leave, Emergency Leave, and others.
- Available. This field is system generated. Refer sample computation from Assigning Leave Entitlements steps 4 and 5.
- Request Title. Key-in here the approved and standard title format when applying for leave that is applicable in the organization.
- Approvers. This is a pre-populated field. The role of the approver/s assigned is displayed here.
- Additional Approver. This is a pre-populated field. The name of the approver is displayed here. (Name of Supervisor or Manager)
- Additional Details. Type additional details of Leave such as Time, Reason, and others.
Note
Required (*) fields should not be empty.
-
Submitting Leave Application
Click the Submit Application button after providing correct information in the fields mentioned above.Note
Application is final and unchangeable after clicking the button.
-
Success notification message will show.
Leave successfully submitted
- “Submitted” status displays for successful submitted Leave request/s.
- Submitted Leaves display on the Applications tab summary table.
-
Otherwise, an error notification message will show.
Please fill the required fields
-
Success notification message will show.
-
Saving Leave Application
Click the Save button to edit and submit Leave request later.-
Success notification message will show.
Leave successfully saved
- “Saved” status displays for successfully saved Leave request/s.
- Saved Leave requests display on the Applications tab summary table.
- Edit button will be displayed.
-
Otherwise, an error notification message will show.
Please fill the required fields
-
Success notification message will show.
-
Cancelling Leave Application
Click the Cancel button to cancel Leave request.- “Cancel” status will be displayed for cancelled Leave requests/s.
- Cancelled Leave requests display on the Applications tab summary table.
Editing Applied Leaves
The edit function will be available when a user saves a Leave request.
-
Click the Edit button to begin editing a Leave. Upon clicking the Edit button, a modal will display (see snip below).
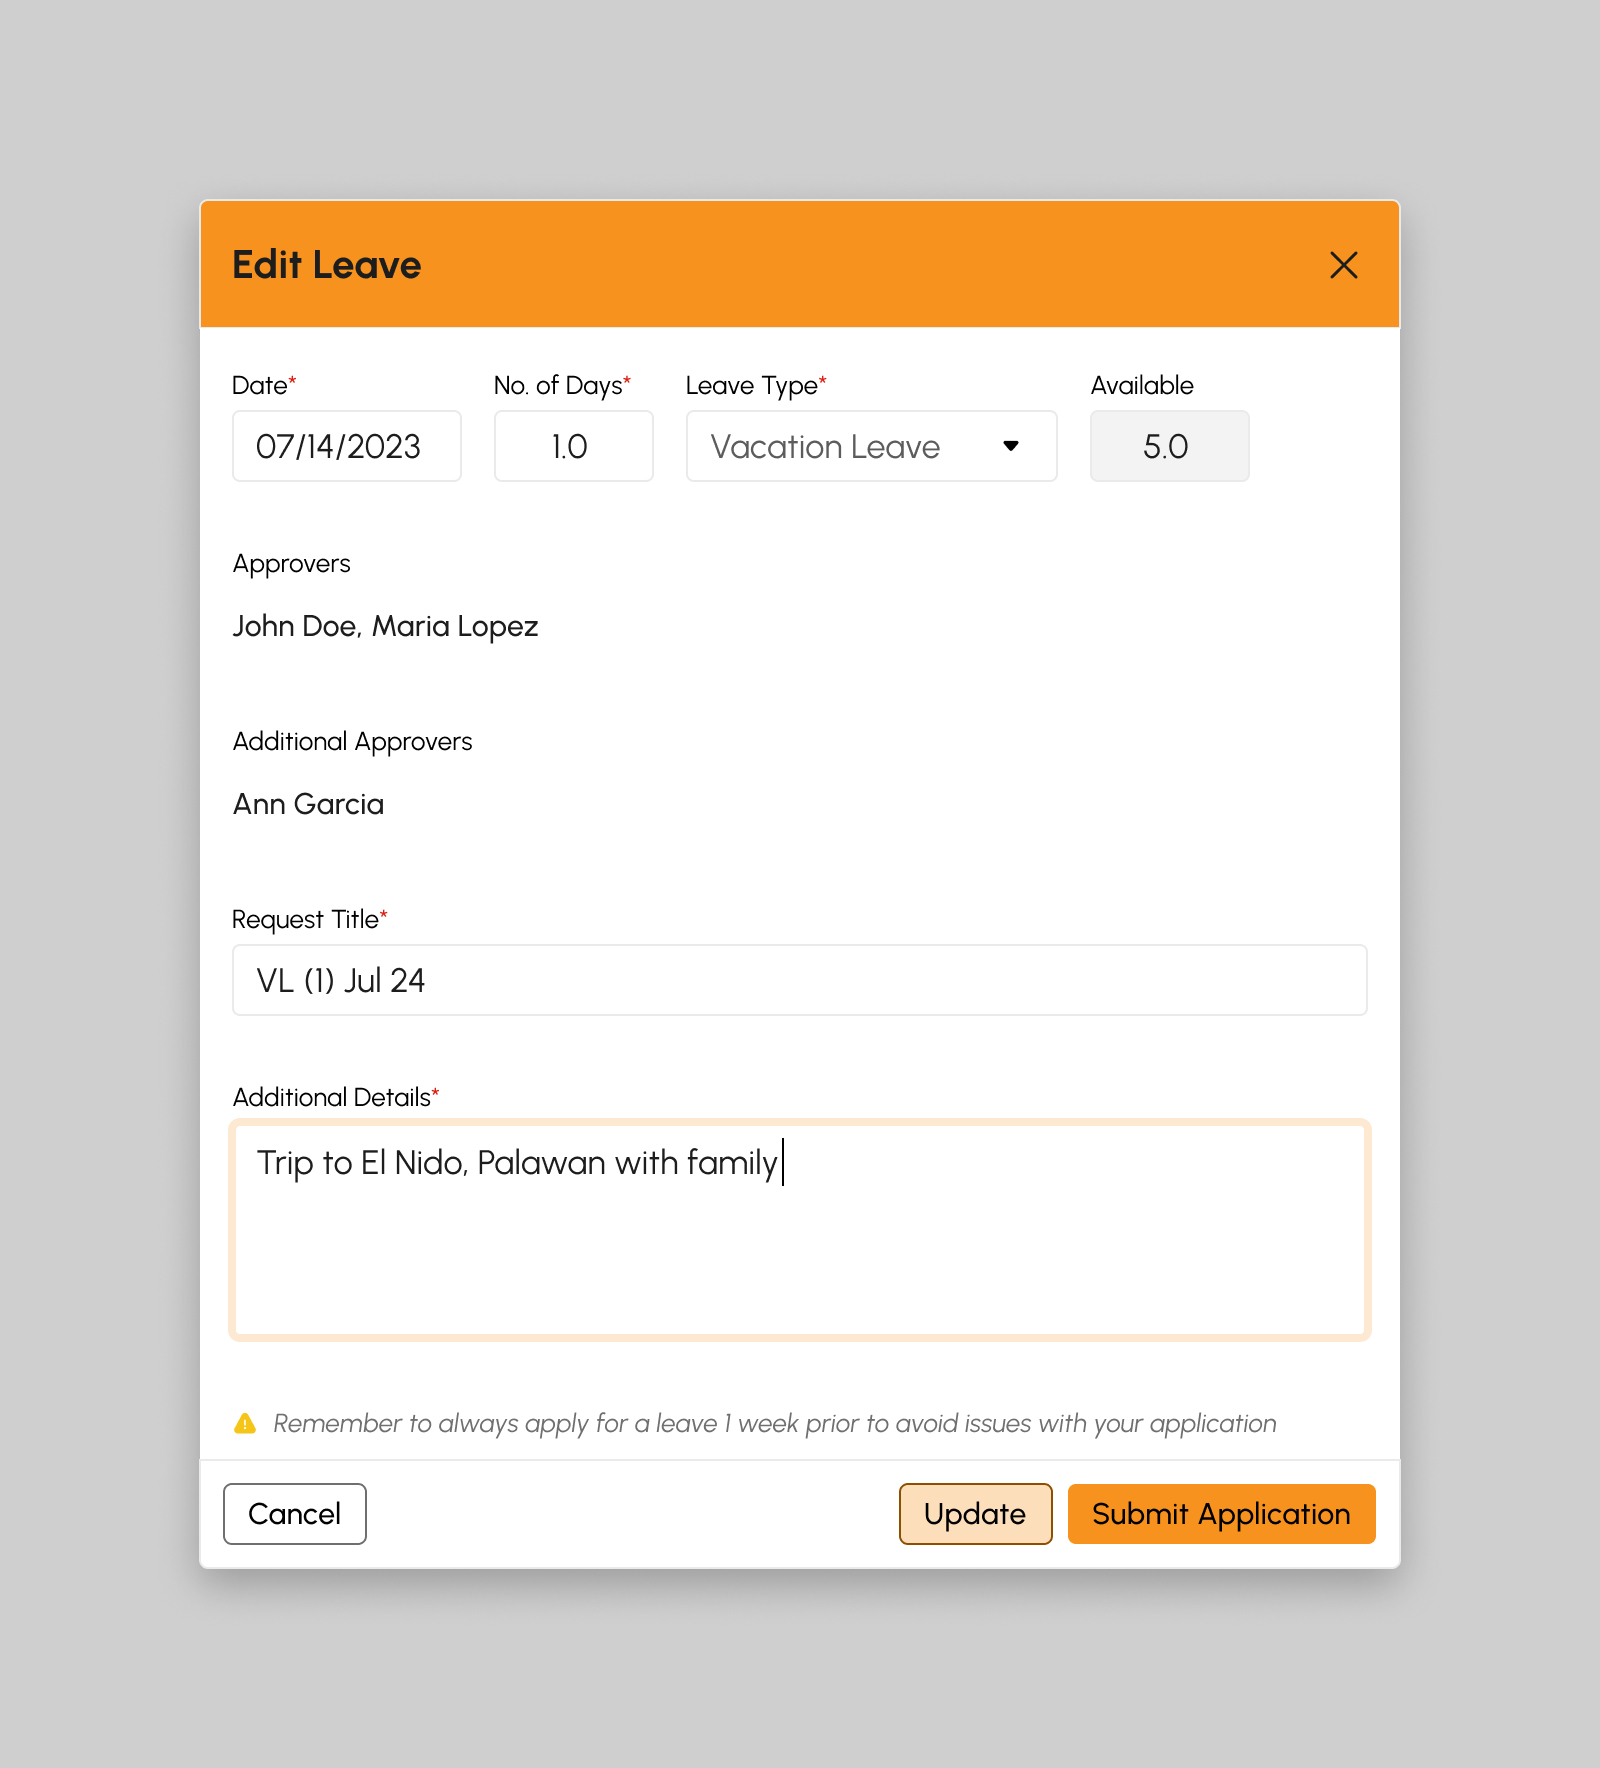
Key in the necessary information asked in the modal indicated with an asterisk (*) as follows:
- Date. The date of Leave.
- No. Of Days. Days off-duty for Leave.
- Leave Type. The type of Leave e.g., Vacation Leave, Sick Leave, Emergency Leave, and others.
- Available. This field is system generated. Refer sample computation from section 6.5.2.4 Assigning Leave Entitlements Steps D through E.
- Request Title. key-in here the approved and standard title format when applying for leave that is applicable in the organization.
- Approvers. This is a pre-populated field. The role of the approver/s assigned is displayed here.
- Additional Approver. This is a pre-populated field. The name of the approver is displayed here. (Name of Supervisor or Manager)
- Additional Details. Type additional details of Leave such as Time, Reason, and others.
Note
Required (*) fields should not be empty.
-
Submitting Leave Application
Click the Submit Application button after providing correct information in the fields mentioned above. Application is final and unchangeable after clicking the button.-
Success notification message will show.
Leave successfully submitted
- “Submitted” status displays for successful submitted Leave request/s.
- Submitted Leaves display on the Applications tab summary table.
-
Otherwise, an error notification message will show.
Please fill the required fields
-
Success notification message will show.
-
Updating Leave Application
Click the Update button to edit and update Leave request.-
Success notification message will show.
Leave successfully updated
- “Saved” status displays for successfully saved Leave request/s.
- Saved Leave requests display on the Applications tab summary table.
- Edit button will be displayed.
-
Otherwise, an error notification message will show.
Please fill the required fields
-
Success notification message will show.
-
Cancelling Leave Application
Click the Cancel Request button to cancel Leave request.- “Cancel” status will be displayed for cancelled Leave requests/s.
- Cancelled Leave requests display on the Applications tab summary table.
Cancelling Leave Requests
To cancel a leave that has already been applied for any reason, please follow these steps:
-
Click the Cancel button to open a confirmation modal.
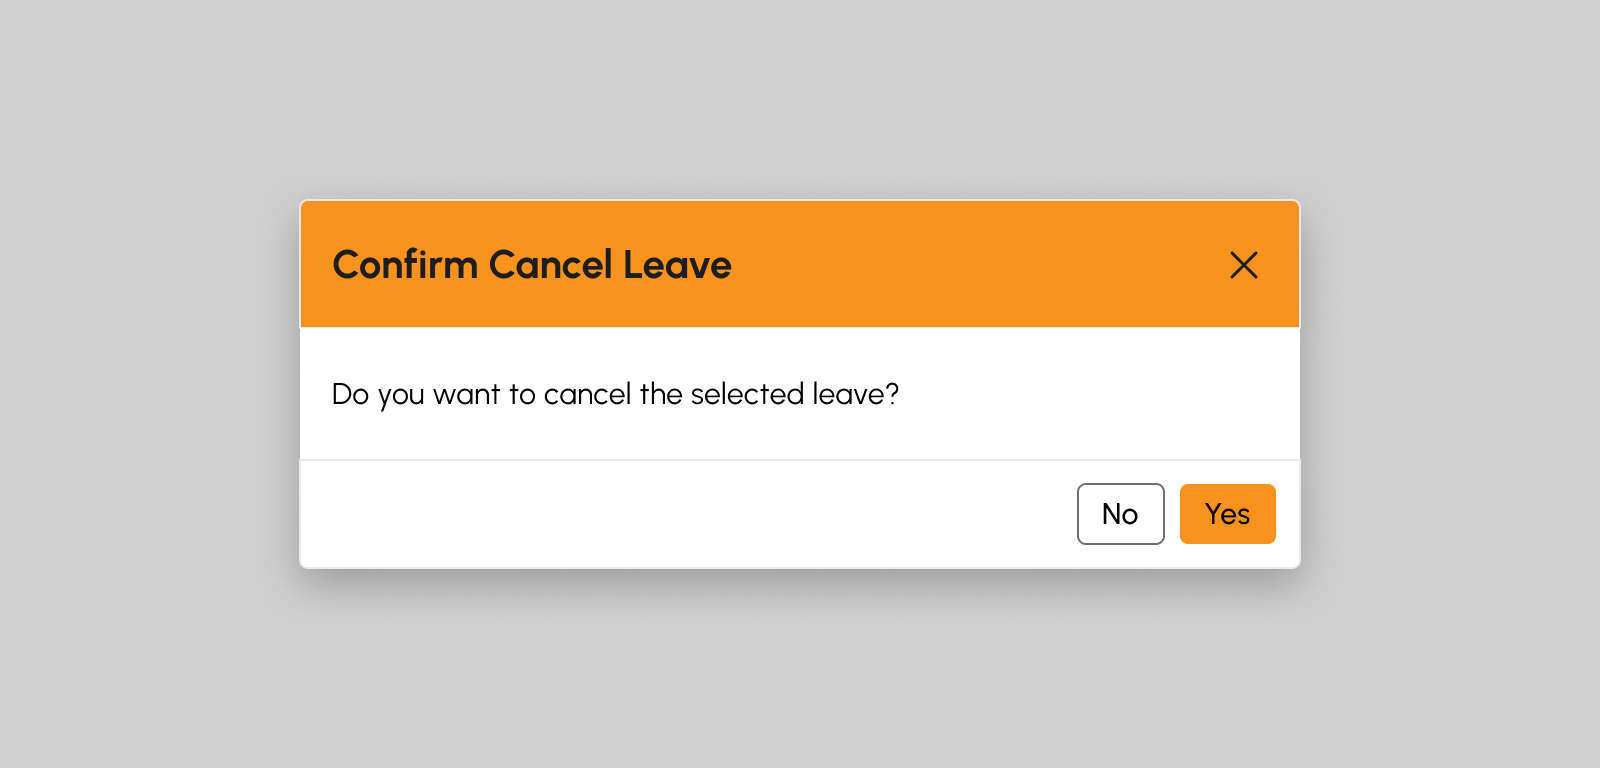
-
Click the Yes button to confirm.
-
Success notification message will show.
Leave successfully cancelled
- Leave status will update to “Cancelled”
-
Success notification message will show.
To prevent leave from being cancelled, click the No button.
Approval of Leaves
Approve Leave requests by following the guide below:
- To show Leaves for review and approval, see the counter beside the For Approvals tab found on the Leaves summary table.
- If the counter looks like this [see snip below], it means that leave/s is/are for review and approval.
- Click the For Approvals tab to view all Leaves that needs review and approval.
-
To view Leave details, click the View button.
-
Click the Approve button, a modal will display the Leave details as shown in the snip below:
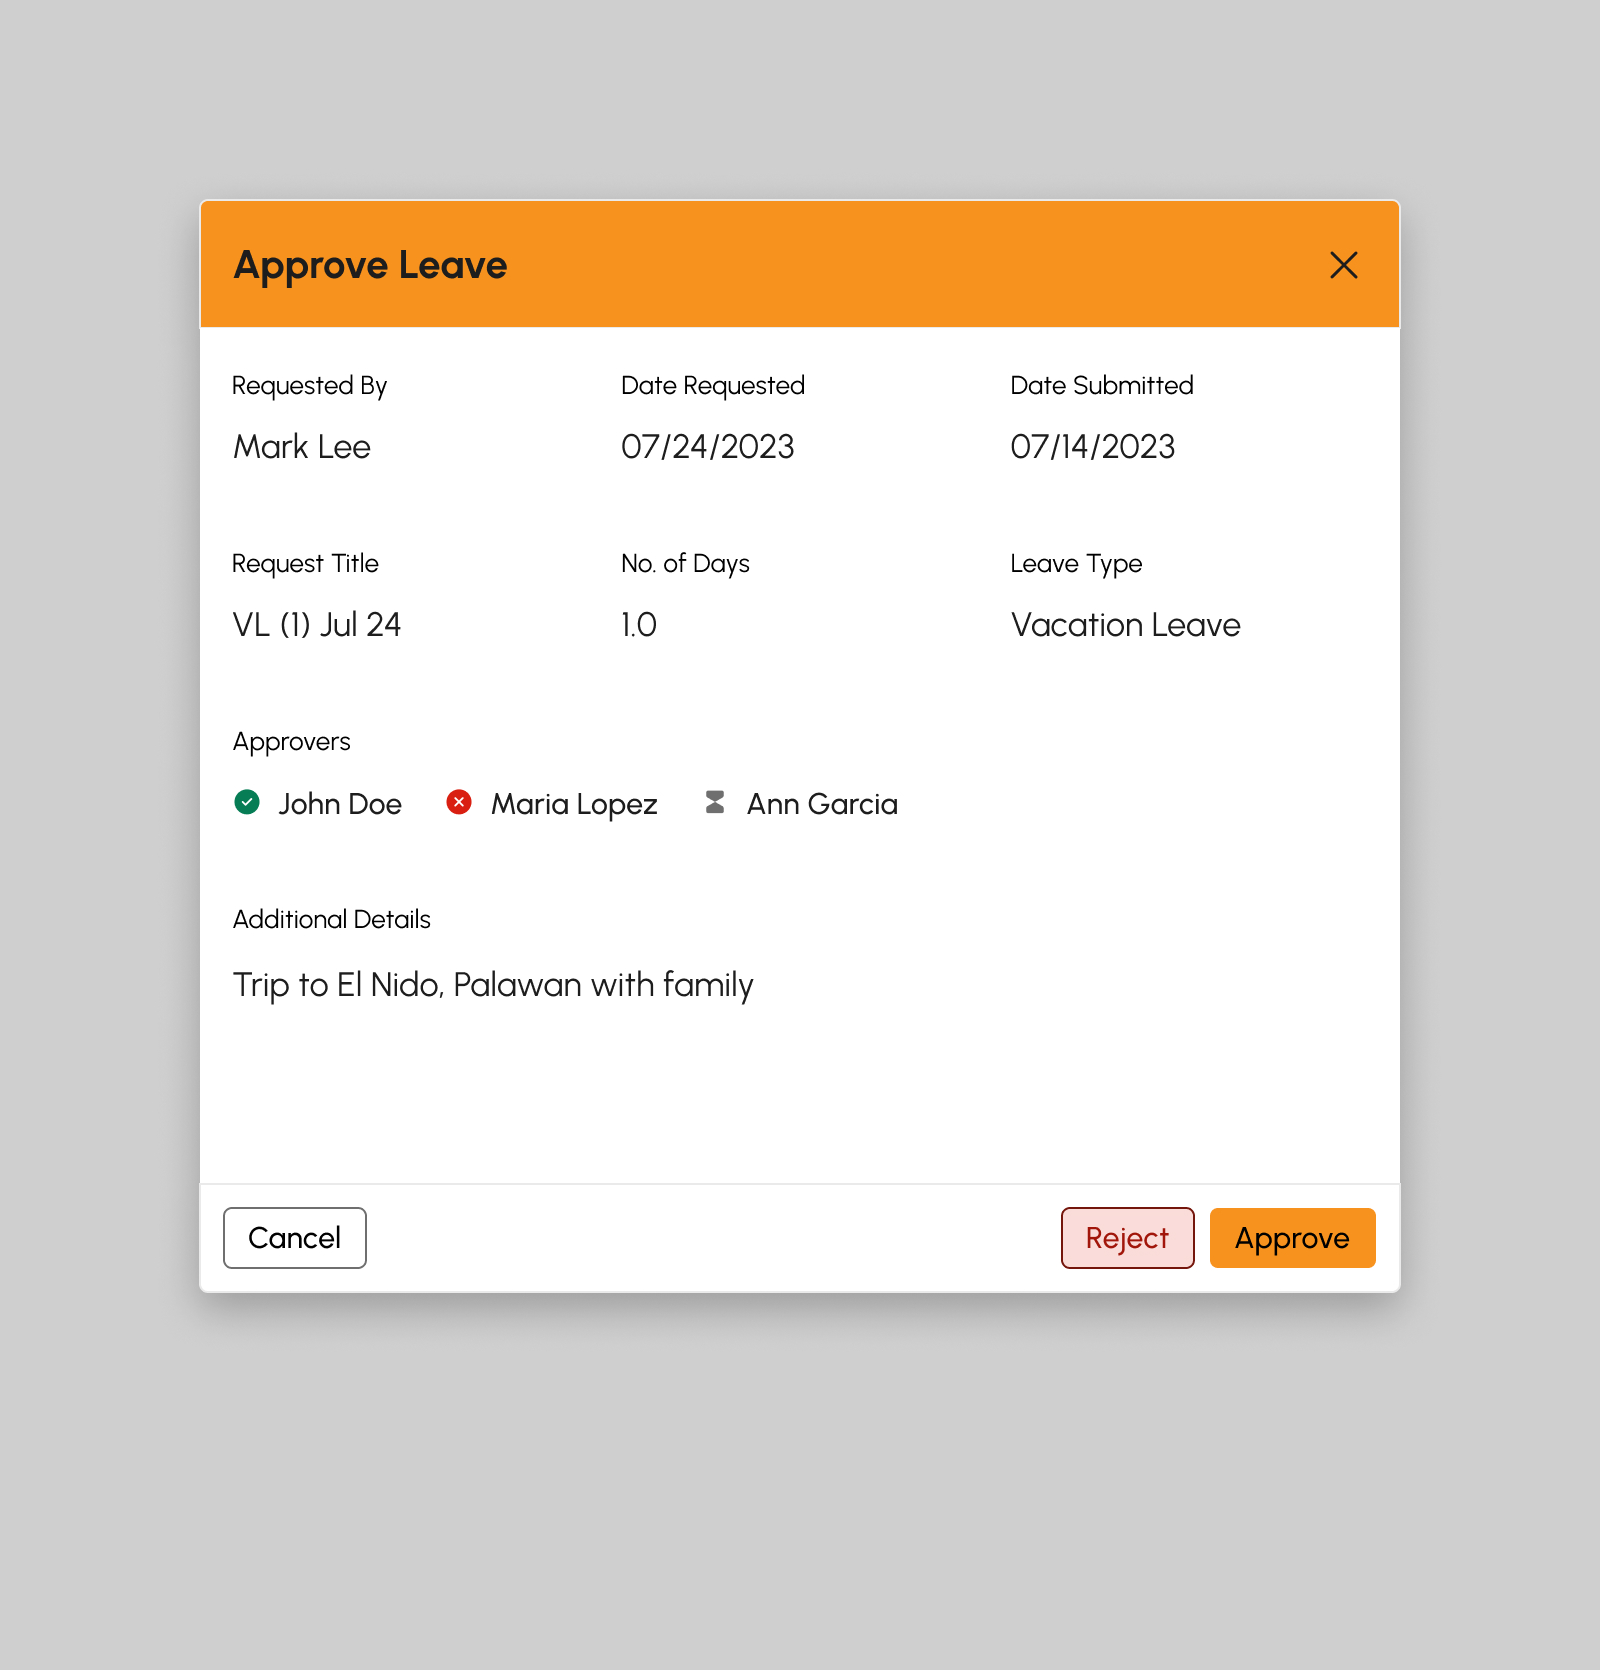
-
To approve the applied Leave, click the Approve button.
-
Success notification message will show.
Leave successfully approved
- Leave status will become “Approved”
- For Approval counter will update.
- Cancel button will appear
-
Otherwise, an error notification message will show.
Please fill the required fields
-
Success notification message will show.
- To proceed without approving the applied Leave, click the Cancel button.
-
To approve the applied Leave, click the Approve button.
How to Void Leave Requests
To void a leave that has already been applied for any reason, please follow these steps:
-
Click the Cancel button to open a confirmation modal.
-
Click the Yes button to confirm.
-
Success notification message will show.
Leave successfully voided
- Leave status will update to “Void”
-
Success notification message will show.
To prevent leave from being cancelled, click the No button.
Rejecting Leave Requests
To reject the applied Leave, click the Reject button.
-
Success notification message will show.
Leave successfully rejected
- Leave status will update to “Rejected”
-
Otherwise, an error notification message will show.
Please fill the required fields
- To proceed without rejecting the applied Leave, click the Cancel button.
How to Load More Employee Leave under Applications
If there are more than 20 leave requests on the list, click theLoad More button to display other leaves since the default item number displayed in the screen is from count 1-20.
How to Load More Employee Leaves under For Approvals
If there are more than 20 leave requests on the list, click the Load More button to display other leaves since the default item number displayed in the screen is from count 1-20.